New Hasbro 30" X-Wing Toy - Impressions

But I feel a little work and a good paint job could class it up some.

I'm a firm believer that the paint job is most important, and a quaility, correct finish can out-weigh some shape and accuracy issues.

That being said, with a top notch paint job, then at first glance walking into a room with this strung from the ceiling, you'd think "model" well before "toy".

Or, in other words, a good paint job alone can make this displayable.
 
Last edited:
When and if they land in Australia, I'm guessing TRU will stock them.

As mentioned, the painting of these beauty's is the critical part. You can have all the scale model accuracy in the world, but if the paint is wrong it looks like poo.

I found one on ebay for $90...very expensive, but they won't be $40 here in Australia like in the States...we here in Oz always get ripped off even when the exchange rate is even.....and plus I would buy two, to kit bash a little.

It looks like cutting the wings apart and scratch building the internals may be an option rather than buying two, Haven't seem enough detailed photos to confirm that.

In the right hands, this 'toy' has appeal and unlimited potential....plus I love the size!!
 
I was thinking of mounting it directly to a wall maybe nose up or something. The reason I do not want to hang it from the ceiling is because then you just mostly see the bottom of it and well, from those pics, the bottom looks like crap (without mods)
 
I was thinking of mounting it directly to a wall maybe nose up or something. The reason I do not want to hang it from the ceiling is because then you just mostly see the bottom of it and well, from those pics, the bottom looks like crap (without mods)

Good point...
 
Depends on how you pose it while hanging from the ceiling. If you hang it flat to the floor, sure, you'll see the bottom.... but it you pose it at an angle where the top is visible... No worries.Make it aiming for a strafing run and you'll do great!

--Alex
 
SO! I've taken this bad boy apart. I'll show you how I did it and what I found inside!

First of all, there are a total of 14 screws holding this shut. 12 of them are easily accessible. Just make sure your screwdriver isn't too pointy, as the notch in the screw-heads is shallow.

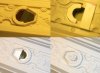
The last two are concealed under the grey engine intakes. These need to come off.

After removing the 12 easy screws, I cut little access holes in the walls that will eventually be covered by the wings.


Use a screwdriver to pop this tab forward and out of the fuselage. Then, with a little twisting and pulling and curse words, you can get the other side's matching tab to come out as well.

This will reveal the hidden screws.


The section sans-intakes:


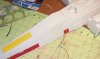
Here's what the grizzly innards look like. Pretty spacious if you are thinking about scratchbuilt cockpit tubs, LED wiring and mounting armatures. In btween the two halves, I have my ruler marked off in one-inch stripes, to give you an idea of size if you still haven't seen this bird in person.


The only gear is the front skid, and it pulls out without too much effort.


Since I'm the type of guy who likes to put the screws back into the same holes they came from, I made a quicky cardboard template (from the packaging of the X-Wing itself) to help me track their positions when I put this thing back together... hopefully mere months from now. Is it important to put them back in their correct holes? I have no idea, but it can't hurt and it's just the way I like to do it. These things are now tacked up out of the way on my bulletin board, where they'll be safe forever...


There you have it guys. I hope that's helpful.

Personally, I'm really excited about this project.

--Alex
 
Alex, great work, thx heaps for the detailed photos:D...now start a re-build thread for this badboy please;)...there are many of us who may never see this bird in the flesh to buy.....god knows when we'll get it down under here in OZ:cry thanks again......
 
I saw one on Amazon the other day and found that it would cost only $62 AUD to be delivered.

When and if they land in Australia, I'm guessing TRU will stock them.

As mentioned, the painting of these beauty's is the critical part. You can have all the scale model accuracy in the world, but if the paint is wrong it looks like poo.

I found one on ebay for $90...very expensive, but they won't be $40 here in Australia like in the States...we here in Oz always get ripped off even when the exchange rate is even.....and plus I would buy two, to kit bash a little.

It looks like cutting the wings apart and scratch building the internals may be an option rather than buying two, Haven't seem enough detailed photos to confirm that.

In the right hands, this 'toy' has appeal and unlimited potential....plus I love the size!!
 
So, I took some of the scraps from those access holes I cut and tested out some glues. This plastic works fine with CA, but nothing else seems to bind to it.

--Alex
 
Mine came yesterday. I am going to wait until the three day weekend before I start messing with it.

My problem is still where to put it. I've been scouring my house and I simply have nowhere to put it. The only place I have come up with is in the bedroom. I have a big picture about four feet wide I may take down and put it there. Maybe get another one and mount them side by side--one nose up and one nose down. That might be cool.
 
I'm still trying to figure out a way to mount this to the wall. Obviously, it is going to have to be screwed into the wall somewhere in the aft section of the fuselage. Can't just screw the bottom half to the wall and then assemble the top half--no way to put the original screws back in. I'm thinking I may have to figure out a way to make the section that artoo sits in to be a removable panel. Then place the whole thing against the wall, screw it in, and then replace the panel. Will have to figure out a way to make the panel still look good while still being removable.....hhhmm, that may take some work.

Any thoughts on a good way to set this flat against a wall and mount it?


As for glues, have you tried a plastic two-part epoxy? I've usually had good results with that on this kind of plastic, but I haven't tried it on this particular piece yet.
 
Last edited:
I'm still trying to figure out a way to mount this to the wall. Obviously, it is going to have to be screwed into the wall somewhere in the aft section of the fuselage.

Any thoughts on a good way to set this flat against a wall and mount it?

Drill a small hole in the bottom and use a monkey hook in the wall to slot into the hole. Don't push the monkey hook in all the way until you've got the ship secured to it. If you want it angled, use two monkey hooks. That's what I would try.
 
Yeah, I had thought about something like that or a Hercules hook, but then it is just going to be hanging on it. I really would rather it be tight and secure against the wall.
 
I've started disassembling mine. Guess it's time to pull out the dremel to get at those hidden screws. I really wish it came with none of the stickers already attached as I'm sure they won't come off and be reusable. The ones that came on it are already starting to peel off, especially the points on the cockpit stickers.. No good. I guess I can just paint on those but I really like the detail on the red and yellow stickers.

What's the word on getting the rear grey parts of the engine off? EDIT; okay they are not that hard. Use a small screwdriver and if you can get one of the tabs open the whole thing will pop off with a good twist.

Really don't like the guns. I would be really interested in ideas on how to remake these.
 
Last edited:
Okay, from the way this thing sits, it is obvious that I will have to mount it by the lower engines. Not sure if that will work with a couple of monkey hooks. Just not sure how secure that will be. Going to have to figure out a way to remove a top engine panel or maybe have the whole top engines be removable. Not really sure how to do that.....
 
Okay, I think I figured out a way to have access to the inside of the ship once it is finished. I took an x-acto blade and cut out that little 'millenium falcon' shaped piece on the top of the fuselage behind artoo, It cut out pretty easily. Then I super glued two strips of abs plastic on the underside for a kind of a lip so the piece won't fall through. Once the piece is put back in it fits really tight and snug. Shouldn't have any problems with it falling off. Once it is in place you can't even tell it was ever cut out. This will give me the ability to stick a screwdriver down into the innards to get to the screw that will hold it to the wall. I will probably cut a small piece of wood with a V shape on top to cover the distance from the bottom of the ship to the wall to give it stability.
 

Attachments

  • 100_0400.JPG
    100_0400.JPG
    646.8 KB · Views: 206
If you are going to paint this thing, you are either going to have to remove the stickers that came on it or tape over them. Except for the cockpit stickers I think I am going to opt to tape over them before painting. Going to either use painter's tape or try to find some removable scotch tape (do they make transparent painter's tape?). With some fingernail scratching and some goo-gone on a paper towel I was able to remove the cockpit stickers, definitely not reusable.

Be sure to not let any of the goo-gone get on the red and yellow stickers you want to save. After you get them off wipe down the area good with a damp rag to remove any residual goo-gone as paint won't stick to that. After I get the base coat done I will use pin striping tape to tape back off the cockpit and paint it with a good gloss black.
 

Attachments

  • 100_0405.JPG
    100_0405.JPG
    648.7 KB · Views: 168
This thread is more than 7 years old.

Your message may be considered spam for the following reasons:

  1. This thread hasn't been active in some time. A new post in this thread might not contribute constructively to this discussion after so long.
If you wish to reply despite these issues, check the box below before replying.
Be aware that malicious compliance may result in more severe penalties.
Back
Top