BoydeyMcNerd
New Member
UPDATE PROJECT COMPLETE:
Hey there fellow makers!,
I have just completed this, my first full on prop build. It was a total blast , especially the 'weathering' which i had never really done before but via this magnificent corner of the WWW i was given tons of ideas and wonderful advice. I will put the details of the rest of the build leading up until its completion below my original post below so as not to spoil the journey haha. I'll also put up some high res pics of my weathering process and the complete project.
But first let me just say this to those of you who may be novice builders who look at a project like this and think, there is no way i can do that.
That's total B.S (no offense") ), because two months ago that was me! I had always dreamed of owning my own proton pack, i've have had the plans i used for this build downloaded on my tablet for at least 2 years, a couple of months ago i had a health scare that turned out to be all ok but it made me realize, life is way to short not to own my own proton pack so i started planning out the best way I could make this work (which is outlined below) and once i saw what others were able to achieve, i got stuck into it and didn't look back... sure i made mistakes that cost me hours of hard work, but i sure didn't make the same mistake twice. I learnt so much from this project and I am really proud of what i was able to make with hard work and a bit of imagination, it is not perfect and i took several liberties to make it my own and also conform to my very limited budget, but i love it.
), because two months ago that was me! I had always dreamed of owning my own proton pack, i've have had the plans i used for this build downloaded on my tablet for at least 2 years, a couple of months ago i had a health scare that turned out to be all ok but it made me realize, life is way to short not to own my own proton pack so i started planning out the best way I could make this work (which is outlined below) and once i saw what others were able to achieve, i got stuck into it and didn't look back... sure i made mistakes that cost me hours of hard work, but i sure didn't make the same mistake twice. I learnt so much from this project and I am really proud of what i was able to make with hard work and a bit of imagination, it is not perfect and i took several liberties to make it my own and also conform to my very limited budget, but i love it.
I decided that i wanted the give the pack the appearance that it had been sitting in one of the retired Ghostbusters attics for the past 30 years after several years of use, now uncovered by one of their grandchildren it once again see's the light of day. This meant i could go nuts with weathering (it didnt not even get a wash after getting slimed for the last time ) this also helped me hide some of my errors quite nicely which came in handy as just about everthing was scratch built, including the infamous 'bumper'.
I apologize for the essay and i appreciate you taking the time to read it as i am sure your got something amazing sitting on your work bench you need to get back to, the final thing i will say is if you want some great advice (and if you do not already) please head over to www.tested.com Adam Savage, Will and Norm give out some truly amazing advice to novice and skilled builders alike in their podcasts, and their videos always feature something truly awesome, i have to thank user 'Robpenfold' for pointing me towards Adam Savages weathering technique video on Tested's youtube channel, it's amazing and put me on to Tested as a truly valuable source of information for makers, new and old. .. Also huge thanks to AJ over at gbfans.com for his shops excellent service and products.
Thanks again and please read to the bottom of my original post for weathering technique and finishing off the build.
Cheers and go make something awesome!
______________________________________________________________________________________________________________________
Hey All,
So i have been reading through these forums for a little while now and am constantly astounded by the amazing work that every one is capable of and very grateful for the brilliant advice every one is willing to provide. It has helped pass many a train trip to work and back that's for sure.
So i thought it would be high time i have a go my self.
My chosen medium for building is wood, mdf mostly. I have spent the last 9 months building 'Ray guns' out of wood, having a great time and learning many important do's and do nots along the way, recently i made my first prop, a Ghostbusters trap, whilst not perfect i was overjoyed with the result, and the fact that i was able to make something tangible to hold and have looking awesome on my shelf from one of my all time favorite movies, was rather exciting ( I am sure I am preaching to the choir) .
I have always wanted my own proton pack (who hasent) .
I was always worried that it would not be possible to make this work out of wood, one day not so long ago i came across Joe Scrivens Scratch built Proton pack whilst browsing through these forums (http://www.therpf.com/f9/ghostbusters-proton-pack-216629/) and was delighted to see that his was scratch built out of mdf, it gave me the push i needed to take the plunge and see if i could make this happen. So i thank Joe for that.
Life's to short not to own a proton pack.
So here i go, below i have detailed a few steps i have taken to make the process a little less daunting and easier, in case there are some fellow noobs (or pros) reading through here who have always wanted to give this a go but not sure how to go about it or the steps involved, i can assure you there are a few steps but...it's not quite as hard as you might think. So lets begin.
First i printed off 'Stefans Proton pack blueprints'from http://www.gbfans.com/, they have been around a long time but Stefan, where ever he may be still deserves tons a praise and credit for his hard work in putting these together.
I found it much easier to decipher all the parts i needed to build by colouring in each piece on the master overview sheet in a different colour and then its plans on the following sheets in the same colour (I even managed to stay with in the lines, as below.

I decided to use 9mm MDF for the backing board or 'Motherboard', the legit size to use would have been 3mm but i doubt 3mm mdf would support the weight off all the wood i was going to use nor give me something solid to screw all the pieces to.
As the image below, i used the scematics to draw out the motherboard and carefully cut it out using a jigsaw.
This piece, will be you best guide on how it is all coming together, as it will give you the scale and boundary all your other pieces need to fit on and let you know when something has gone wrong, as i found out on several occasions down the track.


I decided that for as many pieces as possible, i wanted to try and make my life a little easier and build them with structural pine then cover with MDF to give a smooth finish that i could shape easily with my dremil tool.
This meant that, i would have something nice and solid to screw to the mother board, as well as provide a solid base for other components to sit on top of and screw into.
Below is how that turned out.

I ended up not using the ion arm as it ended up being too wide so I used several pieces of 12mm mdf instead, cutting the two smaller bits on an angle the gluing to the two larger.
I also used two pieces of pine for the gun mount so I would have something nice and strong for the gun to connect to.

Next came the hardest part, cutting perfect circles ,I used 2 pieces of 16mm and one piece of 12mm mdf glued together for the cyclotron with plenty of sanding to round them out.
The synchronous generator I cut out of 12 mm mdf, cutting out the top shape first then gluing several 40mm tall pieces to the bottom following the shape as closely as possible.


Then used wood gap filler to fill in the gaps, sanding back to a smooth finish once left over night to dry.I left the synchronous generator hollow as I plan to use this to store the electronics I plan on putting in.
I used 60mm pvc pipe to make the booster tube and H.G.A cutting out caps to put in the top from mdf so these can be shaped and sanded before painting.


The rest of the parts I built out of mdf and dowl as below using wood gap filler to fill in and gaps then sand back so hopefully will look to be one piece once i paint.


And so this is where she is at currently, i eagerly await the next weekend to get stuck back into it.

I Will update as i go along, please feel free to shoot through and questions and thanks for slogging through all my words haha.
Apologies if this post is all outta whack, and for the small images not sure what went wrong there, its my first time
Please read comments for further progress before final completion below.
--------------------------------------------------------------------------------------------------------------------------------------------------------------------------------------------
UPDATE AFTER COMPLETION: The notorious bumper
--------------------------------------------------------------------------------------------------------------------------------------------------------------------------------------------
This was the part i was not looking forward to but it turned out to be pretty simple to make from scratch although the rounded part is not perfectly rounded due to the method i used but I am happy with it, hooray for wood gap filler!


UPDATE AFTER COMPLETION: Gun mount
I could not afford to buy this as a part so i decided to make my own out of brackets and MDF.

UPDATE AFTER COMPLETION:
Clippard valves:
Again these are expensive to buy so i decided to make my own out of dowl

UPDATE AFTER COMPLETION: Weathering The Pack
As i mentioned above i wanted to weather the pack as if it had been sitting in one of the retired Ghostbusters attics for the last 30 years, after several years of use. This meant i could go a bit crazy with the weathering (maybe a little to much? i tried very hard to stop myself when i thought there was enough haha) I also thought i'd add a layer of 'slime', why not? To make the slime i just had a guess at what could work i knew i needed green (duh) so i got some green food die, i wanted something to make it 'goopy' so i used some cornflour and then something to make it stick, dry and be permanent so i used Wood Glue and to my surprise, it worked a treat! Splatter it on and it sets into blobs, spread it out and it goes all crusty. I could not believe it worked. Everthing else was pretty much standard, fine sand paper (scuff marks), rough sand paper (scratches and gouges), burnt sienna acrylic paint (rust, gunk in crevices) and black acrylic paint (grease on metal and hoses). Please go watch Adam Savages video on weathering on Testeds youtube channel, it's basically what i followed and its is so simple but full of great info!
Most of the pics i took with the camera flash ON, which meant the weathering effects show up a lot more than when you are just looking at it.
First Layer:
Fine grit sand paper (i type used for painting that "does not clog" i found is best) - As i used a Satin Black to paint the pack it meant that sanding the semi gloss finish gave a nice scuff mark.
Coarse grit sand paper - i would then wack the sandpaper against the edges i thought would take most the hits during hard day to day use, making sure to not really concentrate when doing so the the marks would appear more random.


Second layer:
Layer of Grime and oil
Using a water spray bottle i lightly wet the pack whilst painting this helped the paint get into the crevices use a rough bristled but small brush to dab and jab the paint into the crevices and around where grime might build up but not easily be cleaned away then wipe away the excess with a cloth.
I used black acrylic paint on the hoses, wires and other fittings to give a layer of oily grime.


Third layer:
Metal scratches
I used Tamiya aluminum model paint and a rough bristle brush on the edges, be ready with cloth to wipe away or some black paint to paint over because its really easy to get carried away.

Fouth layer:
Slime
As i mentioned above i used green food dye, corn flour and wood glue just adding them as i mixed until i got a nice goopy consistance then used a scrap with of wood to flick it at the pack then smooshing some out with a cloth to look like they had tried to wipe clean.


And that's about it, i did this a couple of times painting with black acrylic over parts that looked overdone.
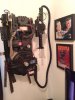
UPDATE AFTER COMPLETION: THE FINAL PACK
And here she is all finished, inside the pack is the gbfans sound card and pack lights kit, however the gun lights are of my own design, i wanted green light emanating out of the gun box handle and the rest of the lights to be extra bright. I had no real experience with this, so it took many hours and soldering iron burns and then more hours then pulling it all apart when it stopped working and rewiring it all again, then more hours but got there in the end.
Biggest downside to scratch building out of wood (other than sanding, all done by hand by first purchase before my next build will be an electric sander!) is the weight, boy is this thing heavy (see: authentic ), around 20 kg (44 Pounds).
But here she is enjoy!, i know i will.
Please let me know if you have any questions, i'll be more than happy to help you out.


And finally.. in action.. WE GOT ONE!!!!!!!!


Hey there fellow makers!,
I have just completed this, my first full on prop build. It was a total blast , especially the 'weathering' which i had never really done before but via this magnificent corner of the WWW i was given tons of ideas and wonderful advice. I will put the details of the rest of the build leading up until its completion below my original post below so as not to spoil the journey haha. I'll also put up some high res pics of my weathering process and the complete project.
But first let me just say this to those of you who may be novice builders who look at a project like this and think, there is no way i can do that.
That's total B.S (no offense
), because two months ago that was me! I had always dreamed of owning my own proton pack, i've have had the plans i used for this build downloaded on my tablet for at least 2 years, a couple of months ago i had a health scare that turned out to be all ok but it made me realize, life is way to short not to own my own proton pack so i started planning out the best way I could make this work (which is outlined below) and once i saw what others were able to achieve, i got stuck into it and didn't look back... sure i made mistakes that cost me hours of hard work, but i sure didn't make the same mistake twice. I learnt so much from this project and I am really proud of what i was able to make with hard work and a bit of imagination, it is not perfect and i took several liberties to make it my own and also conform to my very limited budget, but i love it. I decided that i wanted the give the pack the appearance that it had been sitting in one of the retired Ghostbusters attics for the past 30 years after several years of use, now uncovered by one of their grandchildren it once again see's the light of day. This meant i could go nuts with weathering (it didnt not even get a wash after getting slimed for the last time
) this also helped me hide some of my errors quite nicely which came in handy as just about everthing was scratch built, including the infamous 'bumper'. I apologize for the essay and i appreciate you taking the time to read it as i am sure your got something amazing sitting on your work bench you need to get back to, the final thing i will say is if you want some great advice (and if you do not already) please head over to www.tested.com Adam Savage, Will and Norm give out some truly amazing advice to novice and skilled builders alike in their podcasts, and their videos always feature something truly awesome, i have to thank user 'Robpenfold' for pointing me towards Adam Savages weathering technique video on Tested's youtube channel, it's amazing and put me on to Tested as a truly valuable source of information for makers, new and old. .. Also huge thanks to AJ over at gbfans.com for his shops excellent service and products.
Thanks again and please read to the bottom of my original post for weathering technique and finishing off the build.
Cheers and go make something awesome!
______________________________________________________________________________________________________________________
Hey All,
So i have been reading through these forums for a little while now and am constantly astounded by the amazing work that every one is capable of and very grateful for the brilliant advice every one is willing to provide. It has helped pass many a train trip to work and back that's for sure.
So i thought it would be high time i have a go my self.
My chosen medium for building is wood, mdf mostly. I have spent the last 9 months building 'Ray guns' out of wood, having a great time and learning many important do's and do nots along the way, recently i made my first prop, a Ghostbusters trap, whilst not perfect i was overjoyed with the result, and the fact that i was able to make something tangible to hold and have looking awesome on my shelf from one of my all time favorite movies, was rather exciting ( I am sure I am preaching to the choir) .
I have always wanted my own proton pack (who hasent) .
I was always worried that it would not be possible to make this work out of wood, one day not so long ago i came across Joe Scrivens Scratch built Proton pack whilst browsing through these forums (http://www.therpf.com/f9/ghostbusters-proton-pack-216629/) and was delighted to see that his was scratch built out of mdf, it gave me the push i needed to take the plunge and see if i could make this happen. So i thank Joe for that.
Life's to short not to own a proton pack.
So here i go, below i have detailed a few steps i have taken to make the process a little less daunting and easier, in case there are some fellow noobs (or pros) reading through here who have always wanted to give this a go but not sure how to go about it or the steps involved, i can assure you there are a few steps but...it's not quite as hard as you might think. So lets begin.
First i printed off 'Stefans Proton pack blueprints'from http://www.gbfans.com/, they have been around a long time but Stefan, where ever he may be still deserves tons a praise and credit for his hard work in putting these together.
I found it much easier to decipher all the parts i needed to build by colouring in each piece on the master overview sheet in a different colour and then its plans on the following sheets in the same colour (I even managed to stay with in the lines
, as below.I decided to use 9mm MDF for the backing board or 'Motherboard', the legit size to use would have been 3mm but i doubt 3mm mdf would support the weight off all the wood i was going to use nor give me something solid to screw all the pieces to.
As the image below, i used the scematics to draw out the motherboard and carefully cut it out using a jigsaw.
This piece, will be you best guide on how it is all coming together, as it will give you the scale and boundary all your other pieces need to fit on and let you know when something has gone wrong, as i found out on several occasions down the track.
I decided that for as many pieces as possible, i wanted to try and make my life a little easier and build them with structural pine then cover with MDF to give a smooth finish that i could shape easily with my dremil tool.
This meant that, i would have something nice and solid to screw to the mother board, as well as provide a solid base for other components to sit on top of and screw into.
Below is how that turned out.
I ended up not using the ion arm as it ended up being too wide so I used several pieces of 12mm mdf instead, cutting the two smaller bits on an angle the gluing to the two larger.
I also used two pieces of pine for the gun mount so I would have something nice and strong for the gun to connect to.
Next came the hardest part, cutting perfect circles ,I used 2 pieces of 16mm and one piece of 12mm mdf glued together for the cyclotron with plenty of sanding to round them out.
The synchronous generator I cut out of 12 mm mdf, cutting out the top shape first then gluing several 40mm tall pieces to the bottom following the shape as closely as possible.
Then used wood gap filler to fill in the gaps, sanding back to a smooth finish once left over night to dry.I left the synchronous generator hollow as I plan to use this to store the electronics I plan on putting in.
I used 60mm pvc pipe to make the booster tube and H.G.A cutting out caps to put in the top from mdf so these can be shaped and sanded before painting.
The rest of the parts I built out of mdf and dowl as below using wood gap filler to fill in and gaps then sand back so hopefully will look to be one piece once i paint.
And so this is where she is at currently, i eagerly await the next weekend to get stuck back into it.
I Will update as i go along, please feel free to shoot through and questions and thanks for slogging through all my words haha.
Apologies if this post is all outta whack, and for the small images not sure what went wrong there, its my first time
Please read comments for further progress before final completion below.
--------------------------------------------------------------------------------------------------------------------------------------------------------------------------------------------
UPDATE AFTER COMPLETION: The notorious bumper
--------------------------------------------------------------------------------------------------------------------------------------------------------------------------------------------
This was the part i was not looking forward to but it turned out to be pretty simple to make from scratch although the rounded part is not perfectly rounded due to the method i used but I am happy with it, hooray for wood gap filler!
UPDATE AFTER COMPLETION: Gun mount
I could not afford to buy this as a part so i decided to make my own out of brackets and MDF.
UPDATE AFTER COMPLETION:
Clippard valves:
Again these are expensive to buy so i decided to make my own out of dowl
UPDATE AFTER COMPLETION: Weathering The Pack
As i mentioned above i wanted to weather the pack as if it had been sitting in one of the retired Ghostbusters attics for the last 30 years, after several years of use. This meant i could go a bit crazy with the weathering (maybe a little to much? i tried very hard to stop myself when i thought there was enough haha) I also thought i'd add a layer of 'slime', why not? To make the slime i just had a guess at what could work i knew i needed green (duh) so i got some green food die, i wanted something to make it 'goopy' so i used some cornflour and then something to make it stick, dry and be permanent so i used Wood Glue and to my surprise, it worked a treat! Splatter it on and it sets into blobs, spread it out and it goes all crusty. I could not believe it worked. Everthing else was pretty much standard, fine sand paper (scuff marks), rough sand paper (scratches and gouges), burnt sienna acrylic paint (rust, gunk in crevices) and black acrylic paint (grease on metal and hoses). Please go watch Adam Savages video on weathering on Testeds youtube channel, it's basically what i followed and its is so simple but full of great info!
Most of the pics i took with the camera flash ON, which meant the weathering effects show up a lot more than when you are just looking at it.
First Layer:
Fine grit sand paper (i type used for painting that "does not clog" i found is best) - As i used a Satin Black to paint the pack it meant that sanding the semi gloss finish gave a nice scuff mark.
Coarse grit sand paper - i would then wack the sandpaper against the edges i thought would take most the hits during hard day to day use, making sure to not really concentrate when doing so the the marks would appear more random.
Second layer:
Layer of Grime and oil
Using a water spray bottle i lightly wet the pack whilst painting this helped the paint get into the crevices use a rough bristled but small brush to dab and jab the paint into the crevices and around where grime might build up but not easily be cleaned away then wipe away the excess with a cloth.
I used black acrylic paint on the hoses, wires and other fittings to give a layer of oily grime.
Third layer:
Metal scratches
I used Tamiya aluminum model paint and a rough bristle brush on the edges, be ready with cloth to wipe away or some black paint to paint over because its really easy to get carried away.
Fouth layer:
Slime
As i mentioned above i used green food dye, corn flour and wood glue just adding them as i mixed until i got a nice goopy consistance then used a scrap with of wood to flick it at the pack then smooshing some out with a cloth to look like they had tried to wipe clean.
And that's about it, i did this a couple of times painting with black acrylic over parts that looked overdone.
UPDATE AFTER COMPLETION: THE FINAL PACK
And here she is all finished, inside the pack is the gbfans sound card and pack lights kit, however the gun lights are of my own design, i wanted green light emanating out of the gun box handle and the rest of the lights to be extra bright. I had no real experience with this, so it took many hours and soldering iron burns and then more hours then pulling it all apart when it stopped working and rewiring it all again, then more hours but got there in the end.
Biggest downside to scratch building out of wood (other than sanding, all done by hand by first purchase before my next build will be an electric sander!) is the weight, boy is this thing heavy (see: authentic
), around 20 kg (44 Pounds). But here she is enjoy!, i know i will.
Please let me know if you have any questions, i'll be more than happy to help you out.
And finally.. in action.. WE GOT ONE!!!!!!!!
Last edited by a moderator: