Farscape DRD Sculpt 1:1

Not bad, the "feet" seem a little short but I'm not complaining. I've looked far and wide for what they might have used for that and haven't found anything definitive. There were one or two DRD's with the full base like this used for specific shots, the ones with wheels would only have a rim of 1-2 layers around the edge. I was planning on using a cut up pair of adidas sandals on my build.

adidasadisage-4.jpg
 
I wish it was a bit longer too. The spacing is right... about 4 per inch. I used a "Utility Mat" from Home Depot... I could have sworn 10 years ago every door mat had those little feet on it and I was hoping to find an oval one but these days none of the mats have them anymore. There was one in the flooring section that had a bit longer feet but the spacing was one for every inch. I am inclined to believe they were made of a soft material and that they drug the ground some do to one scene I caught where the DRD takes off on a slightly dusty floor and leaves a solid clean trail behind it. While I am not completely happy with it I think it will make a good place holder for now and something I can start testing some of the mechanical placement and lighting effects on at the same time as working on the body.

Does anyone have any ideas on how to do the pulsing and chasing lights? I have a strong robotic and mechanical background but the most I have done with LED's is on/off. I have talked to people at Car Toys and LED City and was offered suggestions ranging from a $40 strand with a $60 wireless remote that I would have to cycle through 50 patterns to get the lights to do the right thing, or a mechanical wheel solution that would work but would take up a lot of room in the DRD and I doubt would be overly reliable.

I was hoping I might find a strand that just pulses while finding another two strands that chase and simply switch between the two, but apparently that doesn't exist.

ideas?
 
I knew there was a reason to learn about programming Arduinos to run LEDs. Was just discussing this with a friend a couple days ago who wants me to build a steampunk-style backpack for his daughter that would have a few animated lighted bits. I imagine there's a way to connect a remote control too.
Time for research! I love research!
 
I could do the lights either with an arduino or analog using discrete chips. Either way they're not all that hard of a circuit.

The trick is to make them sequence at the same speed as the movement like the heroes. Also not difficult but you'd need to know what you were using for motors and speed controller.
 
Last edited:
there are about 10 major errors on the side I just posted... I am working currently just on that side till done and the moving on... and as a side note.. I know what the big problem was with the "feet" I poured too fast and they all have air bubbles in tips... completely my fault. .. time for me to slow down and really pay attention to detail.
 
I love it. Every time I post pics on here it is at the end of the day... every time I look at the pics I can't help but fix one or two more things...LOL anyway here is the last update for the night
day 11-3.jpg
 
I'm not sure what you're plans are but I think you're going to have some issues with the way you have the front plate. It should be one peice all the way across with the large "door" integral to the plate and not pre-cut.

DRD_000.jpg~original


Also the rear vertical slots should be deeper and both the front and back small slots need the bump detailing:

DRD_012.jpg~original

DRD_044.jpg~original

PDVD_096.jpg~original


So far overall it's looking good though!
 
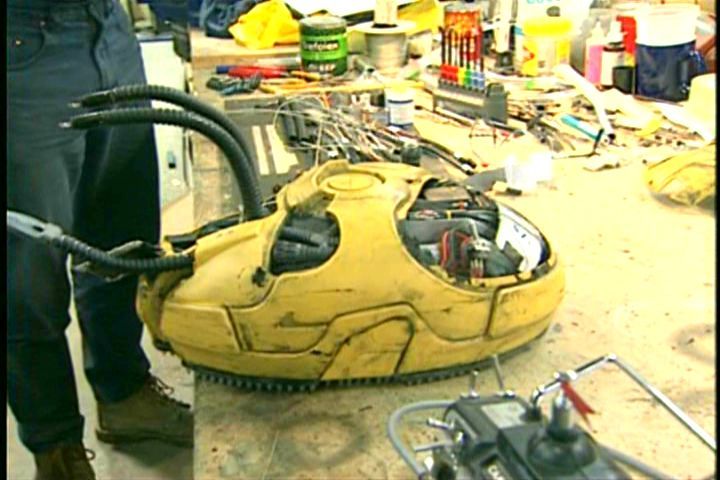
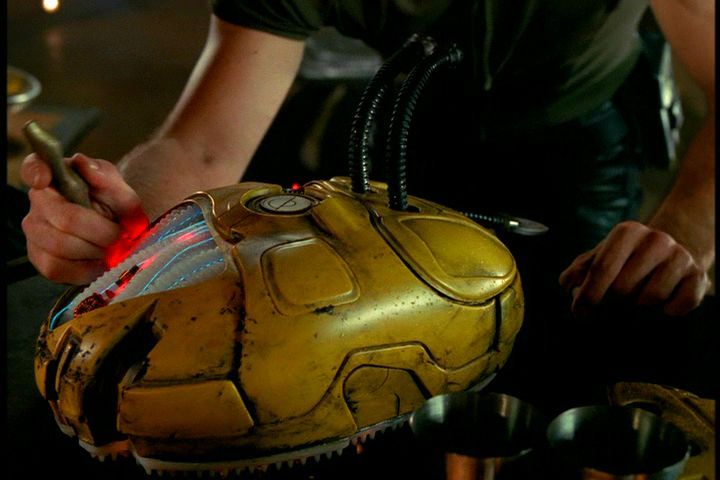
I am still working on it, Jack, and you brought up good points. I chose to cut the front panel based on the shot you actually just posted of the way the original front panel was cut.. also being one piece will make it a stronger piece of material to deal with the claw or the injector (I am hoping to make them interchangeable, but we will see). With all of the movement around that one opening (where the claw is) having that piece in two parts even with magnetic attachments to keep things together it seemed like a weak spot, and after studying the bench shots I came to the conclusion that is why they did that... am I wrong? Regretfully I am afraid it would take me remaking the entire front panel to put that back together again, but I can if I need to.

I am aware on the back slot needing to be deeper and the front and back center slot bumper detail... Honestly there is still so much work needed I was sorta keeping the front and back center bumpers for last... I still have some shaping issues and at least one door to make and the side "wing" doors to finish.

I REALLY appreciate the feedback, though!!! Keep it coming. No use doing it if it isn't going to be done right!

--Scott
 
1.jpg2.jpg3.jpg

Jack, Thanks sooo much again for the feedback! Thanks to your photos and bringing my attention to a couple of things you now see both slots in the back are much deeper and carry into the under shell as well as I now have a section set for being able to display the DRD innards! Slow but steady progress. I know there are still details missing.... now that I am happy with the overall structure you will start seeing the details finally being addressed as I finish off each piece
 
Hey, Jack, you were completely right about the front panel and the big door... as I started working on it today what you said made perfect since... I have remade the front panel and fixed a ton of measurement issues there as well. I will have photos up tonight or tomorrow.
 
This thread is more than 4 years old.

Your message may be considered spam for the following reasons:

  1. This thread hasn't been active in some time. A new post in this thread might not contribute constructively to this discussion after so long.
If you wish to reply despite these issues, check the box below before replying.
Be aware that malicious compliance may result in more severe penalties.
Back
Top