Odiwan ESB Hoth binocular kit build DONE!!!

Zombie Killer

Master Member
RPF PREMIUM MEMBER
Well, I thought it would be about time I did something with this awesome Hoth binocular kit from Odiwan. Marcus did an excellent job on these and it's about time I build it. I have been doing some upgrades as I go along. Nothing like Lichtbringer did with his awesome aluminum parts, although I am getting a lathe here in the near future so I may add them later on. Not many of these kits got made and I have not seen many build threads. I think there is only Lichtbringer's and Odiwan's.

Here is my build.

First thing I dd was add some glass lenses to the eyepieces. I put in some with short focal lengths so they focus in around an inch ahead of the lensplate. If I decide to add some transparencies and lights to the interior they will be ready to go. Also added a dome part from a Revell Apollo spacecraft kit. The one in the kit I thought was a tad small.

IMG_19041280x960.jpg


Also added real screws to the top aluminum part. I will paint this guy aluminum at some point before I paint the whole things white.

IMG_19061280x960.jpg


In the front I thought I would add a lens also. I dremelled the lip that was on the inside of the trim and machined a piece or abs tubing to hold the lens and also mimick the picture of the binocs missing the front cap. Since the front black lens is semi transparent I thought it would add some depth to it.

IMG_19071280x960.jpg


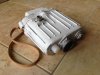
Here it is with the assembly along with the V8 parts. I opted for the Renwal V8 kit rather than the Revell version. Same kit , Renwal is older though.

IMG_19111280x960.jpg


I bought a couple tester plugs that were close but the edge were different than the original plug so I pulled the pins off and glued them to the kit plug.

IMG_19281024x768.jpg


Here it is with the plug painted black and the pins installed.

IMG_19311024x768.jpg


Although Marcus did a great job on the hood I had the urge to make my own from scratch. Here it is in rough form and then cleaned up a bit. Still have a bunch to go but it's getting there.

IMG_19291024x768.jpg

IMG_19341024x768.jpg


Obligatory brass screws with the heads machined to correct shape.

IMG_19331024x768.jpg


Painted the main body black and added real setscrews.

IMG_19371024x768.jpg


Some prepainted parts.

IMG_19321024x768.jpg


Here is the lens tube painted black and lens installed.

IMG_19381024x768.jpg


With the cover. You can see what I mean about the depth. If I do a transparency on the eyepieces i'll add some dark red filters to make the lens glow a very very dim red.

IMG_19391024x768.jpg


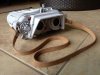
Here are some test shots with all the parts mostly in place and all the real screws. Next i'll clean up the lens plate and paint it black and then get liquid latex to apply to the black before the white for spots where the black shows. Not sure how damaged/worn I want it to be yet. Also need to paint the one square part red along with the "camshaft" ON/OFF switch and the one nub on the front lens ring. Probably do that after the white is done....and of coarse finish the hood. I have purposely left it a bit long at the bottom until I am sure of how short to make it. Once they are trimmed to size i'll finih up the actual hood length. I am happy how it's coming out so far. Its been a fun project for sure. Thanks again Marcus for making these available for the short time they were.,

IMG_19451024x768.jpg

IMG_19401024x768.jpg

IMG_19441024x768.jpg

IMG_19421024x768.jpg
 
Re: Odiwan ESB Hoth binocular kit build

That looks awesome ... perhaps you could add a transparent picture slide of the Hoth rebel base inside so when you look through you actually see it?

;)

Chaim
 
Re: Odiwan ESB Hoth binocular kit build

YES, this is going to be a great replica! :thumbsup
Just for my interest, is this an older kit or is this kit still available?
 
Re: Odiwan ESB Hoth binocular kit build

Odiwan72's (Markus) kit is amazing. The most amazing thing was that he did not sell out of them immediately. I know he had a few left but I think he was going to put them on eBay.

I love mine. Lichtbringer made me up a medal detail kit with glass lenses.

I did not have the guts to drill into the visor so I simply uses the half pearl appliqués from the scrapbook section to simulate fasteners.

The kit is so awesome that if you wanted, you could put it together, spray paint it white, and rub a little sandpaper over it and it would still look great.
 

Attachments

  • image.jpg
    image.jpg
    748.3 KB · Views: 251
  • image.jpg
    image.jpg
    703.1 KB · Views: 232
Re: Odiwan ESB Hoth binocular kit build

Nice work! I snagged one of these, too. It's complete except for the leather strap.
Still trying to source one.
 
Re: Odiwan ESB Hoth binocular kit build

Nice work! I snagged one of these, too. It's complete except for the leather strap.
Still trying to source one.

I got my strap from the leather section of Michaels. I do not know what is accurate on the prop. It is the perfect with and it comes 36" long which I also think is perfect. I opted to secure the wrap with rivets on the end rather than tie a knot.

I believe this is it: http://www.michaels.com/artminds-suede-strip-medium-brown/10249778.html

Not sure if it just looks darker there or if it is actually a different color.
 
Re: Odiwan ESB Hoth binocular kit build

Thanks for the compliments gentlemen :$
I am happy you guys are having that much fun with my kit(s), even if I am no molding/ casting expert and had to learn a LOT from my mistakes during this run :(

Glen:
STELLAR WORK so far (even if I prefer the viewer hood I provided at this point of the build :p)
One word reg. the splitclamp greebly with knurled insert...there is NO need to paint it silver as it was cold-cast with aluminum powder dusted into the mold. Just give the assembly a slight buffing with some steel wool and apply the white then ;)

I love your upgrade on the vacuum tube!

Keep the pics coming...

Markus
 
Re: Odiwan ESB Hoth binocular kit build

Thanks guys. Chaim, that is something I am thinking about doing although I would probably put the Probe droid or ATATs in the picture.

Awesome build MaraJadesFather! Thanks for the headsup on the strap. I need to go through all my vintage camera cases to see if I have something.

Marcus, Thanks bud! The viewer is still in it's early stages. I did some more adjusting to the shape as the bottoms are off in the pics above and the left side was too curved. I need to add the rod to the center of the V8 camshaft part and then line it up. I also need to add the other styreme part up by the on off switch to close that section up. We'll see how it goes. I also need to square up the visor part too and they shouldn't be that round. It needs tweeking. I'll try to work on it tonight a bit .

Thanks again guys!!
 
Re: Odiwan ESB Hoth binocular kit build

I got my strap from the leather section of Michaels. I do not know what is accurate on the prop. It is the perfect with and it comes 36" long which I also think is perfect. I opted to secure the wrap with rivets on the end rather than tie a knot.

I believe this is it: http://www.michaels.com/artminds-suede-strip-medium-brown/10249778.html

Not sure if it just looks darker there or if it is actually a different color.

Sweet! Made a note of the item number. I have a Michael's nearby and I'll look for that leather
strip next time I'm up that way.
 
Re: Odiwan ESB Hoth binocular kit build

Well it's at the final painting part. Still need to glue the styrene rod on the lower V8 part to the rear hood. That's like the very last of the gluing. I may narrow the hood a tad more too. It's a bit too long still. May even try to square up the hood bends a it more too. I've done almost all the prepainting. Just need to do the eyepiece centers, also need to do some masking for the grey squares and do some latex application. Then spray it all white and paint the rear square buttons grey and red and the on off switch and lens cap nub red. I am very happy with how it came out. Now hopefully I wont muck it up on the last part. I tried to do some comparison shots but it was hard to get the same angle as these prop pics albeit I didn't try all that hard. Camera angle and distance is all off. Oh well, I'm tired. Hope you like.

IMG_19471024x768.jpg


IMG_19561024x768.jpg


IMG_19491024x768.jpg


IMG_19531024x768.jpg


IMG_19541024x768.jpg


IMG_19501024x768.jpg


IMG_19551024x768.jpg
 
Last edited:
Re: Odiwan ESB Hoth binocular kit build

I's been a good weekend for me getting a few projects done. With the exception of getting a leather strap I am done with this. I am pretty happy with how it came out. I ended up trimming the hood some more and reshaped it a bit. I am super happy with it. Here it is all painted up. If I could have changed one thing with this kit it would have been the material it was cast in. No matter what paint I tried and no matter the sanding, paint just does not want to stick to it that well, like it has wax in it. Any masking I did even with blue painters tape pulled off the paint already applied. Pissed me off to be honest. It is what it is, not as clean as I would have like but it is done. Luckily I was going for the distressed look! lol
IMG_19681024x768.jpg

01.jpg

IMG_19731024x768.jpg

electros_4.jpg

IMG_19701024x768.jpg

IMG_19641024x768.jpg

electros_6.jpg

IMG_19721024x768.jpg

IMG_19691024x768.jpg

IMG_0809_zps974375673.png

IMG_19741024x768.jpg

SMI_02_09_08_051.jpg
 
Last edited:
Absolutely stunning...I love your new hood!!!

Reg. the resin it was cast with...I used SmoothCast 326 and didn´t have any problem with paint not sticking on the casts I worked with.
BUT I realized that freshly poured resin has the tendendy to "react" with mold-release, if it was applied shortly before the pour any didn´t have time to dry...might be the reason for the "waxy" surface you are talking about.

Really have to take some new pics of my finished binocs as I like the comparsion shots you posted.
These two are the only pics I have of my finished prop so far


Markus

Markus
 
Thanks Markus!! Yours came out great too. How many kits did you end up making? I think I have seen maybe 5 built. I don't think Lichtbringer ended up posting pics of his painted. Just pics of the parts he was making. Would love to see more of them.
 
Good stuff Zombie Killer...while your weathering is good, it seems to me that the visor is too clean compared to the pics of the original. Maybe more wear and tear on that part could put things to another level ;)
 
Doesn't need more wear and tear. He's got that covered. All he needs is to run a black and/or brown wash over it.

That reminds me, one day I need to weather and dirty up my strap.
 
Thanks Markus!! Yours came out great too. How many kits did you end up making? I think I have seen maybe 5 built. I don't think Lichtbringer ended up posting pics of his painted. Just pics of the parts he was making. Would love to see more of them.

Thanks Glen...will post better pics within asap ;)

IIRC I actually SOLD about 20 of these, plus a few I traded or gave away as gifts to befriended collectors.
But you´re right....I only saw a few of these built up (same goes for my Margolins. Did a run of these MANY years ago, but only found a few built up)

Markus
 
Thanks everyone. Much appreciated! It does need another couple layers of weathering. The original looks to have had a black spray paint misting. I'll probably do it but was a bit scared to do it the other day. Also needs a black/brown wash. Sounds like a good project for this weekend.
 
:popcorn A..W..E..S..O..M..E work ZK! Some more dust and sprinkles over its surface and its going to be perfect.
(Probably apply the sprinkles with a toothbrush or something to match the original):thumbsup
 
Phenomal work bud !!
What a few hours of spare time in Glens world can do!!'
Great to see those unfinished boxes up projects come to a close , and not dissapoint !
Mig dusts would also work for dusty surface , so jealous of this project !
Mars
 
This thread is more than 9 years old.

Your message may be considered spam for the following reasons:

  1. This thread hasn't been active in some time. A new post in this thread might not contribute constructively to this discussion after so long.
If you wish to reply despite these issues, check the box below before replying.
Be aware that malicious compliance may result in more severe penalties.
Back
Top