Tron: Legacy Black Guard helmet build

Crimson490

Well-Known Member
RPF PREMIUM MEMBER
Greetings once again, users!
After a long hiatus, I'm back and ready to get to work on another helmet from Tron: Legacy. This is going to be my 3rd helmet from the film, and I'm really excited to get to work on this detailed piece. Stay tuned!

Check out my other Tron builds:
Quorra
http://www.therpf.com/f24/tron-legacy-quorra-helmet-build-135119/

CLU
http://www.therpf.com/f24/tron-legacy-clu-helmet-build-128390/

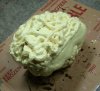
I'm going to make this sculpt the same way I did Quorra: cardboard frame / expandable foam (great-stuff) interior and bondo exterior.

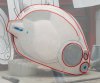
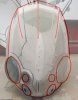
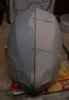
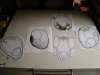
First step is to gather reference photos. I took the pics into photoshop and inverted the color, then added lines for key features so it was easier to see visual cues as I work.

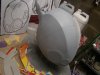
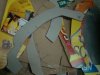
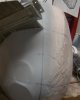
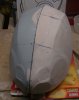
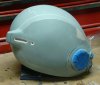
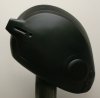
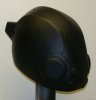
Next step is to print out the front and side views to make a quick cardboard frame. One thing I learned from my previous builds is that the frame and foam interior should be at least 1/4" undersized all around so that the bondo is thick enough. Otherwise, when I'm sanding areas down and I hit the foam I constantly need to re-fill in those areas with bondo. Foam doesn't make a nice smooth surface! =) So this rough foam shape will be a little small.

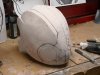
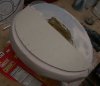
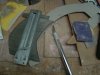
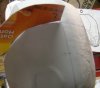
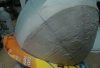
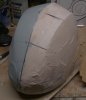
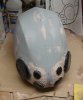
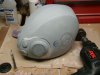
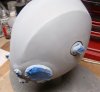
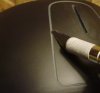
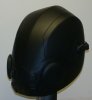
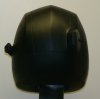
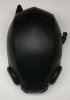
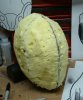
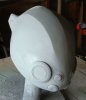
After two foam applications, I took a good knife and trimmed the foam down. Not shown is the small opening in the bottom - I'm using my poor-man's helmet stand again (as seen in my Quorra build). This is where I cut a recess ~4" deep in the bottom of the helmet for the tall (now empty) foam can which doubles as your stand. I screw the bottom of the can into a piece of plywood to give it stability - make sure your can is completely empty! And now you can easily attach and detach the helmet from the stand. I used to screw the cap into the foam, but over time this loosens up. I found that if the recess fits snug around the can, you don't need to fix the cap into the helmet. It's also easier to get the helmet on and off.
 

Attachments

  • BG-01.jpg
    BG-01.jpg
    236.6 KB · Views: 304
  • BG-02.jpg
    BG-02.jpg
    300.3 KB · Views: 256
  • BG-03.jpg
    BG-03.jpg
    383.8 KB · Views: 249
Last edited:
While getting ready for this project a few months ago, I wanted to do a test on the respirator features. I modeled up the three different features and grew them on a 3D printer (I cheat! :D
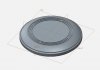
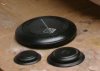
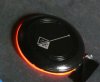
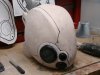
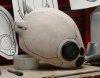
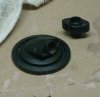
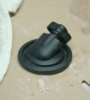
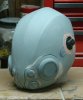
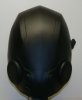
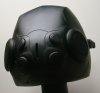
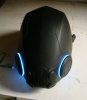
). After smoothing them out with primer filler and sanding, I molded them, cast them, and painted them black. Then applied a custom made rub-on decal that I did up in photoshop that closely resembles the actual artwork. I wanted to design the large respirator piece in such a way that I could use el wire around the circumference - it fits into a nice recessed track underneath. This will give a consistent and bright glow all the way around.
 

Attachments

  • BG-04.jpg
    BG-04.jpg
    89.2 KB · Views: 211
  • BG-05.JPG
    BG-05.JPG
    266.2 KB · Views: 262
  • BG-06.jpg
    BG-06.jpg
    127.9 KB · Views: 256
  • BG-07.jpg
    BG-07.jpg
    167.4 KB · Views: 274
=) I'm excited for your project as well!

A bit more progress on the sculpt. Lots of bondo, and it's starting to take shape. I'm not worried about symmetry at this point. I'll put a little more work into this then compare against the reference photos for general shape and placement of things. Hoping I'm not too far off, but eyeballing stuff doesn't always go as planned. =/
 

Attachments

  • BG-08.jpg
    BG-08.jpg
    385.2 KB · Views: 241
  • BG-09.jpg
    BG-09.jpg
    367.9 KB · Views: 203
It is fun!
I've had a lot of time over the past few days to bondo and sand. At this early stage I'm only using 80 grit and a rubber sanding block. For areas that need a lot of material removal, I go to my dremel with sanding drum. Very dusty work!

OK, after checking my sculpt against the reference photos, I can easily see where I need to carve out more or add more. It's good to see that the respirator parts are to scale and are generally where they should be. I didn't want to have to redo those.
 

Attachments

  • BG-10.jpg
    BG-10.jpg
    237.9 KB · Views: 212
  • BG-12.jpg
    BG-12.jpg
    245.3 KB · Views: 194
  • BG-14.jpg
    BG-14.jpg
    228.7 KB · Views: 219
  • BG-15.jpg
    BG-15.jpg
    283.5 KB · Views: 227
Had a lot of time over the weekend to move this forward. I got the left side done and am almost done mirroring the right side. My mirroring technique is tedious, but gets the job done. For those interested in the 'how', I'll try to explain in detail my process:

With the one side done and a good centerline established, I mark spots roughly 4" apart down the centerline where I will make my profile templates. Using a simple profile gauge I can transfer the exact contour of that section of the helmet onto a cardboard template (any thin cardboard box will work). My gauge is too small, so I have to make a couple overlapping passes to get a nice long template covering the whole side. The templates should go all the way to the bottom, if possible, so that you have another reference point to help locate the template on the opposite side.

The top edge of the template that ends at the centerline should be cut in line with the centerline. That way, when you flip it to the other side, you can see if your template is angled out too far (or not enough) by aligning that vertical edge to the centerline. Making a bottom surface template, you can double check the position of all the other templates that cross that one. Additionally, wherever one profile template crosses another, you can mark it on the template - this helps to triple check positions and angles. It's like constructing your own 3D puzzle where all the pieces slowly start to fit together as you build your template 'matrix'.

When you flip the template over to the side you're working on, and you feel you've got it laying in the right place, just use a pen to mark the location of the template. Then, wherever the sculpt is low, draw a second line roughly showing how much needs to be filled in. As you fill in and sand to match the template, I use a sharpie to indicate the surface is good. That way, if you accidentally cover it over with bondo, you can easily sand down till you see the thick black line.

You don't want to overdo the # of templates, as it will mean more time checking each one. Every 4" worked fine on this helmet. And I went back later to add one or two more templates in between at the front end where things are more complex. The more your templates intersect each other, the more confidence you can have that stuff is where it should be.

Wherever you don't have a template, you can eyeball it and blend. If it's too tough to eyeball, you probably need to add a template in that area.

Oh - it's good to use a flexible tape measure to do 'gut check' measurements here and there. It can save time if you just need to check simple things without making a template, or to check the position of an existing template.

In the end, you may not get it exactly perfect, but it will be far more accurate than you would be able to do by eyeballing it. =)
 

Attachments

  • BG-18.JPG
    BG-18.JPG
    214.6 KB · Views: 256
  • BG-19.JPG
    BG-19.JPG
    198.1 KB · Views: 190
  • BG-20.JPG
    BG-20.JPG
    209.7 KB · Views: 200
  • BG-21.JPG
    BG-21.JPG
    249.5 KB · Views: 209
  • BG-22.JPG
    BG-22.JPG
    186.5 KB · Views: 177
  • BG-23.JPG
    BG-23.JPG
    205.3 KB · Views: 195
  • BG-24.JPG
    BG-24.JPG
    611.7 KB · Views: 211
  • BG-25.JPG
    BG-25.JPG
    236.1 KB · Views: 198
Last edited:
I would not be able to finish one side, like you... I would finish and be like, "Crap, now I have to do the other side".
 
Thanks guys! =)

haha, yes, I feel overwhelmed at times.

It's interesting...I never noticed till now that I've always picked the right side (as you wear it) as the first half. Like the right-brain artistic/creative side does its half, then the left-brained technical/rational side does the other half.

In any event, my brain is tired.

Wrapping up the mirror side and plan to add the respirator pieces next!
 

Attachments

  • BG-26.JPG
    BG-26.JPG
    256.1 KB · Views: 182
  • BG-28.JPG
    BG-28.JPG
    269.5 KB · Views: 182
Quick update -
I managed to get the respirator pieces attached and 1st coat bondo over them so they are integrated with the front. Lots of measuring to make sure they are symmetrical. Right after I took the picture, I noticed the lower right piece had shifted w/o me noticing so I quickly pried it off before the bondo cured. I'll fix it and finish smoothing out the blends.

I've also been working on the left side hose attachment. Spent a lot of time studying the port that plugs the hose into the helmet, as well as the hose segments. I think it's pretty accurate to the movie prop (see reference photo below). My plan is to use a black hose and slip these little segment pieces onto it.
 

Attachments

  • BG-29.JPG
    BG-29.JPG
    354.9 KB · Views: 202
  • BG-30.JPG
    BG-30.JPG
    191.8 KB · Views: 167
  • BG-31.JPG
    BG-31.JPG
    73.1 KB · Views: 196
  • real prop4.jpg
    real prop4.jpg
    63.2 KB · Views: 249
Last edited:
Quick update -
I managed to get the respirator pieces attached and 1st coat bondo over them so they are integrated with the front. Lots of measuring to make sure they are symmetrical. Right after I took the picture, I noticed the lower right piece had shifted w/o me noticing so I quickly pried it off before the bondo cured. I'll fix it and finish smoothing out the blends.

What's your process for sanding in the tight areas between the respirator pieces?
 
Thanks Canobi!

Sometimes I'll try a piece of sandpaper the width of my index finger and just press straight down (which is what i'll do in those areas). For really tight spots, like the circumferential grooves around the large respirator pieces, it works better to fold the paper into a U shape (but with sharp corners), pinch it at the top and push down. When you do this, the profile of the sandpaper looks like an upside down golf tee. The two concave walls support each other and give some rigidity to the thin flat surface that you're sanding with.
 
Almost done blending in the areas between the respirator pieces.

Also added the breathing tube (?) port. For this, a simple hole saw made the perimeter cut. Then I just drilled a bunch of little holes and chiseled out what was left. Attached it and covered it over with bondo. Originally I thought I might want this port to be able to swivel, but I think it'll be fine with a flexible tube.

Now for the fine details - adding the little grooves everywhere!
 

Attachments

  • BG-32.JPG
    BG-32.JPG
    248.1 KB · Views: 178
  • BG-33.JPG
    BG-33.JPG
    124.2 KB · Views: 190
  • BG-34.JPG
    BG-34.JPG
    110.8 KB · Views: 180
  • BG-35.JPG
    BG-35.JPG
    147.2 KB · Views: 178
  • BG-36.JPG
    BG-36.JPG
    105.2 KB · Views: 207
Last edited:
Almost done cutting in the grooves.

For this step, I lay out the lines with a ball point pen (while staring at the reference photos, of course:)). To get nice straight lines on a curved helmet, I use a plastic bondo trowel because it can conform to a curve while retaining a nice straight edge. For the round sections, I just find a cup or whatever I can that is the right size and trace it. For everything in between it's just free-hand, which I try to minimize! Once the lines are on, I use an exacto knife and score the line, slowly pulling the knife toward me (gives me better control). Then I flip the helmet around and go back down the line but ~1mm away from the first cut. The knife is at an angle such that when both cuts are made, I have a V-groove. Usually, the two cuts don't meet each other at the bottom of the groove, so I'll go back and cut a little deeper till they do. Bondo cuts really well with an exacto knife. Then I take 80-grit sandpaper folded in half (about 1-inch wide) and move this back and forth in the groove. This widens and deepens the groove up just a little bit more and helps to smooth out the cut so it looks straighter.

Next steps are:

-one more coat of primer
-light 220 grit sanding
-one coat of black
-2-3 coats of clear lacquer
-wet sand/rubbing compound on glossy areas
-plasti-dip on matte areas

One test I need to do is to see if plasti-dip and smooth-on's silicone play nice together. Anybody know?
 

Attachments

  • BG-37.jpg
    BG-37.jpg
    145.8 KB · Views: 171
  • BG-38.jpg
    BG-38.jpg
    110.3 KB · Views: 178
  • BG-39.jpg
    BG-39.jpg
    104.9 KB · Views: 177
  • Quorra etching1.jpg
    Quorra etching1.jpg
    103.5 KB · Views: 192
Absolutely amazing, i love the design of this helmet and your job is totaly brilliant. If you plan to do a run of these, please let me know!
 
Thanks, EyeintheSky! I'll def. do my best to make this available. As with the other helmets it's always been a 'we'll see how it goes' sorta thing, but I feel like this should work just fine.

So, I managed to get the rest of the grooves and little details done enough to finally be able to put two coats of flat black on it. Wow, it looks MUCH better than primer gray, and I'm really getting excited to wrap this up with some glossy/texture details! I couldn't help but do a test with some el wire laying around, and I think it works well.
 

Attachments

  • BG-46.jpg
    BG-46.jpg
    224.4 KB · Views: 317
  • BG-40.jpg
    BG-40.jpg
    216.3 KB · Views: 203
  • BG-41.jpg
    BG-41.jpg
    269.9 KB · Views: 201
  • BG-42.jpg
    BG-42.jpg
    222.5 KB · Views: 158
  • BG-43.jpg
    BG-43.jpg
    183.6 KB · Views: 183
  • BG-45.jpg
    BG-45.jpg
    274.2 KB · Views: 169
  • BG-44.jpg
    BG-44.jpg
    208.7 KB · Views: 188
  • BG-47.jpg
    BG-47.jpg
    272.7 KB · Views: 213
This thread is more than 9 years old.

Your message may be considered spam for the following reasons:

  1. This thread hasn't been active in some time. A new post in this thread might not contribute constructively to this discussion after so long.
If you wish to reply despite these issues, check the box below before replying.
Be aware that malicious compliance may result in more severe penalties.
Back
Top