First Major Cosplay Effort: Samus Aran Varia Suit

jzerot1437

New Member
Hi all,

I've attended a few cons wearing costumes that were either commissioned or quickly sewn / fabricated at the last minute, but have always loved working on costumes (I get excited around September every year and begin planning for Halloween.) Despite this, I've never worked with EVA foam / Worbla / Wonderflex or any of the other common cosplay materials (plasti-dip, gesso, resin, bondo, etc)--everything is new to me.

For some foolish reason, I decided to grow my teeth on Samus Aran's Varia Suit from Metroid. After testing materials for about a month to see what they could do, I began constructing the costume in earnest about a week ago. I'm freehanding the armor--I found some Pepakura files, but they broke the armor elements into so many smaller pieces that they were virtually useless to my inexperienced self.

tPweiMW.jpg 10438396_10100957769454553_8687476771332587583_n.jpg 10407956_10100960736683203_6207415739662611142_n.jpg


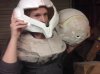
The first chestplate I made was large and rough--I was cutting with a boxcutter when I first began, and the EVA I had wasn't as soft as the colored EVA I began to use later. Because of this, I now have two chestplates--the larger, rougher black one, and the more precisely cut, cleaner red one. Given my lack of experience, I think I may continue with this, creating two of everything, using the black foam as a prototype model, then the colored foam as the actual costume armor. If the rough model looks rough enough at the end, I may just give it a distressed paint job and make it a "Post-Mission" Samus model.

I planned on using the pictured floral hemispheres for the should pauldrons, but they aren't full enough--I'm considering buying some cheap kid's toy balls and paper macheing them, then adding EVA foam in layers to create the channeled appearance of her shoulders. Don't know if you guys have thoughts on other methods to create these, but suggestions would be welcome.

I could also use advice on painting. When I was testing materials, I had the greatest success with Gesso, but those were single, non-joined pieces. I worry that gesso would cover the "seams" of the joined armor, and that I may have to go with Plasti Dip (which I've had a lot of difficulty using). Would Gesso cover the seams? And if it does, would it look crappy to paint the seams on?

I don't plan on the costume being perfect (it IS my first time) but I think I'm off to a good start. I've already learnt a lot about patterning, proportions, Contact cementing, and cutting the EVA.
 
I'm right there with you for the same project. I'd like to see any input from others.

Right now I'm using Wonderflex with craft foam underneath (for comfort). I've only made the leg pieces and started on the arm cannon with EVA foam. I'm testing using layers of Gesso directly over the Wonderflex and should be sanding them tomorrow (roughly 5 layers and last layer created a 'dry lake bed effect' from the heat and humidity of the Atlanta summer) and I'm testing Plasti-Dip then guesso applied over the EVA foam to see what kind of effect that gives me. I want to make this look super shiny metal/plastic or otherwise, like you, I'll be making it look "battle worn". I'm making mine for Dragon*Con and won't settle for less than perfect. I do plan on using pepakura files for the helmet, because I don't have time or the budget for sculpting (clay) and splash coating.
 
Hey there,

So there's actually another alternative to get the "super shiny" look that I only began experimenting with over the weekend. Cover the EVA in Stretch Vinyl using Spray Adhesive.

Here's the rocket base covered in Stretch Vinyl:

0sk4N1R.jpg

And here's the front:

faET002.jpg

And here's one rocket covered and one rocket uncovered

7hQJ6GB.jpg

The only problem is, on curved surfaces like the rocket here, wrinkles form on the edges overnight. I'm kind of resigned to the fact that the costume isn't going to be PERFECT--this is my first "real" cosplay after all, but the wrinkles would bug a lot of people.

Still, wanted to throw it out there.
 
Just spit-balling here, but how much overhang goes around the back on the curves? The larger fabric you wrap around may keep the wrinkling from happening. Or maybe a stronger glue on the edges?

Either way, it's looking really awesome! Can wait to see it all put together!
 
I think you're right. The rocket holster was my first foray into covering armor that isn't sitting flat, and because of the holes near the base, it caused some difficulty. I had to pull the vinyl tight over the whole piece, then I mistakenly folded the overhang into the bottom of the foam BEFORE cutting over the holes, which left less fabric for it. As a result, I had to pull very little fabric of a rather large space to cover the holes (and even then, I made some "band-aid" patches for the inner hole).

Not a terrible effect, but a learned first lesson. Will try to cut the holes before securing the vinyl on rocket holster #2 in order to provide some slack and lessen the tension.


My biggest concern right now is figuring out which foam to use for the abdomen; if I use the stuff I've been using, I won't be able to bend over. I may just buy a black body suit and use thin 1-2mm craft foam to cover the abdomen in the correct pattern. I really want to be able to bend over.
 
Woo! Yay moar Samus peopleses!

I have never felt more useful than I do right now, hoo boy. Looking for Samus peps? BAM! My Samus peps. Granted, the entire suit isn't there, but maybe it'll help!
I 3d printed some of my pieces so I also have made high poly models which I can show for reference if you guys want. They're based off this, which appears to be the original model from Prime 3.

Also take a look at my thread if you want to see my techniques and stuff and things. If you have any questions I'd be more than happy to help!

That vinyl technique looks really similar to what Pixelninja did for hers. Maybe her pics could be helpful too. Looks great! Seems like a great solution for flexible foam.

I can't wait to see more from you guys!

Thank you for that amazing blog! I am using your helmet pep file for my first effort at making a pep, so we'll see how that goes.
 
Woo! Yay moar Samus peopleses!

I have never felt more useful than I do right now, hoo boy. Looking for Samus peps? BAM! My Samus peps. Granted, the entire suit isn't there, but maybe it'll help!
I 3d printed some of my pieces so I also have made high poly models which I can show for reference if you guys want. They're based off this, which appears to be the original model from Prime 3.

Also take a look at my thread if you want to see my techniques and stuff and things. If you have any questions I'd be more than happy to help!

That vinyl technique looks really similar to what Pixelninja did for hers. Maybe her pics could be helpful too. Looks great! Seems like a great solution for flexible foam.

I can't wait to see more from you guys!

Hey Talaaya,

I'd like to 3D print my shoulders--there really isn't a way to pull them off without making them look really home-made (warping on the EVA molds, newspaper outlines on the papier mache, etc). I'll need them to be about 9"-10" in diameter each, which means I'll need a rather large printer; I'm sure I can find someplace in NYC to print them for me (for a lofty pricetag), but I'm not sure how 3D printing works. Do I need to create the models in a special program?

Also, I've been using Pixelninja as a model for the costume; obviously, she's more experienced than I am, so her's is much more pristine than mine will be, but her work is a great model to use.

Also, here's a pic of the (close to) final rocket pack. Needs a good scrubbing with the goo gone to get rid of the residue, but it looks okay.


WmpaisO.jpg
 
Last edited:
I didn't like my initial chestplate, so I spent some time today making a new one, but now I'm not sure which one I should should hook to the rocket pack. Here are pics.

c5Acok5.jpg P8OjECK.jpg

And the other things I did today (paper mache ball for the shoulders, patterning for the vest, profile view of the rounded chestplate and rocket pack)

TNCRd5r.jpg K4uXohA.jpg H55TYEN.jpg
 
What size ball are you using for the shoulders? I found a rather large green ball at wal mart and plastered that, fiberglassed the outside and doing the detail with bondo. I plan on casting it so as to only have to do one, I don't like to repeat myself lol


Sent from my iPad using Tapatalk HD
 
What size ball are you using for the shoulders? I found a rather large green ball at wal mart and plastered that, fiberglassed the outside and doing the detail with bondo. I plan on casting it so as to only have to do one, I don't like to repeat myself lol


Sent from my iPad using Tapatalk HD

They're 10" beach balls from Toys R Us. They're okay, but I kind of think they should be larger. I like your method of detailing with Bondo--I've never used Bondo, and am trying to keep my costume as lightweight as possible, so I'm using EVA foam (WHICH IS A NIGHTMARE FOR THE ROUNDED PAULDRON SHAPE), but your method sounds much more effective and less headache inducing.

I've wrapped work on the chestplate/rocketpack & rib vest. Check them out:

14390345668_1b48b13f6f_b.jpg'

14390345978_814d990672_o.jpg
 
Nice!i was going to get work done today but emergency laundromat trip messed that up. Gonna knock out some sick work on the shoulders tomorrow, I'll post pics then.

And I feel you on the weight deal. I plan on casting them all in order to get the shapes accurate and the weight down, but it is still going to be a good 15 lbs for the whole suit. Here is the last update I have on my armor, I'll get more pictures when I go out to work tomorrow. I have to pace it out with my orders so I usually just time slosh dry times or paint drying to do my own stuff. But without selling things I could not afford this insane hobby.


Sent from my iPad using Tapatalk HD
 

Attachments

  • ImageUploadedByTapatalkHD1404783960.583811.jpg
    ImageUploadedByTapatalkHD1404783960.583811.jpg
    794 KB · Views: 177
Nice!i was going to get work done today but emergency laundromat trip messed that up. Gonna knock out some sick work on the shoulders tomorrow, I'll post pics then.

And I feel you on the weight deal. I plan on casting them all in order to get the shapes accurate and the weight down, but it is still going to be a good 15 lbs for the whole suit. Here is the last update I have on my armor, I'll get more pictures when I go out to work tomorrow. I have to pace it out with my orders so I usually just time slosh dry times or paint drying to do my own stuff. But without selling things I could not afford this insane hobby.

I just realized I AM one of your orders (I think). You run an etsy store, correct? You're who I came to for the helmet! Without your selling things, I could have no helmet (I have no idea what I'm doing with casting/resin yet, and won't have time to learn until after this is wrapped), so thank you!

Here are my balls atm--they're a little rough and need more trimming.

WS5NzY5.jpg

wqwJS09.jpg
 
You are a customer of mine, I found your thread a while back when I was starting my project and recognized your work the second you showed me it on Etsy. And I get the fear of casting. I have been doing this now for about five years and it has only been in the last two that my best work has come out. That being said, upfront cost is very very high for it. The helmet cost about $20 to make, over a hundred hours because I sculpted it from scratch on a basketball (never do this, it was insane) and about a hundred in sillicone. But hey, I love working with it and I don't ever have to worry that the piece I bring to cons or events is the only one, so if it breaks or is badly damaged, I can always make another :)


Sent from my iPad using Tapatalk HD
 
You're cranking out some quality work! I really appreciate the helmet commission!

If I can figure out how to knock the pauldrons out, I think the rest will be much simpler. The foam doesn't like to take the spherical shape--doesn't really bend in 4 ways, no matter how i heat it. I think I finally got them in shape though.
 
Hi there,

I've completed the costume but am still figuring out how to hold everything in place. For now, however, here's my slightly disheveled costume:

0IqiXEb.jpg
 
This thread is more than 9 years old.

Your message may be considered spam for the following reasons:

  1. This thread hasn't been active in some time. A new post in this thread might not contribute constructively to this discussion after so long.
If you wish to reply despite these issues, check the box below before replying.
Be aware that malicious compliance may result in more severe penalties.
Back
Top