New BMF coming

I've almost completed my revised MPC PE kit so the I would probably just upscale it directly to the BMF scale......all the parts are still applicable and should fit, I'll do some measurements and calculations when i get back from holiday!! Also my drawing program no longer works after updating to OSX yosemite so that's a minor issue for now...
 
Pesky%2Bvarmint%2Blogo%2Ba.jpg

J
 
I just hope this new Falcon represents an established shape of the friggin' thing as far as Hasbro is concerned. After 35 years there is finally a mass-produced MF product with good proportions. If they can't make all the future toys correct then at least they can start with a correct baseline before they do the distorting. Even that would be an improvement.
 
Between this and another thread, ther have been a number of suggestions and paint tests.

Would it be worth the effort to consolidte the infor into a single list? A more methodical way to track results?
 
So I know you guys have been waiting for some results, so here's a quick update:So far it's been 4 days and the paint is preforming well. I did manage to get 4 or 5 TINY chips with my fingernail, but I had to scrape really hard to do it(you can see the scuff marks in the second picture) I repeated the tape tests again with special attention paid to the area of the chips, which we all know is the area most likely to fail. It passed again:)

I'm still not calling this test a success yet, as I haven't waited the recommended 7 day curing time. Also to remember, I didn't prep the surface as recommended either, so PLEASE use this stuff at your own risk.....so many different things factor into this...humidity, temp, and so on, you guys know the drill. I do know this: if this paint continues to perform like this I'll use it in the following manner: Two coats of the whiter satin fusion, two coats of the Tamiya gray surface primer with the final colors(whatever those may be) using Tamiya acrylics.

On to the pics:


You can see the big chip from the first test 4 days ago under the Tamiya primer. it also passed the tape test.

Robert
 
Last edited:
My results with the Krylon Fusion, after 1 or 2 days i could not scratch it off (or the fine primer i applied over the Fusion). The only difference from Roberts above is that i did a wipe down with 91% ISO to clean any possible mold release, as a light scuffing with fine steel wool. The other thing to keep in mind is that i only did a dusting, i mean a dusting of the fusion, from like 12-14 inches away with the Fusion nice and warm so the particles were fine.

I think the dusting works well because a heavy coat of Fusion or any other paint seems to want to "float" on the plastic more than adhere. The fine dusting seems to grab better, there may be some scientific reason but my experience comes only from building resin kits that sometimes have the same adhesion issues.

Again, your results may vary but i have had a successful test IMO.
mike
 
Fusion sounds promising...

If an adhesion acellerator is used first, then the Fusion on top of that, would you be negating the effect of the Fusion since it is now being applied to the acellerator coat instead of directly to the plastic?
 
Ok I have a question,
now I don't know most of the differences between the 2' and the 4' studio models.
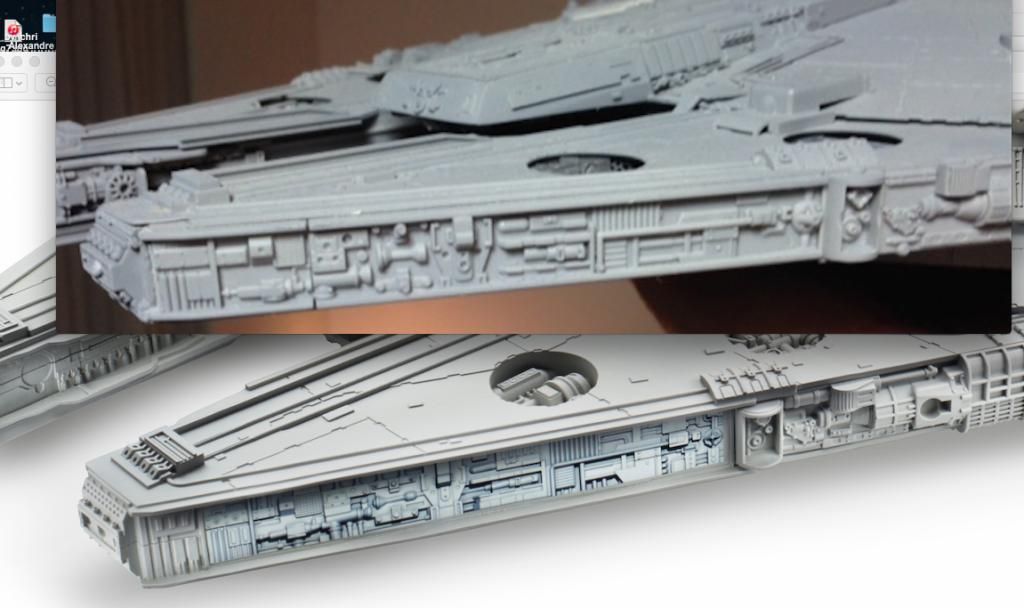
I'm learning, but are the stickers of the side detail accurate in any way?
I want to scratch build the missing details and i would like to use them as a "map"? :)
 
Fusion sounds promising...

If an adhesion acellerator is used first, then the Fusion on top of that, would you be negating the effect of the Fusion since it is now being applied to the acellerator coat instead of directly to the plastic?

Krylon Customer Service was pretty quick to respond to my first question by email, maybe we should give a try on yours:)

What about all the screw holes on the bottom? Instead of filling and sanding, I thought of covering each one with a thin panel of styrene. I know this plastic doesn't take well to sanding and trying to find putty that would stick to it might open up another can of worms:lol

Robert
 
Ok I have a question,
now I don't know most of the differences between the 2' and the 4' studio models.
I'm learning, but are the stickers of the side detail accurate in any way?
I want to scratch build the missing details and i would like to use them as a "map"? :)

It looks like the stickers are based on the 32" model,......I have the FineMolds Falcon which is a model of the 32" ship
Heres a comparison:

comparecopy_zps663b5072.jpg


Thats the only clear image I have of a sidewall,....I'd say the stickers are a safe reference

J
 
Thanks Jaitea,
I can see the last bit on the sticker at the front does not need to be included, apart from that its good basic reference :)
Do you have the finemolds still unpainted?
 
Yep spacebob, at the minute no paint

I can take higher res images of all the walls & post them here, I'll do that today

J
 
This thread is more than 5 years old.

Your message may be considered spam for the following reasons:

  1. This thread hasn't been active in some time. A new post in this thread might not contribute constructively to this discussion after so long.
If you wish to reply despite these issues, check the box below before replying.
Be aware that malicious compliance may result in more severe penalties.
Back
Top