IronManiac
Sr Member
I've been lurking and posting in other people's threads enough, it's time to start my own build thread! I'm putting together Peter Quill's costume for Dragon Con, and if I can finish early enough, for the movie premiere on August 1. I'm starting at the bottom and working my way up.
Shoes:
I started with this photo. I could tell the shoes were separate from the leggings (aka spats). So i went out to Academy looking for hiking boots or workboots that might fit the bill. Then i spotted a pair of Skechers on the wall. The sole looked similar to the photo i had saved on my phone. Same 3 diamonds on the sides, pebbly texture on the bottom. After some more digging I came across some Skechers that are pretty similar.


Amazon.com: Skechers Men's Diameter-Garzo Loafer: Shoes Skecher Diameter Garzos. They have the same sole, same toe detail, and same dark leather. I ordered a pair, and they're comfortable. I've been wearing them to work all this week.
Spats:
I've contacted a craftsperson on Etsy, they are going to make them out of leather for me. I'm no seamstress, and I don't want to blow money on leather i'm just going to ruin. I'll post pics when i get them.
Blasters:
Ordered a pair of these: Amazon.com: Marvel Guardians of The Galaxy Star-Lord Quad Blaster: Toys & Games
Here they are. I plan on painting them up with silver and black. They're the right size for an adult hand, they're pretty accurate to the movie, and I think they'll work.


Jacket: I've ordered from fjackets so now i'm just waiting for it to arrive.
Guardians of the Galaxy Chris Pratt Jacket as Peter Quill / Star-Lord
Pants and shirt:
I've found some pieces at department stores, but i'm not sold on them. I'll keep shopping. The pants are most likely custom. But I think they were inspired by pants that motorcycle riders wear. Unfortunately, the pants i've found that are kinda close are also REALLY expensive. I'm not blowing $300 on a pair of pants!
Boot Rockets:
This is where i've spent the majority of my time so far.

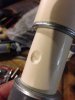
I had alot of ideas on how to create the rockets. Originally i had planned on using a lathe to make the rocket out of wood, carving the details but I couldn't get a hold of a lathe. Next I spent some time at home depot, looking at pipe fittings and various pieces from the plumbing department. I cut up some pipe fittings to size, superglued them all together, and I ended up with this.

Rocket prototype A. It turned out OK. I was happy with the detailing and overall shape, but my cuts weren't super-straight, so as you spun the rocket around, it was crooked and wonky. My plan for this was to buy some casting materials and cast 4 rockets. But casting materials is hard to get, and pretty expensive. I realized I could probably just build out 4 rockets like this from spare parts and then just paint it all. So back to home depot. Prototype A was a little heavy, the metal washers i used to make up the details in the center added to the weight. I came home with these pieces.

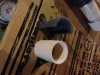
I cut the pieces by hand with a hacksaw. If you have a band saw, i highly recommend that instead, the cuts are hard to make perfectly straight. I used a palm sander I had to try to get the cuts straight. Using super glue and washers between the pieces for stability, I ended up with this.

You can see the finish nails in front, I clipped the nail points with some wire cutters and then just super glued them in. The pipe fitting already had some lines embedded in, so i just spaced them in between each of those. I think it gives it some nice detail. Once i paint them, i'll dry brush some black in to the crevices to bring out that detail. I made these for about $30 including superglue.
Next, the center piece of the rockets. I thought about pepping them from foam, but the rockets were a little heavy, and foam wouldn't be strong enough. I decided that wood would probably be the easiest to work with. Home depot had 1 inch square dowels already. So i spent some time looking at detail photos and set to work sketching up the pieces. They had some bevels on the sides, the curved point at the top had bevels too. So after measuring the photos against the rockets i made, i started working on the bench sander.


For the first side bevels, i did one long piece, then cut it in half to make the two pieces i needed. I sketched out the nose of the piece on the wood, then went back to the sander and ground it down. They turned out pretty good i think.

For the detailing in the middle, i plan on cutting that from foam as it's easy to manipulate. They're coming together nicely.

I'll keep updating my progress here. Thanks for looking.")
Shoes:
I started with this photo. I could tell the shoes were separate from the leggings (aka spats). So i went out to Academy looking for hiking boots or workboots that might fit the bill. Then i spotted a pair of Skechers on the wall. The sole looked similar to the photo i had saved on my phone. Same 3 diamonds on the sides, pebbly texture on the bottom. After some more digging I came across some Skechers that are pretty similar.
Amazon.com: Skechers Men's Diameter-Garzo Loafer: Shoes Skecher Diameter Garzos. They have the same sole, same toe detail, and same dark leather. I ordered a pair, and they're comfortable. I've been wearing them to work all this week.
Spats:
I've contacted a craftsperson on Etsy, they are going to make them out of leather for me. I'm no seamstress, and I don't want to blow money on leather i'm just going to ruin. I'll post pics when i get them.
Blasters:
Ordered a pair of these: Amazon.com: Marvel Guardians of The Galaxy Star-Lord Quad Blaster: Toys & Games
Here they are. I plan on painting them up with silver and black. They're the right size for an adult hand, they're pretty accurate to the movie, and I think they'll work.
Jacket: I've ordered from fjackets so now i'm just waiting for it to arrive.
Guardians of the Galaxy Chris Pratt Jacket as Peter Quill / Star-Lord
Pants and shirt:
I've found some pieces at department stores, but i'm not sold on them. I'll keep shopping. The pants are most likely custom. But I think they were inspired by pants that motorcycle riders wear. Unfortunately, the pants i've found that are kinda close are also REALLY expensive. I'm not blowing $300 on a pair of pants!
Boot Rockets:
This is where i've spent the majority of my time so far.
I had alot of ideas on how to create the rockets. Originally i had planned on using a lathe to make the rocket out of wood, carving the details but I couldn't get a hold of a lathe. Next I spent some time at home depot, looking at pipe fittings and various pieces from the plumbing department. I cut up some pipe fittings to size, superglued them all together, and I ended up with this.
Rocket prototype A. It turned out OK. I was happy with the detailing and overall shape, but my cuts weren't super-straight, so as you spun the rocket around, it was crooked and wonky. My plan for this was to buy some casting materials and cast 4 rockets. But casting materials is hard to get, and pretty expensive. I realized I could probably just build out 4 rockets like this from spare parts and then just paint it all. So back to home depot. Prototype A was a little heavy, the metal washers i used to make up the details in the center added to the weight. I came home with these pieces.
I cut the pieces by hand with a hacksaw. If you have a band saw, i highly recommend that instead, the cuts are hard to make perfectly straight. I used a palm sander I had to try to get the cuts straight. Using super glue and washers between the pieces for stability, I ended up with this.
You can see the finish nails in front, I clipped the nail points with some wire cutters and then just super glued them in. The pipe fitting already had some lines embedded in, so i just spaced them in between each of those. I think it gives it some nice detail. Once i paint them, i'll dry brush some black in to the crevices to bring out that detail. I made these for about $30 including superglue.
Next, the center piece of the rockets. I thought about pepping them from foam, but the rockets were a little heavy, and foam wouldn't be strong enough. I decided that wood would probably be the easiest to work with. Home depot had 1 inch square dowels already. So i spent some time looking at detail photos and set to work sketching up the pieces. They had some bevels on the sides, the curved point at the top had bevels too. So after measuring the photos against the rockets i made, i started working on the bench sander.
For the first side bevels, i did one long piece, then cut it in half to make the two pieces i needed. I sketched out the nose of the piece on the wood, then went back to the sander and ground it down. They turned out pretty good i think.
For the detailing in the middle, i plan on cutting that from foam as it's easy to manipulate. They're coming together nicely.
I'll keep updating my progress here. Thanks for looking.
Last edited: