How do you eat and elephant?
One bite at a time.
That's how I approached my first scratch built prop.
I've always coveted the Stormtrooper blaster from Star Wars, so after much research and preparation, I decided to build my own. This was to be my first time dipping my toe in the waters of serious prop building so I was nervous. I've done a couple of kits before but nothing on this level.
I've been lurking on this site for a couple of years and made a post or two here and there but I have decided to share my work with you. I have found other people's build threads to be immensely helpful and I was able to learn a lot from those who have done this before.
I knew before I started that I wanted a high level of screen accuracy but I was willing to make some compromises. At the end of the day, this was to be for my own enjoyment, so if something was not 100% accurate, I would be ok with that.
So here goes:
I started with the steel pipe and pattern from Unique Canes. I tried printing my own pattern but I couldn't get the sizing right. However, I did reference the measurements on the other patterns I had. You can see them in the background of this first photo.

Many drill holes later:


You can see here that it's starting to come together. I wanted to maintain the integrity of the front sight and muzzle tip so I decided to try something a bit different than what I had seen before.

I got my L2A3 parts from Apex Gun Parts and cut the front of the barrel and muzzle to fit together like a puzzle.


A little JB Weld worked well to marry the two pieces together. This is for display purposes only so I felt that the JB Weld would do a good job holding everything together.
I also made a kind of rudimentary barrel to help hold things in place. It's a bit of 3/8 inch brass tube cut to length. Don't laugh. It worked!


I cut the magazine down to size. I left it slightly longer than movie canon just because I liked the longer look.


Next came the scope rail. Thank you 8th grade metal shop! I finally had a use for those skills after all these years. I beveled the front because I liked the look. Also, because the bend looked sort of funny. I like the hard edge the bevel makes. I looks way better painted")


The next photo is a mock up of the fit. I decided to go with an M38A2 scope for a couple reasons. First, I like the little light bulb greeblie on the top. I know it's non-canon, but maybe all Stormtroopers don't shop at the same scope store. I thought it added an interesting visual element that I liked. Second, I had a heck of a time finding a real M38 or M19 scope for a reasonable price. They pop up on the bay with regular frequency, but I am sticking with my M38A2. I think it looks cool. Plus, it makes it my own.


A little paint makes all the difference!

I added a real Hengstler counter (Thanks Odiwan!) and adjusted the numbers to a familiar setting.


I got some rubber T-Track from Blast-Tech and put it on. It was fairly easy to work with but it required a lot of patience. I used JB Weld but I wish I had used something different. It worked out ok in the end and it's solid for display purposes, but I think a rigid style T-Track might have been easier to manage during the assembly process. I must admit, I do like the feel of the rubber grip though. It's nice.

Here you can see the tips of the T-Track. I cut them to fit and some turned out better than others. You can also see the payoff with my puzzle piece fit for the muzzle tip. Not bad I think.

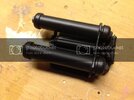
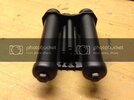
So that's it. Thanks for reading to the end. I will post my progress for the "power cylinders" next.
One bite at a time.
That's how I approached my first scratch built prop.
I've always coveted the Stormtrooper blaster from Star Wars, so after much research and preparation, I decided to build my own. This was to be my first time dipping my toe in the waters of serious prop building so I was nervous. I've done a couple of kits before but nothing on this level.
I've been lurking on this site for a couple of years and made a post or two here and there but I have decided to share my work with you. I have found other people's build threads to be immensely helpful and I was able to learn a lot from those who have done this before.
I knew before I started that I wanted a high level of screen accuracy but I was willing to make some compromises. At the end of the day, this was to be for my own enjoyment, so if something was not 100% accurate, I would be ok with that.
So here goes:
I started with the steel pipe and pattern from Unique Canes. I tried printing my own pattern but I couldn't get the sizing right. However, I did reference the measurements on the other patterns I had. You can see them in the background of this first photo.
Many drill holes later:
You can see here that it's starting to come together. I wanted to maintain the integrity of the front sight and muzzle tip so I decided to try something a bit different than what I had seen before.
I got my L2A3 parts from Apex Gun Parts and cut the front of the barrel and muzzle to fit together like a puzzle.
A little JB Weld worked well to marry the two pieces together. This is for display purposes only so I felt that the JB Weld would do a good job holding everything together.
I also made a kind of rudimentary barrel to help hold things in place. It's a bit of 3/8 inch brass tube cut to length. Don't laugh. It worked!
I cut the magazine down to size. I left it slightly longer than movie canon just because I liked the longer look.
Next came the scope rail. Thank you 8th grade metal shop! I finally had a use for those skills after all these years. I beveled the front because I liked the look. Also, because the bend looked sort of funny. I like the hard edge the bevel makes. I looks way better painted
The next photo is a mock up of the fit. I decided to go with an M38A2 scope for a couple reasons. First, I like the little light bulb greeblie on the top. I know it's non-canon, but maybe all Stormtroopers don't shop at the same scope store. I thought it added an interesting visual element that I liked. Second, I had a heck of a time finding a real M38 or M19 scope for a reasonable price. They pop up on the bay with regular frequency, but I am sticking with my M38A2. I think it looks cool. Plus, it makes it my own.
A little paint makes all the difference!
I added a real Hengstler counter (Thanks Odiwan!) and adjusted the numbers to a familiar setting.
I got some rubber T-Track from Blast-Tech and put it on. It was fairly easy to work with but it required a lot of patience. I used JB Weld but I wish I had used something different. It worked out ok in the end and it's solid for display purposes, but I think a rigid style T-Track might have been easier to manage during the assembly process. I must admit, I do like the feel of the rubber grip though. It's nice.
Here you can see the tips of the T-Track. I cut them to fit and some turned out better than others. You can also see the payoff with my puzzle piece fit for the muzzle tip. Not bad I think.
So that's it. Thanks for reading to the end. I will post my progress for the "power cylinders" next.
Last edited: