MK38 Igor build (04/29> Painting and detailing)

laellee

Master Member
RPF PREMIUM MEMBER
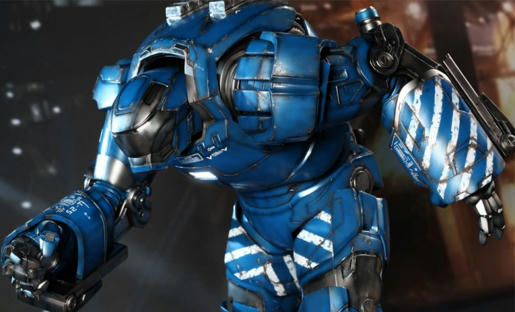
Hey there everybody. I usually don't start threads for commission builds, but this one will have quite a few features and 'toys' added that hopefully makes it a bit more fun to check out progress on. This will be a full suit build, so I'll also be finish detailing, painting, adding electronics, etc.... Fun stuff. Final look will be along the lines of this:


First off, the size of the suit... The finished suit will stand between 6 1/2 - 7 feet tall, so not quite as tall as an actual Igor, but still significantly taller than the average Iron Man suit. I went with this scale namely to allow the suit to still be wearable without modifying the proportions or stretching/shortening/ mucking up any parts. I want the wearer to have to fit for Igor, not the other way around. The suit will use about a 4-5" lift and arm extensions, more about that stuff later though.

To kick this off, I got the extracted Igor model from the Iron Man 3 mobile game. Thanks to Balmung for posting those up quite a while ago, this model (and several other suits) can be found in his thread here: http://www.therpf.com/f78/iron-man-3-armors-3d-models-release-reference-foundation-183705/

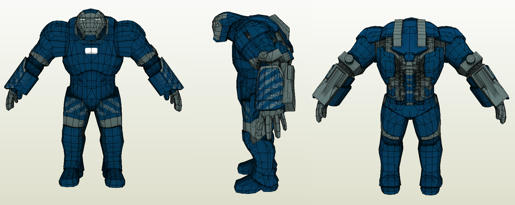
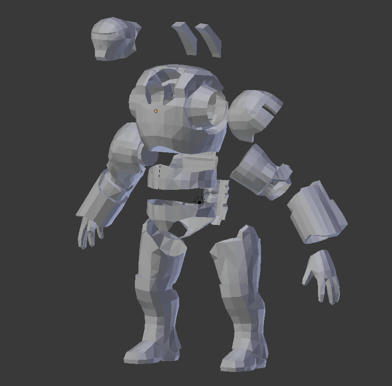
These models are fairly low-poly, but a great starting point. I applied the texture to the base model in Blender, and then used that texture as a guide to add more details to the suit. I also cut up and modified the individual suit parts to make them more suitable for cosplay.

Low poly model exploded


I then applied the wearer's measurements to a digital mannequin of him, and used that to determine the best scale for the suit:


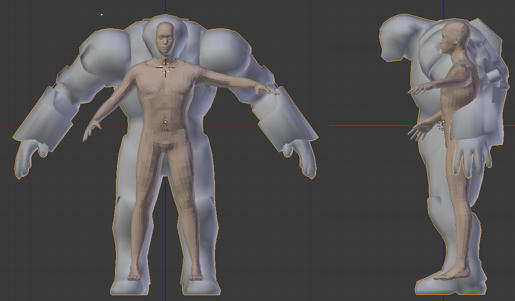
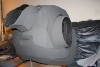
Now it doesn't take a rocket scientist to see that there will be some vision, height, and arm control issues to overcome. I've already got those things worked out, but it'll be a bit of time before we get going on that stuff. For now, A productive Sunday has gotten me a basic upper torso completed:


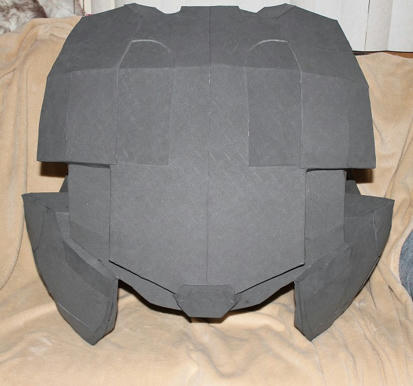
I've got a feeling that this is going to be a BLAST to finish. This torso section alone is already over 2 1/2 feet tall, I could easily fit another Iron Man torso inside with room to spare... :)
 
Last edited:
Re: MK38 Igor build

Yeah, I figured you'd like this one. :) I've been feeling pretty burned out on the usual Iron Man builds lately, but this one feels like a change of pace, more like an Iron Man Space Marine :lol
 
Re: MK38 Igor build

This is just what we all need.....a change of pace and for someone push the limit. This is going to be a kick ass build dude, I can feel it!

Now, to find Andre the Giant so he can wear it!!!
 
Re: MK38 Igor build

Never really understand why people would want to wear an Igor suit when you need to be a hunchback for it to fit properly.

Hope it looks cool at least. Will be watching.
 
Re: MK38 Igor build

This is just what we all need.....a change of pace and for someone push the limit. This is going to be a kick ass build dude, I can feel it!

Now, to find Andre the Giant so he can wear it!!!

No worries, the guy who'll be wearing it is 6' tall. It'll work.

Never really understand why people would want to wear an Igor suit when you need to be a hunchback for it to fit properly.

Hope it looks cool at least. Will be watching.

Once again, no worries. Look at the mannequin renderings in the first post; just because Igor's head is way out front, doesn't mean your head has to go there. :thumbsup It'll all make sense in a while :lol
 
Re: MK38 Igor build

Maybe we will see a camera at eyes and a monitor in front of wearer's head a la VR? ;-) at least there's enough space

Gesendet von meinem GT-I9305 mit Tapatalk
 
Re: MK38 Igor build

as a lurker for the past several months i've been able to pick out the members of this forum that stand above the crowd - all i can say is this build is in very capable hands. i look forward to following your progress. will you be adding any tutorial type stuff for the tricky parts once you've crossed those bridges?
 
Re: MK38 Igor build

Thanks guys for looking, I appreciate it :)
Dadatown: I started a thread for this build (with the suit buyer's permission of course) specifically to show a lot of the less main-stream stuff you can put into a build to make it unique, such as larger shoe lifts that are safe, non-arduino animatronics, lightweight cooling and ventilation systems for larger suits, and yes, auxiliary camera installs for setups that have poor field of vision. :thumbsup I'll try to explain the steps I take, but if anybody has a question, feel free to ask. I DEFINITELY would not be building something like this if I didn't know how to make it work :)

So I got the arm-rings built and slid into each side of the torso, and the reactor opening framed out. The size of the build means that the reactor and repulsors are a bit larger than usual, so I will be scratch-building those to fit. I also got the initial lower neck section roughed out and taped in place:

ejws02kolxc8s824g.jpg


The neck opening in the chest is closed right now to help keep the rigid shape of the torso; once i get the upper torso reinforced a bit then the neck area can be trimmed out and fit properly. Some of the panel lines are already worked into the basic shape, but the majority of finer details and hardware will be added after the basic suit shapes are finished and trouble-shot (if that's a word). I should have put something in pics to give a better idea of the size, anyways that's a 4" glue stick propping up the torso in the picture.

I'm hoping to get the helmet built tomorrow and sized to the neck. The torso looks a lot better now with at least a neck stuck on it, before that I thought it looked like the top half of Humpty Dumpty's overalls... :facepalm

Thanks again for looking.
 

Attachments

  • ejws02kolxc8s824g.jpg
    ejws02kolxc8s824g.jpg
    53.6 KB · Views: 93
Last edited by a moderator:
Re: MK38 Igor build

:lol Well you know I wouldn't be planning to put repulsors in the gloves if they can't be used :)
 
Re: MK38 Igor build

stupid question. . .how do you plan to deliver/send/ship/transport this suit when it's done? :confused

honestly, after seeing your latest progress. . .i want to build one too :lol
 
Re: MK38 Igor build

your builds are super clean! very cool!

Thanks Mig!

stupid question. . .how do you plan to deliver/send/ship/transport this suit when it's done? :confused

honestly, after seeing your latest progress. . .i want to build one too :lol

You should, this thing really grows on yah.

And yep, the shipping was a HUGE concern before I took this on, as it'll be traveling to the other side of the US. I keep all of the components modular, so the suit can be broken down into forearms-biceps-cod-chest-etc.... just like I would a regular scale suit. The chest itself is the biggest single piece, but it will still fit in a 2 foot square box. I pack other components inside the larger pieces if they'll fit (I wrap them first), and then box it up. We're guessing this will have to go in 4-5 boxes total, to keep each package size down. At least the stuff will be light :lol
 
Re: MK38 Igor build

Are u going to use animatronics? I've seen a grunt costume from mass effect in comicon movie episode 4. Maybe it will help :-D

Gesendet von meinem GT-I9305 mit Tapatalk
 
Re: MK38 Igor build

Are u going to use animatronics? I've seen a grunt costume from mass effect in comicon movie episode 4. Maybe it will help :-D

Gesendet von meinem GT-I9305 mit Tapatalk

Not much for animatronics in this suit hopefully, but there should be some stuff. I've just gotta get the main components built before I can start working out the interactions. :)

Speaking of main components, got the rough head assembled and stuck (quite crookedly I might add) on the torso to get an idea of proportions and placement. The faceplate is separate (just taped in place for now), but don't ever expect a head in there; Keeping it removable for now will make installing the LEDs a lot easier than working from the back.


The head itself is over 14" wide, with the spacing between the eye centers 6 1/2", so needless to say I'll have to make my own LED eye installation fit.

Thanks for looking!
 
Re: MK38 Igor build

Added the back bars... These will serve double-duty as the air intakes and housings for the cooling fans; the notched panel in each face will be replaced with a grate before more detailing is added to hide the openings. The fans aren't too loud, but keeping them outside of the main torso will cut the noise down even more:


I also started getting the LEDs together for the eyes, arc, repulsors, etc....


All of the lighting will be wired back to a single dashboard so each area can be independently conrolled via switches.

I'm hoping to get the shoulders banged out tomorrow afternoon, along with the addition of reinforcements to the upper torso.
 
Re: MK38 Igor build

Regular work got into the way, so the shoulder bells will have to wait for another day. In the meantime, I got to work on the LED eyes.

LED CANNIBALIZING
For Igor's eyes, the LEDs need a pretty large gap between them to fit properly. Sometimes, if I can find an easily available pr-emade LED assembly, I find it saves some time and labor to cannibalize a flashlight or worklight and use it's components. It's cheaper for me to build from scratch, but this method saves a bit of soldering, tracking down resistors, etc....

For Igor's eyes, I picked up one of these NEBO 8 LED magnetic work lights at the local Radio Shack for 10 bucks:


These are powered by 3 AAA batteries, and put out 60 lumens, so this is plenty bright for my eye LEDs. After a little prying and screwdriver, I was able to get the LED board out of the light. One end has a copper contact strip soldered on, the other a short lead with a switch. By looking at the wiring and flashlight itself, I could see that the positive terminal power runs into the board through the switch end. Important to know, as I want to wire my power the same later.


Here's a (poor) diagram of the LED board. My intention is to split this up into two sets of 4 LEDs, one for each eye. By looking at the circuit traces and solder points on the board, I can see that the positive comes in through the switch, and then feeds one post of each LED. The negative comes in on the other end, passes through a resistor, and then connects to the other post of each LED, completing the circuit:


To mod the circuit for Igor, I want to split the LEDs into two groups of 4. So I snip 'em:


By cutting the board in two, I broke the two electrical traces that connected the LED circuit on the top and the bottom. To reclose the circuit, and also give me the space between the eyes I need, I then soldered in a couple of new leads to bridge the previously-cut gap. While I was at it, I also removed the switch and copper contact strips from each end, and soldered on my own clean LEDs:


Once I finished that up, I hot-wired power off of the original flashlight batteries just to make sure it was working:


So now I've got some eyes. I just need to clean these up, build a couple of enclosures, add the translucent covers, and install. If I wanted a very simple powered system, I could pick up a battery pack with switch to hold the flashlight's 3 original AAAs, and wire it right in. Just be sure to secure all your components (and solder points) well, to keep them from failing later.

I also ordered another LED assembly that was the correct size for my rectangular reactor, and added my own leads to power it. Sometimes the boards will already be labeled for the power inputs, like this one. It's nearly impossible to see in he pic, but the positive and negative inputs were labeled B+ and B-, respectively.


There you go, cannibal electronics. I'm sure I'm forgetting a bunch of important stuff, but this gives you a general idea of what you can do. Just keep in mind, trying to use different power sources can cause your electronics to fail or burn out, so it's easiest and the most reliable to use the same power supply your LEDs ran off of originally. Thanks for looking, it's time for me to go cut some shoulders out. :thumbsup
 
This thread is more than 5 years old.

Your message may be considered spam for the following reasons:

  1. This thread hasn't been active in some time. A new post in this thread might not contribute constructively to this discussion after so long.
If you wish to reply despite these issues, check the box below before replying.
Be aware that malicious compliance may result in more severe penalties.
Back
Top