After reading Risu's post I admit that my point of a wool hood mostly stems from the other games, which were set in much different times and locations so the materials made sense. In the Caribbean seafaring setting, maybe not so much.
The denim/dungaree idea is mostly because I found it to look very similar and it matches historical dates. Not much else going for it there
")
If you haven't already you could play the game and see what it looks like in engine.
I haven't personally played it so I can't really comment on it, but like Risu said it might be much more obvious when the character is actually moving.
Do keep in mind though that fabric is really difficult to animate and simulate in real time, and they might have taken liberties with it to avoid bogging down the engine. Thus in-game animation might not be the best representation of what material it is.
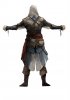
The aspect which worries me the most is the creation of the hood and the white and denim "coattails"; I believe these features will either make or break an Assassin's Creed cosplay. Is it just a case of cutting and sewing the materials? I will certainly play around with various materials, assuming money is not an issue.
I think you are right in the notion that both the hood and the "coattails" are important details. They seem to have been present in some form throughout the series (not really sure since I'm no connoisseur of the series) and they've become familiar parts of the costume.
In a way it
is just cutting and sewing, but it's one of those things that is at the same time very simple and very difficult.
Coattails: The white "tips" at the center would be most easy to add on top of the blue material. That way the double layer makes it more willing to stay in shape, and you don't have to deal with fitting the edges of two pieces together.
I don't really have a good way of writing how to do this. The simplest way to explain it is if you look at the back view and make the coat with all blue fabric. Then add a layer of white fabric on top of the blue at the edge, and close of the seams on either side (where the white fabric and the blue fabric meet) by folding it in and sewing it down with the outside up so that you can see what you're doing.
Hood: It seems to be made out of 3 pieces. The two side pieces seem to be a very simple pattern of a quarter circle each, sewn together at the top where the curve is, and then they've added what looks like a somewhat lopsided diamond shape at the back to broaden it some more.
At first I thought that was it, and that would mean that the side pieces were somewhat curved at the bottom, but I believe that there is one or a pair of pieces that the top 3 are sewn to. I can't find a good reference from the front, but the concept art showing the back shows what looks like a seam between the diamond shape and the shoulder pieces. This would be more easily made if the shoulder pieces were separate from the side pieces as well, so that this seam goes all the way to the front.
This is confusing just to write and probably incomprehensible to read. I'll get you some reference images with arrows or something.
The actual sewing of the hood should not be too difficult. The top seam and the back seams with the diamond looks like the pieces were just sewn together back to back, then the seam was pressed flat with an iron to either side and then the edges were sewn down. I've found that this makes the seam much less rigid and it makes the piece look better when finished.
The front of the hood looks like it's either lined with a strip of the same fabric, overturned and sewn down or it's lined all the way inside with the same fabric.
Concerning reinforcing the hood I'll have to disagree with vargatom somewhat. It is completely possible to get the triangular shape without any hidden wires, at least in real life. It all comes down to what cut and fabric you use, as well as how you treat it afterwards.
Several years ago I made a cloak in heavy wool and I wanted that shape, so I planned on fitting metal wire into the edge to shape it, but the hood stayed in that shape no matter what I did without the wire.
The only way to make it not look like that was for it to be crushed for days under something while it dried, but if it was ironed and put back on it resumed the same triangular shape again.
Sadly, since then I've removed the hood from the cloak because a hat was warmer, but I still have the pieces (the fabric was expensive) so I can see if I can put it together again to show how it looked.
What's important to note though is that this was made out of heavy wool, which falls different to cotton or linen. It might be necessary to hide wires or back the hood with heavier fabric or the same fabric if you make your hood out of those materials, as they're much lighter and don't hold themselves down the same way. It's also important that you wash and iron your piece a couple of times to limber it up, because this mechanically softens the fabric and removes any chemicals that keeps it stiff and shiny. The ironing is important to remove creases, as light cotton and linen isn't heavy enough to pull these straight by their weight alone, and creases can hold fabric up in weird ways, kind of like origami folding or corrugated iron makes those mediums more stiff.
Also remember to wash your fabric before cutting or sewing, so that the finished piece won't shrink on you. That's not fun.
Before washing it you should zig zag the edges of the fabric to eliminate any fraying that might occur.
Pleather can work well, but keep in mind that it's an artificial material and as such does not respond to weathering, shaping or coloring the same way real leather does. It does have the advantage of a cheap price though.
Concerning the weapons, I was considering making them however again I have no expertise in this field, and simply purchasing a look-alike would be too expensive or (if made from cheaper materials) would not look the part, so I will have to give that a good think. I was also thinking of buying a replica 'Black Flag' hidden blade which I found on eBay a few days ago.
Weapons: What tools and how durable of a work area do you have available?
The hidden blade is most likely best purchased, at least if you want it functional. Not saying that it's impossible to make, just that the project alone is enough to last months. I'm always really impressed when I see people make an accurate replica that's actually functional.
I've never tried to do a sword realistically or with that kind of detail though.
This could be of interest to you.
Forge a Paper Sword
If you want it even smoother you could cover it in paper clay and sand it, or add gesso (kind of like a mix of glue, filler and white paint) which can be wet sanded to the point where it looks and feels like porcelain. Venetian masks are often covered in it.
I do believe there are recipes for it, and it's more of an issue of keeping at it and working with it until it looks good rather than pure skill, so you don't really have to worry about being to inexperienced.
A paper sword would not hold up for dueling though, so keep that in mind.
For the pistols, I've given it some thought. There are some variations of ways you could make these with pretty simple and cheap tools and materials, but it will cost you time and some hard work to get them looking really good.
These different ways share materials, but they alternate somewhat in how the end result is achieved.
First the wooden stock
Tools: Drill with the right diameter bit, coping saw, rasp, file, sandpaper.
Material: Thick wooden board, wood varnish, linseed oil?
Sketch out the profile with some room to spare at the top, then bore a hole with the diameter of the barrel in the right spot.
After that you saw the profile out with a coping saw and then go to town with the rasp to shape the piece. Make sure to use gloves as a rasp will easily turn on you and take your skin off if you slip. Take it from someone with experience in the matter.
After the general shape is there you move onto a file to smooth out the teeth marks left by the rasp. After that you sand it to smooth it out. Paint with vanish and maybe oil it with linseed oil.
This way of doing it is probably close to how the real thing would've been made back in the day. It takes some effort and manual labor to get there but it does not require any powertools, although a power drill does make it much easier to get the hole without a sore back.
You do need some kind of workshop for this though, because this will leave a lot of wood dust and other stuff that you don't want in your living room.
If you have no area to use as a workshop you could make it with expanding foam or styrofoam and then cut and sand it down, cover it in paper clay, filler or spackle and then paint wood texture on it. The downside to this is the wood grain that you get for free (minus all the work and sore hands that is) when you make it from actual wood, and the finished piece might feel somewhat light, but this could be a plus when you consider that you're going to wear it.
For the metal parts you could start with cardboard models for the complex parts, wooden dowels for the small pipe under the stock and pvc piping for the barrel, which you then reinforce and build from with paper mache and paper clay to get the right shapes. When the general shapes are there you have some options:
1.Add details with thin cardboard cut into profiles, and then paper mache over it to make it more uniform.
2.Add details with relief paint.
3.Cover the whole thing in a thin layer of paper clay and then push the lowered sections in with a thick, blunt needle, dowel rod or similar. Keep the clay moist and workable by spraying water on it occasionally.
4.Mix and mash the above techniques.
To avoid making the same thing twice you could then make a mold of it and cast it in resin, or if you're up to it, pewter.
If you go with the second option you'll need to get a lot of pewter which might be costly, but with some patina it could look amazing, especially if you decide to make the stock out of wood. It will be rather heavy to carry though, but that would be pretty accurate.
I'll try to illustrate the more abstract ideas.
Just tell me if anything is unclear and I'll add that to the illustrations.


.jpg")
.jpg")
.jpg")
.jpg")
.jpg")
.jpg")