Studio Scale Shuttle Tyderium build thread/build quide

mslz22

Sr Member
RPF PREMIUM MEMBER
So finally getting some time to get cracking on this build/quide, thanks to everyone for being patient that has been waiting for this. It will likely take me about a month to get thru all this but by the time that it is done I should be able to sort out if anything is missing from my release of the kit. While this is specific to my release it should help out anyone with the older releases. A couple of notes before i go forward.

1. There is a cockpit interior add on kit in the works, actually 3 versions. One based on the full size set with a rebel crew, one full size with the bad guys, and hopefully one actual studio interior. All versions will come with smoke glass window. Price is TBD, but will not be much, just enough to cover my cost, paying for the pattern+materials.
2. I am considering offering this kit with NO WINGS, basically a scratchbuilders starter kit. It would have almost everything but the wings. This would allow me to offer this to people at lower cost, and allow people who want acrylic or styrene wings to get the parts that are a bit trickier or time consuming to build. If that interests anyone please chime in here so i can gauge interest. This version with the wings will still be available of course.

So with that being said, here we go.

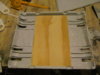
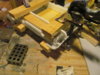
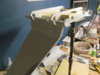
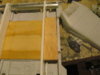
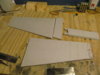
You don't need to go with this order but I'm starting with the wings. My version has the lower wings in 2 parts each instead of 1. This allowed me to cleanly run metal thru both the upper and lower portions of these wings, it also helped with the configuration of the molds to keep each wing portion dead flat. These wings are cast with about 20% aluminum fill in them, so while they are heavy they should be pretty stable over time. I know that fiberglass is lighter, but fiberglass comes with it's own set of issues production wise.

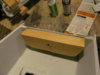
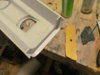
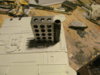
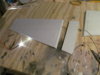
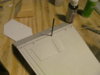
First I clean up the wings and trim back the metal tubes except for the one that is at the very top. I made sure that none of the metal is proud by giving it a once over with a metal file.
 

Attachments

  • 011.JPG
    011.JPG
    3.1 MB · Views: 265
  • 010.JPG
    010.JPG
    3.3 MB · Views: 256
Next up is to run some wires for the wing tip lights. The metal rod may have some resin in it from being cast, but a quick shot with a 1/8 drill bit will clear it out, you will need a 12 inch drill bit. You can also dremmel a channel in the edge of the wing that gets covered by the greeblie detail strip. After running the wire i do a quick LED test to make sure i did not damage the wire.
 

Attachments

  • 015.JPG
    015.JPG
    3.3 MB · Views: 217
After it's all nice and cleaned up i get ready to tack the 2 parts together, I made a little jig to use as a set of helping hands to glue up the panels. I checked with wings out before modding the pattern, i got about a 45 to 48 degree angle for the wings, that's what i set my miter saw at to make these little wedges to hold up the upper panel. I don't really know if the studio model is at 48 degrees, but i put a compass up to a photo and got just about that 48 degrees, i know 45 would make more sense but that is what i got, anyone with better knowledge please chime in.

By using the jig it allows me to be able to put a few small drops of CA on the wings, let it set up, check it, go back and really get some zap a gap on there to get it really secure.
 

Attachments

  • 020.JPG
    020.JPG
    3.4 MB · Views: 234
I'm not going to trust the joint to just glue alone, so i mark 5 locations that do not interfere with details and drill a 3/32 hole thru the lower wing to the upper wing, mind the angle so you don't drill a hole thru the upper wing. I then use a 1/8 drill bit to make a little countersink for the brass pins. That also gives a little place for apoxy sculpt to dig in for clean up.
 

Attachments

  • 022.JPG
    022.JPG
    3.2 MB · Views: 209
  • 023.JPG
    023.JPG
    3.1 MB · Views: 206
Awesome, Mike!
Excited to see what you do.
I'd love a builder's kit one of these days. I know a fella on these boards who just got a BIG laser cutter and I bet he could crank on the wings...
 
Awesome, Mike!
Excited to see what you do.
I'd love a builder's kit one of these days. I know a fella on these boards who just got a BIG laser cutter and I bet he could crank on the wings...

id love to be on that list :)
if you or he makes a run on these PLEASE add me
 
Wow instruction build thread by Mike,would be great to following this,sweet:thumbsup
Yea,laser cut acrylic wings would be lovely.

Don
 
Hey guys, yeah laser cut wings would be a good option for those who are inclined to make the wings themselves. It's a option that i am also considering with the x wing fuselage, I'd like to offer up just the parts that are difficult to scratch, or rare kit parts like the sealab stuff. I know that there is more than a few people here that like to put there personal touch on stuff by doing some of the scratchbuilding themselves. It also allows me to offer stuff up much more cost effective on my end. the $ may wind up going to buying Sat V parts and such but then your build will have some real kit parts on it and not resin.

Anyway back to the shuttle.

All owed kits and the first few of my release for this went out with acrylic parts for all of the following. All those were left over parts that Steve sent me, from now on i will be sending out the armature parts in either 1/4 inch plywood, like here for the floor, or this High Density resin for the crossbeams, with has the same strength of acrylic. Couple of reasons, allows me to offer it up cheaper, and i find both of these materials plenty strong and a bit easier to work with in regard to drilling etc. Even going slow i cracked the acrylic parts when i tried to put together my Nice-n one, both the floor and the cross beams.

First up is the new floor in place. Next I test fit the cross beams and square them up with some machinist blocks. I also made an additional wood block that will accept the coupler for the gas pipe stand. It may be overkill, and it's not included in the kit, but it's just made out of scrap from around the shop.
 

Attachments

  • 003.JPG
    003.JPG
    3.5 MB · Views: 219
  • 001.JPG
    001.JPG
    3.2 MB · Views: 234
  • 005.JPG
    005.JPG
    3 MB · Views: 250
008.JPGUsing 5 minute epoxy you need to work a little quick. I mixed up 3 batches one after another, one for the floor then 2 for each crossbeam. You have some time but need to have everything ready to go. I make sure to coat both sides of the crossbeams. I then set up a clamping jig, again using scrap from the shop, this distributes the clamping pressure evenly and protects the detail on the bottom. I insert the 3/4 inch rods for the wing mechanism for alignment but DO NOT GLUE them in, it's just to check the full alignment.

- - - Updated - - -

The clamping jig all set up. Be sure to remove your blocks before the squish out makes them a permanent resident in your shuttle.
 

Attachments

  • 012.JPG
    012.JPG
    3.6 MB · Views: 207
  • 013.JPG
    013.JPG
    3.7 MB · Views: 231
  • 017.JPG
    017.JPG
    3.4 MB · Views: 296
While that is all setting up i move on to the top. This rim near the head makes me a bit nervous in how thin it is. I kind of wish i had thickened it up a bit before molding, but i did not because I was not sure how it would effect the fit. Turns out with a bit of mold compression you loose about .010-.020 on this part. Simple fix, i cut a couple of .010 strips, laminate them in with some CA, trim and sand and it's nice and solid.

This trim part that holds the head is most definitely not a load bearing structure so again to the scrap pile for some back up. I predrill a hole that will be used in my case to get a socket screw into the back of the head, but brass or aluminum round will do just as well. This mount is also 5 minute epoxy'd into place, much better than CA for that job.
 

Attachments

  • 024.JPG
    024.JPG
    3.2 MB · Views: 166
  • 022.JPG
    022.JPG
    3.4 MB · Views: 187
  • 019.JPG
    019.JPG
    3.4 MB · Views: 174
After everything has set up nice it's time to get the coupler in place. I mark where i want it, take it over the to milling machine (drill press will do) use the scrap to protect the bottom again, and drill a hole for the coupler. For the 3/8 gas pipe that i am using i drill a 1 inch hole for the coupler. I did notice that depending on the brand they tend to run about 1 inch to 1 1/16 in diameter.

Before epoxy glue i make sure that the pipe is a square to the ship as possible. I've made a temp work stand out of scrap. I went with 15 inches of pipe for the work stand. It may need less but for now it gives good clearance for the wings.
 

Attachments

  • 033.JPG
    033.JPG
    3.1 MB · Views: 281
  • 029.JPG
    029.JPG
    3.2 MB · Views: 240
  • 026.JPG
    026.JPG
    3.2 MB · Views: 208
  • 028.JPG
    028.JPG
    3.6 MB · Views: 260
Wooow!
Absolutely stunning! I am looking forward to the progress.
I am lucky to have this kit. It is a fantastic master and Mikes castings are absolutely great. I do highly recommend it.
Michael
 
Thanks for making this build thread Mike. I'd been concerned about how the wings and top wing would torque the body under the load. That's exactly how I'll build mine by loading up the interior with wood. Nice, simple solution.

The other idea is to make the side wings lighter and scratched, which might be in addition. So much heavy resin is hanging cantilevered off if these solutions aren't taken into account.

Looking forward to more of your build!
 
Preview shot of the rebel crew interior, hopefully will have this and the imperial crew here by the end of the week, then molding. Once that is done i will continue this build thread.
mike

shuttle1_zps5d9a1684.jpg
 
The interior and both crews are all molded up. I just need to get the canopy as glossy as i can before i mold it, been dipping it in future for a few days now so it's almost ready. Once that is done the interior kit will be ready to go.
thanks
mike
 
Little change of plans, i just can't seem to get the canopy the way i want it, very frustrating, eveytime i think i am close to ready to mold some little thing goes wrong and it's messed up. I literally just got so frustrated i snapped it in half and thru it away, only way i can get myself to stop tinkering with the darn thing.

Anyway just ordered some smoke/tinted plastic sheet, should have done it in the first place. Hopefully what i have in mind will work and i can get this rolling again. Sorry for the delay, I can't believe the amount of time i spent trying to get the canopy pattern correct, it was cursed i guess.
mike
 
This thread is more than 10 years old.

Your message may be considered spam for the following reasons:

  1. This thread hasn't been active in some time. A new post in this thread might not contribute constructively to this discussion after so long.
If you wish to reply despite these issues, check the box below before replying.
Be aware that malicious compliance may result in more severe penalties.
Back
Top