Scratch-build of Rocketeer Cirrus X-3 Rocketpack

Valor

Sr Member
RPF PREMIUM MEMBER
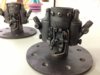
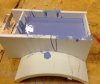
I've wanted a Cirrus X-3 for years, but have never been able to swallow the price of the beautiful ACME kit. ... Well, I can't hold out any longer. I'm going to attempt a scratch build.

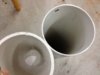
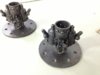
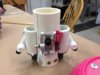
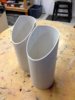
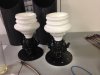
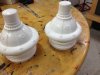
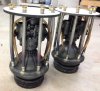
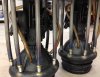
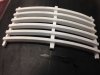
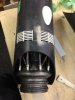
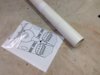
The main booster bodies? Simple. Picked up some 6" PVC. The outer dimension is actually close to 6-5/8" so it's not too far off from the 7.5 size of the actual prop. I plan on scaling the pack down to reflect this look. I've seem the ACME kit in person and it is HUGE. I'm not a big guy so a slightly smaller pack will look better anyway. It's THICK ... I may try to find some thin-walled 6" PVC.

Dimensions on the Cirrus X-3 are really hard to verify. I've seen one image on the rpf with dimensions, but it doesn't cover everything. I'm not shooting for EXACT screen accuracy, just proportional-correctness.

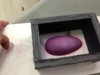
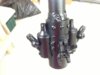
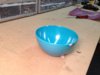
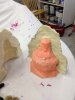
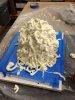
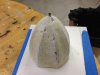
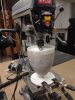
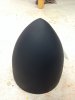
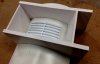
This will likely be a slow build. Not sure how this will progress. Mostly because I'm diving in not knowing how to solve some pretty big parts of this design. I'm not sure how to handle the round, organic part that sits between the two rockets. I've never cast anything so I'm not sure how to do this. I wondered if it could be vacuformed, although I've never done that either. Time to learn something new!!

It's been a while since I've done a WIP thread. I'll try to show steps along the way.
 

Attachments

  • step1.JPG
    step1.JPG
    391.3 KB · Views: 523
  • step2.JPG
    step2.JPG
    359.9 KB · Views: 636
Or pep. Heck, yeah ... I could pep that center piece then attach it ... Not that I've done pep before either. This is going to be fun :)
 
Some progress this week.

I scratch/kit-bashed the upper portions of the two rocket engines. Made from various parts in my shop and from the hardware store. Tried to match the general look and topology of the screen-used rockets. It was cheaper to build both, instead of building and casting.

The bottom/bell portion of the engine was build from a plastic bowl, a drainage fitting and various trim pieces. The rings were added with clay to mimic the look of the actual rockets. This part will be brush-on rubber molded and slush cast. Just waiting for my supplies from Smooth-on to come. Side note: This is the first time I've molded and cast anything. I'm really excited.

The stainless steel lines have been cut and fittings made for the ends. I also used Duplicilor Metalcast paint to create the heat distortion colors at the ends.

Also created the "egg" for the side of the rockets from clay. It will be molded and cast as well.

I also got the 6" thin-wall PVC pipe I ordered from flexpvc.com. The pic shows the thickness difference from the 6" pipe I bought from a big-box store. The thin wall will save weight and looks more accurate.

All for now :)
 

Attachments

  • IMG_1045.jpg
    IMG_1045.jpg
    52.7 KB · Views: 584
  • IMG_1043.jpg
    IMG_1043.jpg
    63.7 KB · Views: 831
  • IMG_1042.jpg
    IMG_1042.jpg
    60.5 KB · Views: 629
  • IMG_1041.jpg
    IMG_1041.jpg
    96.9 KB · Views: 713
  • IMG_1040.jpg
    IMG_1040.jpg
    79.3 KB · Views: 8,184
  • IMG_1039.jpg
    IMG_1039.jpg
    56.2 KB · Views: 620
  • IMG_1034.jpg
    IMG_1034.jpg
    77.7 KB · Views: 859
  • IMG_1020.jpg
    IMG_1020.jpg
    52.9 KB · Views: 718
  • IMG_1013.jpg
    IMG_1013.jpg
    73 KB · Views: 608
Last edited:
Rocket tubes done!

I cut the PVC tube to length for the main housings and cut the 45-degree angle for the ends. I built a jig to hold the PVC steady, and cut an exact 45-degree guide.
 

Attachments

  • IMG_1049.jpg
    IMG_1049.jpg
    87.6 KB · Views: 475
  • IMG_1048.jpg
    IMG_1048.jpg
    93.6 KB · Views: 579
  • IMG_1047.jpg
    IMG_1047.jpg
    54.4 KB · Views: 540
Did my first mold and cast (ever) for the bottom of both engines today. Used the Smooth-on Brush-on Starter Kit. The kit was a total pleasure to work with. Everything worked as the instructions indicated. As I said, this was the first time I've ever cast anything, so this was a total blast. I love learning a new technique.

I plan on sculpting and slush casting the rocket cones as well.
 

Attachments

  • 3-0.JPG
    3-0.JPG
    47.6 KB · Views: 553
  • 3bells2.jpg
    3bells2.jpg
    156.2 KB · Views: 674
  • 3bells.jpg
    3bells.jpg
    207.4 KB · Views: 659
Last edited:
I'm working on the master for the two cones. I made a skeleton for the cone shape from styrene. Just cut the profile shape and glued them onto a brass tube in a radial pattern. This was then filled with expanding foam and trimmed. I fiber glassed and Bondo'd it into shape. For sanding I created a sort of "vertical lathe" with my drill press. The brass tube at the center allowed me to mount it vertically on the press and hold sand paper on each side and work it into shape. Had to run the drill press SLOW, but it worked great and saved time.

I also carved one of the "finlettes" that go around the top of the cone. I made a tiny mold and will cast the16 of them I need for the master.

The plan is to mold this and slush cast the two cones I need.

More soon.
 

Attachments

  • 31.jpg
    31.jpg
    94.9 KB · Views: 530
  • 32.jpg
    32.jpg
    106.1 KB · Views: 526
  • 33.jpg
    33.jpg
    75.9 KB · Views: 608
  • 34.jpg
    34.jpg
    96.4 KB · Views: 656
  • 35.jpg
    35.jpg
    54.9 KB · Views: 574
  • 36.jpg
    36.jpg
    63.8 KB · Views: 545
  • 37.jpg
    37.jpg
    63.5 KB · Views: 507
Last edited:
I finished the engines today. I may do some additional weathering, but I'm pretty happy with how they came out. I also spent the last couple days casting the 12 little fins for the top of the engine cones. I'm casting each one individually so I bought two eye droppers. Each fin takes 1/4 dropper of part A and B. They will be attached to the cone I have carved, then slush cast.
 

Attachments

  • R_2.jpg
    R_2.jpg
    3.3 MB · Views: 722
  • R_1.jpg
    R_1.jpg
    1.1 MB · Views: 636
  • F_1.jpg
    F_1.jpg
    200 KB · Views: 502
Last edited:
Small update. I spent today building one of the four vents that run along the front of the rocket. It required matching the curve of the shell by heating and bending styrene bar stock for the horizontal pieces. Then assembling 27 individual pieces. I glued the curved final piece onto a scrap piece of PVC shell and build a mold box around it and sunk it in rubber. When I cast it, I'll need to roll the resin back and fourth, kind of like a slush cast, but it should yield good results.

On a side note, I was walking a guy from Craigslist through my basement to retrieve a desk he was buying. He glanced over at my work bench and asked "Are you ... building a ... rocketpack??" ..... "Yes. Yes I am." :)
 

Attachments

  • G_1.jpg
    G_1.jpg
    154.6 KB · Views: 415
  • G_2.jpg
    G_2.jpg
    127 KB · Views: 416
  • G_3.jpg
    G_3.jpg
    137.2 KB · Views: 420
Last edited:
This is awesome. I love watching scratch-builds come together in an epic fashion. Valor, would you mind explaining, painting-technique-wise (even briefly), how you managed this finish:

scratch-build-rocketeer-cirrus-x-3-rocketpack-img_1040.jpg-229250d1378659933


^THIS^ looks, a ridiculous amount, like a piece of hardware one would expect to find on a rocket engine.

In other news, BRAVO, sir. :eek:thumbsup
 
This is awesome. I love watching scratch-builds come together in an epic fashion. Valor, would you mind explaining, painting-technique-wise (even briefly), how you managed this finish:

http://www.therpf.com/attachments/f...x-3-rocketpack-img_1040.jpg-229250d1378659933

^THIS^ looks, a ridiculous amount, like a piece of hardware one would expect to find on a rocket engine.

In other news, BRAVO, sir. :eek:thumbsup

At that stage it was really just matte black primer with some metallic acryic paints dry-brushed on. I found some cool Martha Stewart metallic acrylics at Michaels. They are really dark metallics which worked well for this. The later engine pics here show that I added more weathering, black washes, etc.
 
Looks great. I'm doing my own scratch build of the Cirrus X-3 rocket pack - thanks for some inspiration!

Are you planning on doing lighting effects or a smoke gag? I have thought ALOT about how be able to get smoke to blow out of the engines (safely of course). Hit me up via a PM if you're interested in hearing the idea.
 
Holy WOW! That is some exceptional work, Valor!

Now I want to try my hand at building one...
(gah, I hate being poor :(...)
 
amazing work, definately have wanted one of these since I saw the movie in theaters

sorry if I am just missing something here but why is it called the cirrus x-3 wouldnt it have been the hughes x-3?
 
This thread is more than 4 years old.

Your message may be considered spam for the following reasons:

  1. This thread hasn't been active in some time. A new post in this thread might not contribute constructively to this discussion after so long.
If you wish to reply despite these issues, check the box below before replying.
Be aware that malicious compliance may result in more severe penalties.
Back
Top