My Iron Man Mark III Helmet 3d Print Files (V3 available in post #1 now!)

Re: My Iron Man Mark III Helmet 3d Print Files (DL post 17) New Neck started PG 2

View attachment 263730

my 3d printer PRUSA I3 has arrived, go go go, I NEED PRINT!!!!!! jajaja


AWESOME!!!!!!

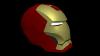
I am working on a new helmet V2, which will be much easier to print, and produce better results than my helmet V1 files. I am almost finished with it, all that is left is to add the screws and make the back of the helmet watertight. This helmet is free of topographical errors, thanks to ballanux advice! It is made of quads instead of triangles. The process of converting it is extremely tedious, but I feel as though it is quite worthwhile indeed! There is still some EXTREMELY slight distortion where the two halves were digitally joined together, but it is so little it is negligible. I just thought I'd mention it anyway.

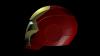
Here are some renders of my almost finished helmet V2. I will be posting the STLs soon!

helmetv2shot2.jpg


helmetv2shot1.jpg


helmetv2shot5.jpg


helmetv2shot4.jpg


helmetv2shot3.jpg


This is really coming together now! I am finally starting to feel comfortable in 3ds MAX again!

Thanks for staying interested!
 

Attachments

  • helmetv2shot2.jpg
    helmetv2shot2.jpg
    20.4 KB · Views: 217
  • helmetv2shot1.jpg
    helmetv2shot1.jpg
    20.6 KB · Views: 266
  • helmetv2shot5.jpg
    helmetv2shot5.jpg
    19 KB · Views: 212
  • helmetv2shot4.jpg
    helmetv2shot4.jpg
    15.8 KB · Views: 212
  • helmetv2shot3.jpg
    helmetv2shot3.jpg
    19.3 KB · Views: 193
Last edited by a moderator:
Re: My Iron Man Mark III Helmet 3d Print Files (DL post 17) New Neck started PG 2

This looks awesome man! I'm looking forward to trying to print your V2!
 
Re: My Iron Man Mark III Helmet 3d Print Files (DL post 17) New Neck started PG 2

This is incredible stuff. I wish i had a 3d printer. The printing community is going to soon be insane with competition. Staples is now selling them and soon futureshop, bestbuy. That means lower prices and bigger variety...GM
 
Re: My Iron Man Mark III Helmet 3d Print Files (DL post 17) New Neck started PG 2

Alright, here we GO! First wave of the V2 files is the back of the helmet. I haven't finished to faceplate or the jaw yet, but I will soon (probably tomorrow, it's late!) I figured I'd go ahead and upload it so you guys could go ahead and start printing!

The helmet is scaled to a head size of 1 CENTIMETER . This means that all you need to do is measure your head from ear to ear (maybe using a micrometer), or measure the circumference and calculate the diameter off of that, and scale the helmet by whatever size your head is. For instance, my head is very big at around 8 inches (20.32 centimeters). So to print the helmet i would scale each part multiplied by 20.32, which would give me the perfect size for my head.

The files come in two versions. One section is the back of the helmet split up into seperate pieces (bottom, back, top, and ears). This is good for people that want to remove the back of the helmet to put their head in, or have printers with smaller print areas. These files are put together like in the picture below


The next file is the helmet all put together in one piece. This is for people that are making it for display or have a printer with a large print area. It looks like the picture below


Here are the links for the files

ear (repaired) - ?? - 4shared - D H (ear)

helmetback (repaired) - ?? - 4shared - D H (removable back piece of the helmet)

helmetbottom (repaired) - ?? - 4shared - D H (bottom/main piece)

helmettop (repaired) - ?? - 4shared - D H (top of the helmet)

HelmetFull (repaired) - ?? - 4shared - D H (full helmet in one piece)

Thanks to everyone who is excited for this. I feel very good about it!

P.S. - I'd advise re-orienting the parts to use as little support structure as possible for less cleanup. I may re-orient them someday for this, but for now I'm too tired. I'll let you guys deal with it! ;)
 
Re: My Iron Man Mark III Helmet 3d Print Files (V2 Helmet DL Page 2!)

u can use netfabb basic to slice the model up to print in small areas
 
Re: My Iron Man Mark III Helmet 3d Print Files (V2 Helmet DL Page 2!)

Alright, got some progress pictures to show, as requested. I've got two failed prints, and one good print. Keep in mind I'm very new to 3d printing. I just got my Lutzbot a week or two ago. There is still some tweaking for me to do, but I'm happy with how much better the prints are coming out.


So, I'm using PLA. The first attempts were without full tweaking of the proper extrusion temps. Also, I read from Lutzbot's site that PLA does real good with a fan blowing on the print, particularly with bridging. The first prints are without any fan cooling, while the last, best looking print had fan cooling.


Here we have my failed attempt at an ear. Without cooling, the ends began to curl up, as you can see. I stopped the print to try something else.
fe 1.jpgfe 2.jpg


Still trying to work out sizing, as the main goal for me is to print this to fit the head of a four year old boy, I tried the back part of the helmet. The first attempt was, without a doubt, too big for what I was aiming for. However, seems to be the perfect size for my head. The bottom half was without cooling. You can see how crappy the bridging for the bottom tab came out. Having then thought (and read) to put a fan in front of the printer, I did. The print quality seemed to improve a great deal.
fb 1.jpg


I had also stopped that one early. Today, I did a reduced size back piece with cooling non stop. Here's pics of it before trimming the support material.
sb a.jpgsb b.jpgsb c.jpg

And trimmed up a little bit.
sb 1.jpgsb 2.jpgsb 3.jpgsb 4.jpg


I'll try another part tomorrow:cool
 
Last edited:
Re: My Iron Man Mark III Helmet 3d Print Files (V2 Helmet DL Page 2!)

Alright, got some progress pictures to show, as requested. I've got two failed prints, and one good print. Keep in mind I'm very new to 3d printing. I just got my Lutzbot a week or two ago. There is still some tweaking for me to do, but I'm happy with how much better the prints are coming out.


So, I'm using PLA. The first attempts were without full tweaking of the proper extrusion temps. Also, I read from Lutzbot's site that PLA does real good with a fan blowing on the print, particularly with bridging. The first prints are without any fan cooling, while the last, best looking print had fan cooling.


Here we have my failed attempt at an ear. Without cooling, the ends began to curl up, as you can see. I stopped the print to try something else.
View attachment 265445View attachment 265446


Still trying to work out sizing, as the main goal for me is to print this to fit the head of a four year old boy, I tried the back part of the helmet. The first attempt was, without a doubt, too big for what I was aiming for. However, seems to be the perfect size for my head. The bottom half was without cooling. You can see how crappy the bridging for the bottom tab came out. Having then thought (and read) to put a fan in front of the printer, I did. The print quality seemed to improve a great deal.
View attachment 265447


I had also stopped that one early. Today, I did a reduced size back piece with cooling non stop. Here's pics of it before trimming the support material.
View attachment 265448View attachment 265449View attachment 265450

And trimmed up a little bit.
View attachment 265451View attachment 265452View attachment 265453View attachment 265454


I'll try another part tomorrow:cool


what program you're using ghost? Slicer and the Pronterface? or Cura?, I tell you that the cura can move the object in three dimensions and thus accommodate the brackets on the inside of it, these get way better finish both in the edges as the entire outside of the piece.

to see if this term to calibrate my Prusa I3 week and I get to print, and i will tell you.
 
Re: My Iron Man Mark III Helmet 3d Print Files (V2 Helmet DL Page 2!)

Alright, got some progress pictures to show, as requested. I've got two failed prints, and one good print. Keep in mind I'm very new to 3d printing. I just got my Lutzbot a week or two ago. There is still some tweaking for me to do, but I'm happy with how much better the prints are coming out.


So, I'm using PLA. The first attempts were without full tweaking of the proper extrusion temps. Also, I read from Lutzbot's site that PLA does real good with a fan blowing on the print, particularly with bridging. The first prints are without any fan cooling, while the last, best looking print had fan cooling.


Here we have my failed attempt at an ear. Without cooling, the ends began to curl up, as you can see. I stopped the print to try something else.
View attachment 265445View attachment 265446


Still trying to work out sizing, as the main goal for me is to print this to fit the head of a four year old boy, I tried the back part of the helmet. The first attempt was, without a doubt, too big for what I was aiming for. However, seems to be the perfect size for my head. The bottom half was without cooling. You can see how crappy the bridging for the bottom tab came out. Having then thought (and read) to put a fan in front of the printer, I did. The print quality seemed to improve a great deal.
View attachment 265447


I had also stopped that one early. Today, I did a reduced size back piece with cooling non stop. Here's pics of it before trimming the support material.
View attachment 265448View attachment 265449View attachment 265450

And trimmed up a little bit.
View attachment 265451View attachment 265452View attachment 265453View attachment 265454


I'll try another part tomorrow:cool

Great!!! Thanks so much GhostMinion for sharing these pictures! It gives me motivation to continue moving with the project. I plan on finishing the faceplate very soon, and then the jaw after that. Your prints are turning out quite well! Good call on using the fan on the PLA prints. Can the Lulzbot print ABS too? If so, you may have better luck with ABS. You may also try re-orienting the parts with the outside of the part facing up so that the outside of the part doesn't have any support structure. That way you only have the little support spurs on the inside of the helmet, and cleaning them up fully is optional. I say this because the inside of the back part looks very clean and smooth, and looks like it would not need a lot of clean up. May be worth a shot!

Thanks again!
 
Re: My Iron Man Mark III Helmet 3d Print Files (V2 Helmet DL Page 2!)

what program you're using ghost? Slicer and the Pronterface? or Cura?, I tell you that the cura can move the object in three dimensions and thus accommodate the brackets on the inside of it, these get way better finish both in the edges as the entire outside of the piece.

to see if this term to calibrate my Prusa I3 week and I get to print, and i will tell you.


I'm using Slicer with Ponterface. I haven't really had too much time to experiment and explore yet. But I'll check out Cura, thanks for the advise!:thumbsup

Great!!! Thanks so much GhostMinion for sharing these pictures! It gives me motivation to continue moving with the project. I plan on finishing the faceplate very soon, and then the jaw after that. Your prints are turning out quite well! Good call on using the fan on the PLA prints. Can the Lulzbot print ABS too? If so, you may have better luck with ABS. You may also try re-orienting the parts with the outside of the part facing up so that the outside of the part doesn't have any support structure. That way you only have the little support spurs on the inside of the helmet, and cleaning them up fully is optional. I say this because the inside of the back part looks very clean and smooth, and looks like it would not need a lot of clean up. May be worth a shot!

Thanks again!


Thank you, good sir! :) I look forward to printing the rest of the revised helmet. My printer does use ABS as well, really it amounted to picking one, and I just happened to pick PLA. I do intend to try some of the other filaments the Lulzbot can use.

I had been thinking of rearranging the parts so that the support material was on the inside of the part, like IronGemenis mentioned. I'll surely give it a try.

I'll without a doubt be sure to post more pics. Least I can do to thank you for sharing such fantastic work with us!:thumbsup
 
Re: My Iron Man Mark III Helmet 3d Print Files (V2 Helmet DL Page 2!)

Faceplate is finished and ready for download. Scale is exact same as back of helmet. So whatever you scaled the helmet to, simply scale the faceplate the same amount for a perfect fit!

The faceplate is available in two different types of files. One file is the faceplate fully attached, like the picture below


The other is the faceplate split into two pieces. If you go this route, I'd absolutely suggest adding some fiberglass cloth and resin where the two pieces meet on the inside to make it more rigid. This file looks like this.


Here are the files for the faceplate

faceplatebottom (repaired) - ?? - 4shared - D H (bottom of faceplate)

faceplatetop (repaired) - ?? - 4shared - D H (top of faceplate)

FaceplateFull (repaired) - ?? - 4shared - D H (full faceplate)

I'm so close to the finish line on this helmet! Once i get this V2 helmet finished, it's back to the neck I go!

Thanks again everyone!
 
Re: My Iron Man Mark III Helmet 3d Print Files (V2 Helmet DL Page 2!)

Man this is awesome! I have tried printed your helmet v1 in the past but got lots of issues for scaling correctly and get a successful clean print of it. I will give a try to your v2 once you finish it.

Great work!!!!!!!!!

mmfox
 
Re: My Iron Man Mark III Helmet 3d Print Files (V2 Helmet DL Page 2!)

Amazing work!

I'll try to print the faceplate V2 today on an Ultimaker.
I used your 2 part faceplate, and actually split it up into 2 parts each (4 total)
I'll let you know how the result will be.

I am awaiting the rest of your V2 helmet to print that aswell.

Keep up the good work!

~ Leander
 
This thread is more than 3 years old.

Your message may be considered spam for the following reasons:

  1. This thread hasn't been active in some time. A new post in this thread might not contribute constructively to this discussion after so long.
If you wish to reply despite these issues, check the box below before replying.
Be aware that malicious compliance may result in more severe penalties.
Back
Top