airhead
Sr Member
My daughter has developed into a Whovian and for her birthday, I thought I would try my hand at my interpretation of River Song’s Tardis journal. I loved the travel-worn look of the journal, but decided to make a blank “new” version that she could fill with her own story.
I looked at the screen cap examples and re-watched LKH to try to work out the dimensions. In the end, I settled on an overall outside of 7 5/8” high by 5” wide (add another 1/8” for the spine bands). To keep the journal close to the original dimensions, I added enough pages to make a useful size, but not too bulky.

I chose a smooth finish white 28lb paper to give the pages a good weight. I would be sewing the signatures on cloth tapes and using mesh mull to secure the signatures, so the book could be opened flat without worrying about pages coming unglued and falling out over time.

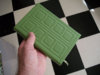
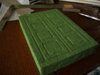
I wanted to use leather for the cover, again for esthetic purposes – it just looks and smells wonderful – and for long-term durability. The relief embossing of the cover would be built on the cover boards with a pattern of thinner strips of cardboard glued to it. The leather that I found appeared to be a bit thicker than what was used on the prop, but I thought that I could make it work.
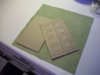
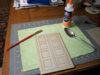
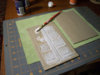
I started folding and cutting the signatures to size. I chose 4 sheets per signature, giving 16 pages each. I decided on 14 signatures giving 224 pages for recording time traveling adventures. I sewed the signatures on three cloth tapes for maximum strength and affixed the mull using flexible glue.


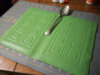
Next came the cover. I had the embossing pattern glued to the boards and spread on a good layer of glue. I had already cut the leather to size, allowing for wraparound on the boards. I had visions of making a wooden “stamp” with raised ribs to force the leather into the pattern and even started working on one, when I realized that I could take advantage of the moderate tack time of the glue and just manually force the pattern. After a short search, I decided on using a spoon handle. Worked great! The only problem (which I was afraid of) was that as I worked the leather into the pattern, it would pull out of the adjacent recesses. So, I just kept working it into the pattern over and over until the glue had set enough to hold the leather in place. Tedious, but it worked.
I wanted the spine to be flexible and have the distinctive raised bands of the original. I ended up gluing strips of the excess cover leather together and then gluing them on the inside of the spine, again pressing the details in with the spoon (what a great tool! And you can use it to eat soup!). I finished the corners and was ready for the signatures.
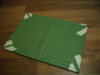
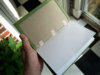
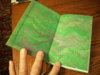
I glued the book together and used a replica of some vintage blue-waved marbled paper that I picked up on Etsy to give the journal a finished look. I don’t know if there is any evidence that the original prop had a detail like this, but it looks nice. I also added a ribbon page marker that isn’t in the original, but makes the journal more practical. It is of the same ribbon stock that I planned to use for the tying-up, as in the shot on the night stand.

While everything was drying, I thought that I would make a custom presentation box (this was a birthday present, after all) and glued up a cardboard tray and cover. I cut strips of cardboard and made a pattern to match the journal on the top of the cover and used a technique that I had seen others use to cover the box – crumpled blue tissue paper. I gave the box cover a coat of Modge Podge to give the paper some depth and when dry, sprayed that with a matte fixative for durability.

Here’s the finished product. It was a success! What do you think?


David
I looked at the screen cap examples and re-watched LKH to try to work out the dimensions. In the end, I settled on an overall outside of 7 5/8” high by 5” wide (add another 1/8” for the spine bands). To keep the journal close to the original dimensions, I added enough pages to make a useful size, but not too bulky.
I chose a smooth finish white 28lb paper to give the pages a good weight. I would be sewing the signatures on cloth tapes and using mesh mull to secure the signatures, so the book could be opened flat without worrying about pages coming unglued and falling out over time.
I wanted to use leather for the cover, again for esthetic purposes – it just looks and smells wonderful – and for long-term durability. The relief embossing of the cover would be built on the cover boards with a pattern of thinner strips of cardboard glued to it. The leather that I found appeared to be a bit thicker than what was used on the prop, but I thought that I could make it work.
I started folding and cutting the signatures to size. I chose 4 sheets per signature, giving 16 pages each. I decided on 14 signatures giving 224 pages for recording time traveling adventures. I sewed the signatures on three cloth tapes for maximum strength and affixed the mull using flexible glue.
Next came the cover. I had the embossing pattern glued to the boards and spread on a good layer of glue. I had already cut the leather to size, allowing for wraparound on the boards. I had visions of making a wooden “stamp” with raised ribs to force the leather into the pattern and even started working on one, when I realized that I could take advantage of the moderate tack time of the glue and just manually force the pattern. After a short search, I decided on using a spoon handle. Worked great! The only problem (which I was afraid of) was that as I worked the leather into the pattern, it would pull out of the adjacent recesses. So, I just kept working it into the pattern over and over until the glue had set enough to hold the leather in place. Tedious, but it worked.
I wanted the spine to be flexible and have the distinctive raised bands of the original. I ended up gluing strips of the excess cover leather together and then gluing them on the inside of the spine, again pressing the details in with the spoon (what a great tool! And you can use it to eat soup!). I finished the corners and was ready for the signatures.
I glued the book together and used a replica of some vintage blue-waved marbled paper that I picked up on Etsy to give the journal a finished look. I don’t know if there is any evidence that the original prop had a detail like this, but it looks nice. I also added a ribbon page marker that isn’t in the original, but makes the journal more practical. It is of the same ribbon stock that I planned to use for the tying-up, as in the shot on the night stand.
While everything was drying, I thought that I would make a custom presentation box (this was a birthday present, after all) and glued up a cardboard tray and cover. I cut strips of cardboard and made a pattern to match the journal on the top of the cover and used a technique that I had seen others use to cover the box – crumpled blue tissue paper. I gave the box cover a coat of Modge Podge to give the paper some depth and when dry, sprayed that with a matte fixative for durability.
Here’s the finished product. It was a success! What do you think?
David