Luke ROTJ V2 lightsaber

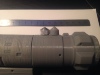
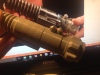
Maybe someone has already seen that, but in ROTJ, during the last clash between Luke and Vader, were there plans to make Vader having both sabers ? His own and Luke's? View attachment 720005We can see clearly that Vader is holding something/a lightsaber in his left hand. Is that the ROTJ V2 ? View attachment 720006

Yes, I've heard there was meant to be a moment that Lucas filmed where Luke threw away his lightsaber while he's hiding under the platform. Vader picks it up, and continues his goading of Luke. Luke then grabs the lightsaber out of Vader's hand via the Force, and the fight continues. Lucas cut this out of the final film, but you can still see the lightsaber in Vader's hand clearly in a few frames.
View attachment 720007

View attachment 720008

View attachment 720009

Wasn't the original plan to have luke skywalker forcepull Vaders saber outta his hand and they continue fighting with each other's saber.a stunt that he also did again in revenge if the sith with obi one and anakin.you can clearly see obi one holding anakins saber when he is on top of anakin right before anakin forcepulls his lightsaber back to him from the ground.also he did it somewhat again in revenge if the sith with palpatine,originally anakin was there the whole fight between palpatine and the Jedi and palpatine forcepulls anakins saber from his belt and uses it to fight mace .if you watch the fight he is using the skinnyflex


i brought this up a few months ago while researching the V3. someone on here told me they read in a book... luke loses his v2 when vader cuts the cat walk in half and luke slides to the under side of the throne room. vader picks it up and walks around taunting luke while luke is hiding un armed. finally when luke snaps, he uses the force to pull the v2 out of vaders left hand and ignites it

i forgot the name of the book.... "making RoTJ" maybe?
 
I ordered one of Inigou's "mistery chunks" from Shapeways. The attached photos show it exactly how it arrived. I have not done any clean up yet. It's a little rough, but not too bad. The color is more brownish than I expected. Almost like sand color.

Mystery-Chunk-1.jpg
Mystery-Chunk-2.jpg
Mystery-Chunk-3.jpg
Mystery-Chunk-4.jpg
 
Hi buddy. Yes, shape ways stainless steel is a mix of steel powder and bronze at a low %. Is why it shows that slight brownish color. But when you polish it, the color turns much closer to steel.
Im gonna prepare a smal tutorial later today for you to show how to polish.
meanwhile here is a picture (took with a phone camera) to show how it looks.
i also weathered with alu black a bit.
ill take better pictures later.

IMG_1161.JPG


I ordered one of Inigou's "mistery chunks" from Shapeways. The attached photos show it exactly how it arrived. I have not done any clean up yet. It's a little rough, but not too bad. The color is more brownish than I expected. Almost like sand color.
 
Hi buddy. Yes, shape ways stainless steel is a mix of steel powder and bronze at a low %. Is why it shows that slight brownish color. But when you polish it, the color turns much closer to steel.
Im gonna prepare a smal tutorial later today for you to show how to polish.
meanwhile here is a picture (took with a phone camera) to show how it looks.
i also weathered with alu black a bit.
ill take better pictures later.

View attachment 721612
The polished version looks really good. I'm surprised the color changes like that. Looking forward to the tutorial.

Sent from my Nexus 10 using Tapatalk
 
Damn! Now I really have to order one! That looks awesome!! My fear is I already drilled and tapped my saber.. I think I'm gonna have to epoxy this sucker in..


Sent from my iPhone using Tapatalk
 
Hi buddy. Yes, shape ways stainless steel is a mix of steel powder and bronze at a low %. Is why it shows that slight brownish color. But when you polish it, the color turns much closer to steel.
Im gonna prepare a smal tutorial later today for you to show how to polish.
meanwhile here is a picture (took with a phone camera) to show how it looks.
i also weathered with alu black a bit.
ill take better pictures later.

View attachment 721612

I love how that came out!! I too would love to see a tutorial!


Sent from my iPhone using Tapatalk
 
I ordered one of Inigou's "mistery chunks" from Shapeways. The attached photos show it exactly how it arrived. I have not done any clean up yet. It's a little rough, but not too bad...
I rather like the "pitted" surface myself; it might not be accurate to the original prop, but it gives the impression of being older and more weathered than if it were bright and shiny. If I ever get around to making one of these (I have a machined aluminum body, but not much else) I'll have to keep Shapeways in mind and hope they still offer this part.
 
this is still in progress, but I tried something different tonight that I think worked out pretty well. I had already stenciled in black spray paint, but I went back and took a metallic gold paint pen and on the sections at the base of the emitter and 'grenade', touched it on lightly, then immediately wiped it off. Then where needed I went over it with black paint pen and immediately wiped that off. In the end I think it left me with a look of something that had been painted black and copper, and both had worn off some over time.

This saber is becoming a long term project for me. It's already in my display cabinet, but every couple of weeks I take it out and do something more to it.

IMG_2332.jpeg
 
OK.

I finally watched the complete "pop culture quest" episode featuring the V2.


Having now seen it at a much larger scale, I took a crack at coloring the wind vane to represent what I see in the episode and am pleased with the results.

I masked of the wondvane with stencils and sprayed it satin black.

I then sprayed metallic copper paint into a sponge and wiped it lightly over the wondvane. After hitting that with a heat gun, I rubbed it down with 0000 steel wool and removed the stencil masks. Following that, I gave the area a light brush up of aluminum black in a rag.

Opinions?


Last edited:
Thanks for the compliments, I appreciate it.

Almost done..

I added a vintage GRAFLEX clamp with some patina and corrosion, Roy's lever, and Slothfurnace's card. I had a replica clamp ready to go, originally, but I found that the shiny new clamp just did not seem to match the overall look of the rest of the saber. I also added the D-ring. I have the mystery chunk to add, and I'll be completed with this build:


Last edited:
Love the vintage clamp!!


Sent from my iPhone using Tapatalk


Thanks.

It cost me more than I would have liked, but as this build is the "final version" of the V2 for me, after building several prior versions, I thought I would "go for broke" on this last one.

I was able to salvage the original side bar nut, which has a nice patina. The clamp jaw tolerances gave me some trouble with Roy's card as they were "tighter" jaws than I have dealt with before (they may have been altered by the prior owner) but after a few minutes of work on the belt sander, I was able to resolve the issue.

Well worth it! The vintage clamp seals the deal! I want a vintage clamp for mine but the prices eBay is asking is out of this world...


Sent from my iPhone using Tapatalk
 
Guys, I've got some doubts about the knurled knob.
Everyone here believes that the knob is from a Transcriptor Turntable Motor (we can find some parts on Boba Fett's costume and Greedo's DT-12 as well).
Thanks to morgan63 , I had the chance to get a genuine knob.
BUT, I'm making my model upon the pics that are available, and there are some inaccuracies.
First the knurling is clearly different.
Then, "I think" that the cone part should be higher...
What do you think ?
Am I mistaken ?


b0a411049bf1a7a3b98759a8d25aa772.jpg
f4deb3dac179ec72260cd91a17949351.jpg
1eea76abfbdcff228bdb51a09c688ebc.jpg
4ad81f575cd75a8a90a77878194446cf.jpg
 

Attachments

  • f4deb3dac179ec72260cd91a17949351.jpg
    f4deb3dac179ec72260cd91a17949351.jpg
    601.7 KB · Views: 75
  • 1eea76abfbdcff228bdb51a09c688ebc.jpg
    1eea76abfbdcff228bdb51a09c688ebc.jpg
    602.5 KB · Views: 78
  • 4ad81f575cd75a8a90a77878194446cf.jpg
    4ad81f575cd75a8a90a77878194446cf.jpg
    1.1 MB · Views: 53
Last edited by a moderator:
Is the knob that you got from morgan63 a vintage one from the 1970s? If not, and if it's a modern variant *that's* why it's not the same - the knurling is different on the new knobs.
 
Yeah... also your pics are really not sharp at all, and the knurl isn't easy to make out well.

That said, I have two vintage 70's knobs and they match the real part well. They ALSO have two different heights of the knurl... so they're not identical like a modern CNC'd part would be.
 

Your message may be considered spam for the following reasons:

If you wish to reply despite these issues, check the box below before replying.
Be aware that malicious compliance may result in more severe penalties.
Back
Top