Wouldchop
Active Member
Hallo!
This is my first post on theRPF.
I'm building a spaceship with found scrap-parts, inspired by their topology. When finished, the parts may still be
recognisable as where they originated from, but i like the whole to look like a proper spaceship.
I was kind of reluctant to post here, because my built seems offtopic by default, but i've been leeching long enough of the awesome threads here. Specially scratchbuilders, like thenylongag and yuumi2891103. Although my pile of scrap cant stand in the lights of the greatness here, i guess ill post it anyway.
It started a long time ago, when i learned the makers of starwars used a tennis shoe, a potatoe and printercartridges for props.
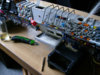
I started collecting a foldable shoppingcrate, a cd-rack, some dia-carousels, a fanpropellor and just a heap of scrap.
I wanted to use a little kitbashing too, and make use of a hot wire-technique to cut styrofoam.
The basic shape came out something like this:

Further i want my ship to be:
-Big (like my height; 1,81m)
-Sturdy and displayable
-Lit, partly bulbs, partly leds and fiberoptics
-Detailed with original grey scrap where possible
So i cut a stack of styro with a hot guitar wire in a bow. I cut it around a set of dinerplates, to match the diacarousel size.
.jpg")
.jpg")
The dia-carousels resemble something like engineports. Its fitted with lightbulbs.
Yes, christmastree lights. Bare with me, i started this over ten years ago..
.jpg")
.jpg")
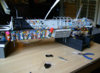
The styro shape and carousels form an engine array, which i finished with cloth and resin. As a poor mans fibreglas.
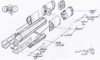
Some early detailing. I learned you still really have to plan ahead for a long build like this.
Contradictive to my intension, making it up while going along..
.jpg")
.jpg")
eastereggs, botllecaps, socket, whatever.
The back of the ship (engine part) is coming along nicely. And will come along for years more, i'm afraid..
.jpg")
I also tended to the cd-rack, which will form the body. It will house fibreoptics.
.jpg")
.jpg")
The front is a coffeemachine lit, a shoulderpad and fotorollcases (yep this built is that old).
An early mockup of the overall look:
.jpg")
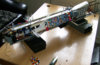
I started on the monumental task of cladding the engine array with keyboard keys.
I really like the way this forms a surface, but man..
.jpg")
I ran out of keyboards, i moved, twice, and then it sat on a shelf like this.
So much for the old built.
Now, i picked it up again, inspired by the builts on this site.
Although its a bit different ballgame, i'd like the quality to be in the same park.
So i finished the key-cladding:
.jpg")
Note the bucket of keys in the front. It once was full keys from over 20 keysboards. sigh.
But now they are a techy surface, forever!
I left an openening for some orange truckrims i like to point foreward. On with the going along.
So much for now, i hope someone digs this.
More to follow.
This is my first post on theRPF.
I'm building a spaceship with found scrap-parts, inspired by their topology. When finished, the parts may still be
recognisable as where they originated from, but i like the whole to look like a proper spaceship.
I was kind of reluctant to post here, because my built seems offtopic by default, but i've been leeching long enough of the awesome threads here. Specially scratchbuilders, like thenylongag and yuumi2891103. Although my pile of scrap cant stand in the lights of the greatness here, i guess ill post it anyway.
It started a long time ago, when i learned the makers of starwars used a tennis shoe, a potatoe and printercartridges for props.
I started collecting a foldable shoppingcrate, a cd-rack, some dia-carousels, a fanpropellor and just a heap of scrap.
I wanted to use a little kitbashing too, and make use of a hot wire-technique to cut styrofoam.
The basic shape came out something like this:
Further i want my ship to be:
-Big (like my height; 1,81m)
-Sturdy and displayable
-Lit, partly bulbs, partly leds and fiberoptics
-Detailed with original grey scrap where possible
So i cut a stack of styro with a hot guitar wire in a bow. I cut it around a set of dinerplates, to match the diacarousel size.
The dia-carousels resemble something like engineports. Its fitted with lightbulbs.
Yes, christmastree lights. Bare with me, i started this over ten years ago..
The styro shape and carousels form an engine array, which i finished with cloth and resin. As a poor mans fibreglas.
Some early detailing. I learned you still really have to plan ahead for a long build like this.
Contradictive to my intension, making it up while going along..
eastereggs, botllecaps, socket, whatever.
The back of the ship (engine part) is coming along nicely. And will come along for years more, i'm afraid..
I also tended to the cd-rack, which will form the body. It will house fibreoptics.
The front is a coffeemachine lit, a shoulderpad and fotorollcases (yep this built is that old).
An early mockup of the overall look:
I started on the monumental task of cladding the engine array with keyboard keys.
I really like the way this forms a surface, but man..
I ran out of keyboards, i moved, twice, and then it sat on a shelf like this.
So much for the old built.
Now, i picked it up again, inspired by the builts on this site.
Although its a bit different ballgame, i'd like the quality to be in the same park.
So i finished the key-cladding:
Note the bucket of keys in the front. It once was full keys from over 20 keysboards. sigh.
But now they are a techy surface, forever!
I left an openening for some orange truckrims i like to point foreward. On with the going along.
So much for now, i hope someone digs this.
More to follow.
Attachments
Last edited:
.jpg")
.jpg")
.jpg")
.jpg")
.jpg")
.jpg")
.jpg")
.jpg")
.jpg")
.jpg")
.jpg")
.jpg")
.jpg")
")