11th Doctor Metal Sonic Screwdriver Remote Conversion

cama900

Active Member
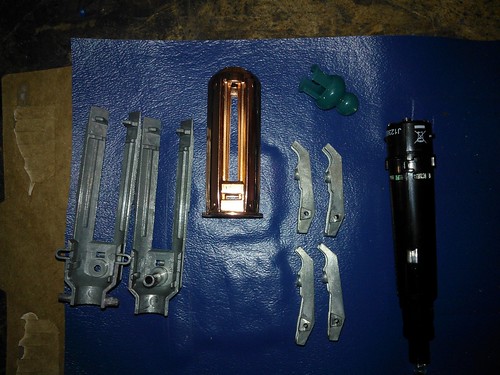
After seeing NakedMoleRat and kursosawa's mod of the Sonic Screwdriver universal remote, I figured I just had to have one :D So I bought my remote and began dremeling and filing away at the copper cage and aluminum arms. Ive also began taking the coating off the aluminum parts using steel wool, but i cant get into all the cracks and crevices, anyone know a better way to do this? And here are some pics! :D


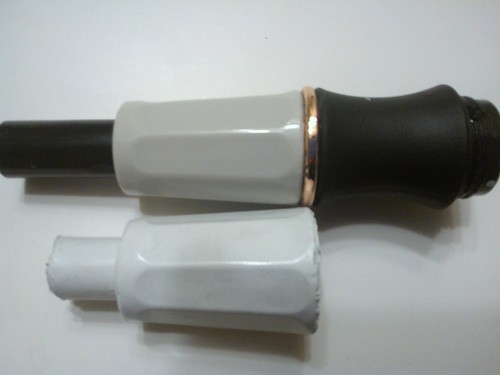
Before any modification
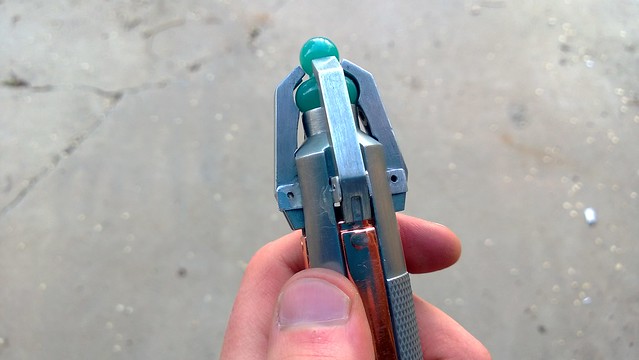
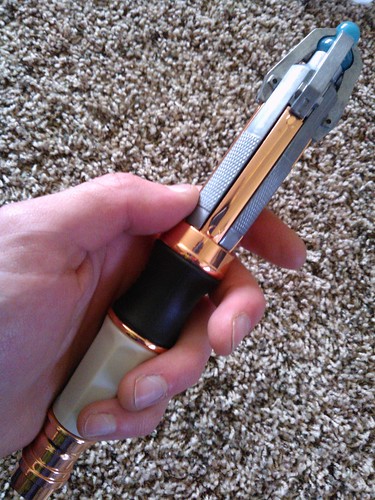

As of now


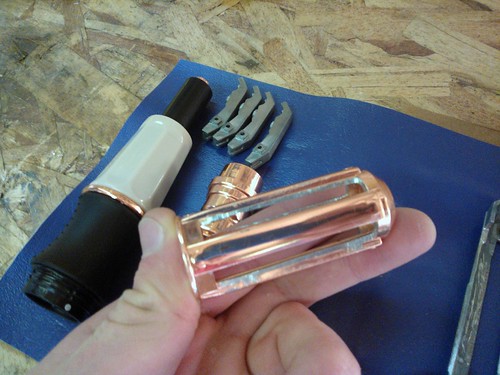
Havent figured out how to get the white handle off yet, but my next priority is the claws, so it can wait

And my apologies for the somewhat blurry pictures...

Any tips, advice, questions or criticisms are very welcome!

Peace out! :ninja
 
Last edited:
So I cant, for the life of me, get the white handle off!! Ive pulling, wiggling, prying, hitting it on things... Im quite afraid that i will end up accidentally breaking it, Ive already beat it up. I think it must have gotten some glue in it somehow (or something like that), because it seems that im the only one to have had this problem. So I made a ghetto mold of it, so that if if i does break it wont be the end of the world :)


Until next time!
 
To remove that coating, soak the parts in a 50% solution of purple degreaser from home depot for 24 hrs. Works like a charm.
 
Alright thanks! Ill be sure to pick some up!

By the way, I forgot to say thanks for all your help so far! Its made my life much easier!
 
Last edited:
Kursosawa, that's awesome news! Do you have any pictures of the end result of the degreaser trick?

Cama, the white part is tricky and I can't remember exactly how it worked. When I get home tonight I'll pull it out and see if I can recall how to remove it.
 
Thanks, I think mine might just have an abnormally large amount of glue in it. The guys at the wand company (Seriously the nicest guy i've ever talked too online) sent me a new one. I would still prefer getting this one off in tact obviously :D Thanks for the help!
 
Some of the more recent remotes I have taken apart use a bit of glue to hold the white handle in place. Its a bit of a pain to deal with really.
 
I made the mounts for the claws out of an old TV Antenna that had a section of square aluminum. It took a ridiculous amount of time, but they turned out pretty decent so I'm happy :)


I still need to modify them a little bit. Anybody know the best way to attach them? I've got them on with hot glue right now, but that's just temporary to make sure they work fine :)

Anyway, thanks for looking!
 
Sorry I took so long to respond. But you can carefully pry it off with a screwdriver, or you can just grab it and pull and carefully wiggle it. I wiggled it and pulled to get it off, took me about a half hour or so. Good luck!
 
I'm sorry fellas! I got this done nearly 3 months ago and just completely forgot to update this thread! To make it up to you, Ive made a youtube video :)
Here is more or less whats inside:
11105005593_e7eb8c62f4_z.jpg

11105004473_9681e83e4c_z.jpg

I have no Idea why I had this crazy system, It was a pain in the butt! But it ended up working so I'm happy!
11104965784_be934d1724_z.jpg

11104883185_c06cee0069_z.jpg

I did replace the LED with a white one so I can change the emitter to one of the other colors should I acquire them at some point.

Here are some comparison shots with the want company 10th doctor remote!
11104970904_7bf543d32d_z.jpg

11104968984_f399377a8c_z.jpg

11104942376_b9315c7407_z.jpg


Here is the video I promised! ITs pretty much just showing off the 11th doctor one and comparing it a bit with the 10th from the wand company
 
Last edited by a moderator:
great!
did you get the green emitter from Kursosawa?
Where would it be possible to get a green core?
I'm working on my remote,and would upgrade the front too...
 
The emitter and core are both from the CO toy, although I will probably buy a few emitters from kursosawa. I did some sanding on the core and then rubbed bothe the emitter and core with steel wool.
 
Looks fantastic! I have a couple questions about the claw mechanism if you don't mind. I was looking at trying a budget scratch-build version of this sonic and my initial thought was to use torsion springs for the claws, which it looks like what you've done. Is that the same method as the toy and other prop versions use? And where did you get the springs that you used in this mod?
 
very nice conversion.

Though, if I were you, i'd go ahead and take some enamel nail polish remover to those copper parts and give them a little bit of wire wool treatment. It makes a world of difference to the sonic.
 
Looks fantastic! I have a couple questions about the claw mechanism if you don't mind. I was looking at trying a budget scratch-build version of this sonic and my initial thought was to use torsion springs for the claws, which it looks like what you've done. Is that the same method as the toy and other prop versions use? And where did you get the springs that you used in this mod?

I used Kursosawa's method method. I had the drywall anchors laying around. I cant remember off the top of my head how the toy works, but I still have the parts so I can go figure it out.

very nice conversion.

Though, if I were you, i'd go ahead and take some enamel nail polish remover to those copper parts and give them a little bit of wire wool treatment. It makes a world of difference to the sonic.

I was thinking about doing that, so I may have to try it!
 
This thread is more than 4 years old.

Your message may be considered spam for the following reasons:

  1. This thread hasn't been active in some time. A new post in this thread might not contribute constructively to this discussion after so long.
If you wish to reply despite these issues, check the box below before replying.
Be aware that malicious compliance may result in more severe penalties.
Back
Top