You are using an out of date browser. It may not display this or other websites correctly.
You should upgrade or use an alternative browser.
You should upgrade or use an alternative browser.
Doctor Who stuff
- Thread starter mrchester
- Start date


Greetings. I freed the lost photos from my Lappy and am going to fill the holes in Big Red's construction. Mainly the painting of his skirt spheres, bands, and ears... with some other finished shots. The shoulder bands got colored with Krylon Gloss Gold. I tried not to handle them (once dried) too much because I didn't want the oils from my hands to tarnish the finish. I tacked the ping pong balls to long strips of wood and painted them with Black Primer. It covers well and the whole Dalek was going to be clear coated when assembled. There is only photos of a portion of the spheres.... yes, I steered away from saying "Balls'. The ears were turned from PVC tubing and capped with sheet styrene. To make them 'POP', I would paint them with Candy Apple Red. This meant that they would have to be painted Silver first, then (once dried) they would have the Red added after. Finish details (pupil) were added to the Eyestalk, also.


Last edited:
To have access to the inside of 'Red' once he was perched on the tree, I made a swivel lock plate from aluminum. This was mounted the bottom inside the neck bin and a set of Allen cap screws were mounted to the top of the shoulder box. A second ring was mounted to the top inside. I had also plated off the bottom of the dome and secured a short length of PVC to it. This mount through the holes in the neck and allow the dome to swivel. A cross pin keep the dome from being pilfered by the pesky squirrels.


Here are some shots of Red before and after clear coating. Some final stats and info. The ears had rods in them which were fitted into coresponding holes in the dome. The Neck bin and dome (once assembled) would act as an access point for internal maintenance. The lower three sections were bolted together internally and could be accessed by starting at the top and working down (section by section). I did have to take him down once to address the retainer for the claw arm and gun.


In what might be a little unorthodox for this site, Some better pictures of the final product. I had fabricated a three pronged stand that Red would slide onto. This was made form flat steel stock (with holes added for detail) and 1/2" rods. The rods were 11" long and reached far enough into the Dalek so that they offered support in bad weather and so that a locking ring could be secured to the top rod ( inside the shoulder box). Removing the neck bin provided access along with a ten foot ladder. I fabricated three braces that would be secured to the pine tree and perch him out away from said tree. I did have one squirrel that would sit on his dome... but that didn't last long (Red Tailed Hawks live here, too).


Greetings folks, sorry for being away so long. I plan to play catch up on several projects that I’ve posted about (sorry, MPC Cygnus is still idle). While I was working on the Aqua-foil project, I decided to purchase and build another Metropolitan Police Box from Squirrel Works rocket company. I have officially retired the first TARDIS after taking a gold medal several years back at my first Modelpalooza show. This time the plan was to light up the inside windows and signage...even having a flashing top beacon. Being a balsa wood construct, a delicate hand will be needed for some of the finish work. The inside of the windows and recesses especially.


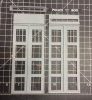
The great thing about the kit is that everything is laser cut, thus making the windows and the panel recesses identical. I did notice that there were some minor changes in this kit compared to the one from six years ago. Mainly, the pitched roof comes out with different trim when its finished. In building the Box you have to include the core tube (which the frame plates mount to), but completely ignore the motor mount/ fin canister... unless you want to fly your model. Next are some random pictures of the roof, molding for the bottom, and test fitting the ‘Police Box” signs into their boxes.


Lighting a wooden construct was a tricky proposition. The outer panels (with the holes) are glued to solid sheets (with window stickers in between). The Police Call Box signage are stuck into rather delicate boxes that were a little tricky to build for the first box. Modifying the kit to have the signage and windows light up took some creative knife work. The other trick to make this an award winning model is to prime and sand the individual panels and the four square posts that make the corners of the box. The signage boxes are assembled then prepped for painting. Slots are cut in the sign boxes and in the top of the outer panels to allow light through. I shorted the back panels so that the top half of the outer panels could be lit.
The decals would be adhered to 0.040” sheet plastic ( which would be able to allow light through).


The decals would be adhered to 0.040” sheet plastic ( which would be able to allow light through).
Attachments
 . It was about 6" tall. I love your collection. ' May it continue to grow'
Wow Nick K, sorry to here that some miscreant thieved your SW Dalek... and from a hobby shop to boot. I will get to the. 12” scratchbuilt SW dalek that I’ve been teasing soon. But first I need to finish the second Police Box build. Here’s some pics of it with Product Enterprises 12” Dalek.


For this build, I was pushing my luck trying to get this ready for Modelpalooza 2017. At the same time I was also building Micro-Mir’s 1/35 scale H.L. Hunley model (which I planned to enter in the watercraft category) so there is not a full set of build photos for the Police Box (TARDIS) build. I had assembled the roof and the base and started painting the components Master Modeler Blue Angel Blue. I would score the paint on the side and backing panels where the glue would be applied. Yeah, I know, can I make things more complicated than they need to be. However, in the case of the side panels, it is easier to fix the individual pieces (that are flat) than the assembled pieces if the painting process goes sideways. The painted panel pieces were flat coated and wet sanded smooth. A weight ( in this case a dead center) was used to insure that everything bonded together flat.


Attachments
In assembling the box, there was a little warpage. This was resolved with some cross bracing. They were installed in a way that the windows and signage could be lit from a cluster of bulbs mounted in the central motor tube. 0.040” thick white plastic is used to be the background of the windows and signage. The stickers are applied to the white pieces and then ( in the case of the windows) carefully installed. OOPS... view pictures in reverse order.


Blofeld111068
New Member
This is a Comet Miniatures Movie Dalek that I converted to the Dalek Supreme from Planet of the Daleks. The Comet dome is wrong so I turned a proper master from aluminum then made a mold of it. The neck bin and rings are turned from aluminum. The front half of the shoulder box (from Comet) is wrong, so I remade it from 1/16" sheet styrene. The skirt is done straight from the box. The 'flashlight' eye piece and the 'jam jar' ears are turned from pvc. The model is finished in Krylon blacks and krylon gold. :cool
I do need to finish the underside.
View attachment 576164 View attachment 576163
Excellent conversion
Sent from my iPad using Tapatalk
Similar threads
- Replies
- 9
- Views
- 1,013
- Replies
- 115
- Views
- 11,462