You are using an out of date browser. It may not display this or other websites correctly.
You should upgrade or use an alternative browser.
You should upgrade or use an alternative browser.
Doctor Who stuff
- Thread starter mrchester
- Start date
Okay, some final words about my Doctor Who stuff's performance at Modelpalooza 2013. Not only did the Daleks and TARDIS get some pictures on the Orlando IMPS forum, but they got some pub at the Cult-TV-Man's site, too. Love the Cultie, big time. Modelpalooza Orlando 2013 » CultTVman's Fantastic Modeling
Modelpalooza 2013 Photos by drackstein | Photobucket
Coming soon: Emperor Davros...or 12" scratch built Special Weapons Dalek... or scratch built 1/8 scale Imperial Dalek. Too many projects.
Modelpalooza 2013 Photos by drackstein | Photobucket
Coming soon: Emperor Davros...or 12" scratch built Special Weapons Dalek... or scratch built 1/8 scale Imperial Dalek. Too many projects.
And now for something new. Several events over the past nine years came together to get this project going. First, the Dalekmania documentary that has the guy who built a bunch of 2' Daleks to make the "third" movie. He used Ping-Pong balls for the skirt spheres. Upon hearing this, I thought that would make a wicked birdhouse (Its a minor side hobby that the wife allows). About three years ago, I had made a bracket mount for a rocket birdhouse (that was converted from a real high powered rocket kit) that hangs off of the side of the pine tree in my front yard. 5 months ago, I had to take down the Gerry Anderson inspired rocket birdhouse due to improper paint prep. I was not ready to drop everything to redo the complicated finish and the bracket on the tree sits empty. Finally, three months ago, our town got a Hobby Lobby craft superstore. Upon exploring the store, I came across something that made everything finally come together and whammo...the Dalek birdhouse clicked in my head, completely clear. They sell half spheres that are made from Styrofoam and in the right diameter. The hardest part (in my book) of scratch building a Dalek is making the dome. I was not looking forward to turning one and my shop does not have a radius tool for 8".
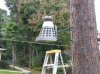
This sets things up and I am adding a couple of teasers of 'Tree Dalek' (and the Gerry Andersen Birdhouse predecessor...the hole is on the other side) at its current state. Next up...construction photos.


This sets things up and I am adding a couple of teasers of 'Tree Dalek' (and the Gerry Andersen Birdhouse predecessor...the hole is on the other side) at its current state. Next up...construction photos.
Attachments
Last edited:
Since the paint started peeling off of Birdhouse in sheets (a major boo-boo for me), the idea is for these two will trade places when the Florida Sun takes its toll. Oh, when I was doing 'Birdhouse', the theme to Stingray (except I used the word Birdhouse in the theme) kept playing in my mind.
Now on to the build, I purchased an 8" half sphere and marked it for cutting. I then marked the dome for the chamfer on the bottom. Using my table belt sander, I set the table at the proper angle and free handed the chamfer. I also located and cut out the slot for the eye stalk. Since the finished product is meant to be weatherproof, I'll have to toughen up the dome. I used fiberglass cloth and marine epoxy to coat the outside and inside of the dome. When cured, I cut out the eye slot and primed the dome with etching primer.
At the same time, I went ahead and made up the eye stalk. In a nutshell, I used grey pvc, copper and aluminum tubing, and sheet styrene to build it.
My usual M.O. when I scratch build, is to make all of the components and dress them up separately. I was sitting on a bit of balsa and lite-ply left over from my rocketry days. Using the plans from Project Dalek, I layed out the profile for the bumper on three sheets of 1/4" lite-ply. I glued two of the sheets together to make the upper deck of the bumper. I used block balsa to fill the space (around the perimeter) between the top and the bottom. I dressed off the outer sides with my shop's vertical belt sander. After rounding of the top edges, I made preparations to coat the bumper with fiberglass (and cloth). I applied several coats of resin and rough sanded it out. I then applied Bondo body filler and milled the top and bottom surfaces true. I planned to make the bottom like my Dalek Supreme (check my other thread). After laying out the hole pattern, I cut out the holes with hole saws (6" in the center and 1-1/2" for the outer four). I made the travel ball sockets from pvc and sheet styrene. For the outer balls, I used ping pong balls and for the center, I'm using a Tap Light. It has the right shape... sorry, no lights for this guy. The bottom details are finished with a blue anodized paint kit.


In making the skirt, I used a method that I stumbled on when I had built smaller scratch built Daleks. I cut out the top and bottom plates from 1/4" lite-ply. I spaced the top plate in relation to the bottom plate with the use of a LOC Precision 5.5" coupler tube. I then cut the panels from 1/4" sheet balsa wood. I left the panels long so I could make adjustments during assembly and I would sand off the excess at assemblies end. I fiberglassed the finished skirt and trued up the top and bottom when it cured. Access holes were cut in both ends so I could remove the core tube.


Now, on with the skirt, I first sanding it out with 120 grit. After which, I skinned it with Bondo. After several sanding and priming sessions, I got ready to mark the skirt for the sphere cutouts. The method that I use is to mark the height of the four rows of balls and mount a pen at the proper place. Then I spin the skirt around (on a flat surface) to mark the proper level. After which, I mark the top and the bottom of each panel and draw the proper vertical lines. My horizontal boring mill might be a little overkill. Then, with a circle cutter, I put a bunch of holes in my skirt... sorry, no pictures of that operation.


Now to cover some loose ends, I turned the ears from a couple of pvc couplers, which I capped with sheet styrene. Since its perch is 15 feet up my pine tree, I think I'll pass on the fluted details for now. I used a red anodized paint from the parts house to finish off the ears.
The neck bin was turned from a cedar transition that was left over from my high powered rocketry days. The proper angle was turned (and the center bored out) and shoulders were cut to help locate the rings. This would help in the manufacture ring/cage assembly. Oh yeah, I sealed the cedar bin with thin CA...it fumed for a couple of hours.
.jpg")
.jpg")

.jpg")
The neck bin was turned from a cedar transition that was left over from my high powered rocketry days. The proper angle was turned (and the center bored out) and shoulders were cut to help locate the rings. This would help in the manufacture ring/cage assembly. Oh yeah, I sealed the cedar bin with thin CA...it fumed for a couple of hours.
Last edited:
Now, back to Tree Dalek. For the shoulder box (Which I used a corrected Comet Miniatures box as a guide), I cut an upper and lower plate from 1/4" Lite-ply and spaced them with a piece of LOC Precision 4" cardboard tubing. Then, using 1/16" sheet styrene to wrap around the section. After the CA cured, I trimmed the top and bottom. I then wrapped another sheet of plastic around it, to bring the wall thickness to 1/8". I busted out my Sharpee ( black marker) and started the process of laying out the boxes. These were made from the same sheet styrene. Holes were cut in the bottom and in the back of the shoulder boxes.
I have some in between pictures of this project in its bare wood stages. Yeah, I know, bad continuity. So, sue me.
.jpg")


.jpg")
.jpg")
.jpg")
I have some in between pictures of this project in its bare wood stages. Yeah, I know, bad continuity. So, sue me.
The gun, claw arm, and neck ring assembly are made from aluminum. The neck rings were cut from a piece of thick walled aluminum tube. Each rich was properly chamfered and notched for the verticals. I did the verticals out of (three each) 1/16" aluminum welding wire. Once assembled (and glued together with CA), the frame slips over the cedar bin. Finishing was pretty straight forward and was finished in Krylon Gold and Clear Coat.


I used a machinist block and a flat surface to draw out the band area on the shoulder bin. Then I layed out the pads that the bands will mount to. The bands are made from 1/16" sheet styrene and are secured with tapered head machine screws. After roughing out the bands, they were secured to the box, then drawn out the same way the box was marked. They were then trued up and the connector plates were secured to the front and back. The bands were removed for finishing later.


Right, now moving on. I turned the ball mounts for the gun and the claw arm out of aluminum (with some help from a home made radius cutting jig at my shop). I drilled a hole through each to mount their corresponding part. I made the claw arm from a solid aluminum rod (set a full extension and non- telescoping) and the same for the gun barrel. The barrel would be counter -sunk slightly (then painted black) to give the desired effect. Using a dividing head, I drilled the two sets of holes for the external wires and finished the gun off with aluminum welding wire. The two balls are held in by a Teflon crossbar that mounts to a long bolt that is epoxied inside the shoulder box ( similar to Comet Miniatures).


Greetings, I didn't mean to be away for do long...I'll try to do better. Lets pay off the Big Red Dalek story. He got finished and was mounted to the side of a big pine tree in my front yard. At about twelve feet off of the ground, he was an interesting oddity to add to the wife's whimsical yard.


"Red" was mounted to my tree in March 2015. Eight months later we noticed that the tree was oozing sap in excessive quantities. It also smelled of rotten fish. After our Arborist examined the tree we were told that we had Pitch Beetles...the tree was doomed. The plan was to take Red down in the Spring of 2016 and change out any treated (damaged) wooden parts for PVC. But, the tree removal changed that. I jokingly put him out by the road with a hitchhiker sign for his home world of Skaro but no takers. He currently sits quietly in my den (with the rest of the little Daleks that I have. I give him a restoration in a few years (the Florida summer really took its toll).
Coming soon, 12" Special Weapons Dalek Scratch build.


Coming soon, 12" Special Weapons Dalek Scratch build.
darth_myeek
Sr Member
Lovely job on the Dalek.
casperdj777
Active Member
that would look awsome next to a Christmas tree! I really need to try & make one ...one day..
Thanks guys for the kind words. I know that there are a few missing steps (like the painting of the ping pong balls and cutting the holes in the skirt). However, I need to get off of my lazy butt and get those pictures trapped in my laptop (from two summers ago) into my I-Pad.
Similar threads
- Replies
- 9
- Views
- 1,039
- Replies
- 115
- Views
- 11,669