Hello everyone, this is a project i started some weeks ago after studying NMR's conversion though there are a few differences in my sonic's construction. I got caught up in the flurry of work, so sadly, i forgot to take pics along part of the way.
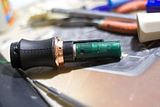
first is the battery pack. Instead of keeping the green shaft from the CO toy intact, I decided to create a separate battery/sound board pack that would be stationary near the back end of the sonic. First, i cut the shaft down to size unseated the sound board, hollowed out the tube so I could move the soundboard back about half a centimeter. I also cut out the momentary switch in the back of the module so make a little more space.
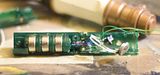
After sealing up the module, I glued it to the back end of the black casing near the pommel end of the sonic, cutting away part of the black housing so I could retain access to the batteries. I then cut out the swith originally wired to the board and replaced it with a larger switch and ran the wire through a hole in the casing. I then cut a notch out of the rubber portion to seat the new, larger, momentary switch. In order to keep everything in place, I glued the portion of the black housing i cut away into the side of the white handle, to ensure a snug fit. I then used a small brass slotted screw to hold it in place when closed. The sound module fits snugly into the copper end cap, thus there is no risk of sliding off.

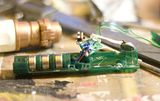
Here is pretty much where I completely forgot to take pics. First, I stripped off the coating on the aluminum parts. Secondly, I really did not like the look of the CO toy shaft with all the buttons and seams. Thus, I cleaned up the shaft with a bit of putty and made a master mold of the shaft which had a 1/4 inch ID hole in the middle for me to fit an aluminum pipe to ensure rigidity. I had also molded the green emitter. The shaft and emitter where then cast in green tinted clear resin. While A great deal darker than the prop, I rather like it. I trimmed out the channels of the copper cage to make room for the sliding action. Furthermore, I hollowed out part of the interior sides of the aluminum parts which hold them to the copper cage but left enough to act as posts which slide into holes drilled into the resin shaft, that way, it ensures a strong bond between the shaft and the aluminum cage.
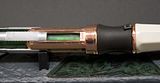
The Last part was the largest pain in the back side....those damn claws. I used NMR's L shaped strut idea to hold the claws in place. However, I used 4 torsion springs to hold the open position of the claws when the sonic is deployed. I used a small grey ring that came from the emitter end of CO toy and mounted it on the green shaft under the claws in order to hold the claws open. The eerie thing is that is the grey ring is exactly the same OD as the ID in the opening on the copper cage so it slides in and out smoothly! The tolerances on this this thing is pretty tight, especially on the shaft, which makes helps in keeping the sonic closed.
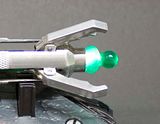
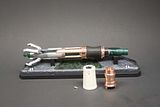
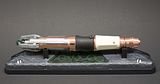
Enough talking, here are the final results.
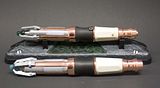

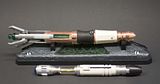
and a few pics with my MFX Sonic for good measure.

first is the battery pack. Instead of keeping the green shaft from the CO toy intact, I decided to create a separate battery/sound board pack that would be stationary near the back end of the sonic. First, i cut the shaft down to size unseated the sound board, hollowed out the tube so I could move the soundboard back about half a centimeter. I also cut out the momentary switch in the back of the module so make a little more space.


After sealing up the module, I glued it to the back end of the black casing near the pommel end of the sonic, cutting away part of the black housing so I could retain access to the batteries. I then cut out the swith originally wired to the board and replaced it with a larger switch and ran the wire through a hole in the casing. I then cut a notch out of the rubber portion to seat the new, larger, momentary switch. In order to keep everything in place, I glued the portion of the black housing i cut away into the side of the white handle, to ensure a snug fit. I then used a small brass slotted screw to hold it in place when closed. The sound module fits snugly into the copper end cap, thus there is no risk of sliding off.


Here is pretty much where I completely forgot to take pics. First, I stripped off the coating on the aluminum parts. Secondly, I really did not like the look of the CO toy shaft with all the buttons and seams. Thus, I cleaned up the shaft with a bit of putty and made a master mold of the shaft which had a 1/4 inch ID hole in the middle for me to fit an aluminum pipe to ensure rigidity. I had also molded the green emitter. The shaft and emitter where then cast in green tinted clear resin. While A great deal darker than the prop, I rather like it. I trimmed out the channels of the copper cage to make room for the sliding action. Furthermore, I hollowed out part of the interior sides of the aluminum parts which hold them to the copper cage but left enough to act as posts which slide into holes drilled into the resin shaft, that way, it ensures a strong bond between the shaft and the aluminum cage.

The Last part was the largest pain in the back side....those damn claws. I used NMR's L shaped strut idea to hold the claws in place. However, I used 4 torsion springs to hold the open position of the claws when the sonic is deployed. I used a small grey ring that came from the emitter end of CO toy and mounted it on the green shaft under the claws in order to hold the claws open. The eerie thing is that is the grey ring is exactly the same OD as the ID in the opening on the copper cage so it slides in and out smoothly! The tolerances on this this thing is pretty tight, especially on the shaft, which makes helps in keeping the sonic closed.
Enough talking, here are the final results.


and a few pics with my MFX Sonic for good measure.


Last edited:


")


