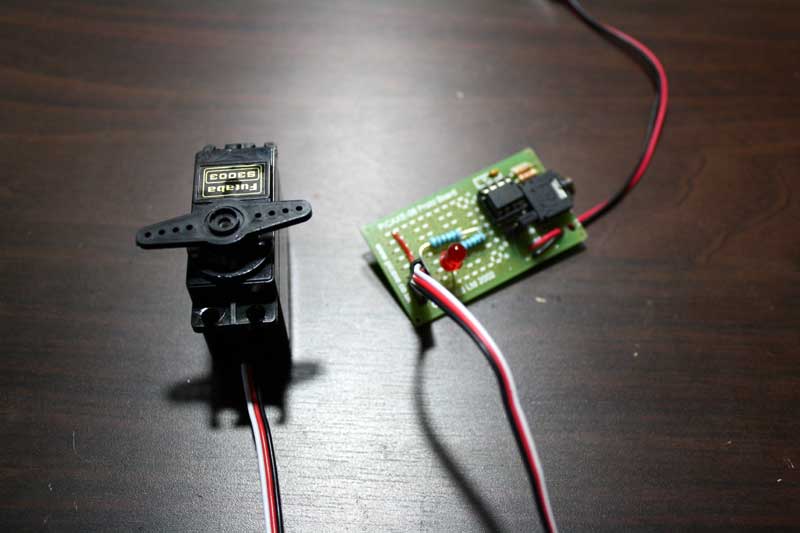
Iron man motorised faceplate electronics tutorial!!!

looks more difficult than it really is.. (just dont panic like I do).. ad it'll be fine! lol

designing the pcb and getting the gerber files sent out to get a solder mask is usually step one for myself..

(unless board is more on the simple side, then you can use a piece of paper and exacto knife to make your own solder mask/stencil, as I was so kindly advised of a while back)


Im just like you too.. I buy different parts.. ad keep them.. play with them.. see how they work & interact..etc..

for me its fun!
 
The arduino mini pro also has a 5v option. So I may buy that usb converter and use one of those. Compact. Next thing worth thinking about is having infra red, or Bluetooth etc for the switch. I don't want any wires coming from the helmet but I also don't want the switch in the helmet. So wireless is the only option.
 
For a wireless option ask Xrobots about it as he used one for his set up.

Edit. Or ask him to add it to this thread if he has time.
 
Ah ok. I didn't know whether the wireless unit he uses could be applied to the arduino board. I am a complete noob when it comes to electronics. I just assumed that the reciever of the wireless unit could be put in place of the switch on the arduino but like I said I am clueless in these matters and my reasonings are based on logic and not practical application. I will leave it to you guys as you know far more about it than I ever will. I just hope that when this project has been refined even the layman can achieve it with a little work on their part ofc. I am looking forward to breaking down what you guys are doing so I can put this tech in my lid too :)
 
Drack you could well be right. I assume very much that the stuff can be applied to arduino the same as xrobots did. I just meant I can't copy his setup exactly the same. Not looked into it yet. I only started playing with this stuff for the first time around a month ago, so I'm not much more knowledgable than anyone else here. I'm just learning publicly to save everyone else the hassle of learning it. Next step on my agenda is to buy the arduino mini pro 5v variant and start hard wiring stuff and getting it into the helmet. My brain is already aching at the thought of it.
 
The simplest method to control servos is with a Picaxe: XRobots.co.uk - How to make LEDs flash and Servos move

They don't cost much (practically disposable), small size, and can drive servos directly, programmed in basic, and support SONY IR remote codes out of the box for making wireless things.

Look at page 19 of the Picaxe Manual to see the servo wiring diagram and how simple the code is: http://www.picaxe.com/docs/picaxe_manual3.pdf

My actual approach was to use a separate servo controller as well so I could control servo speed and acceleration, but if your mechanics are rock solid then you can just drive the servos full speed straight from the Picaxe.

XRobots.co.uk - Iron Man MkVI Armour Motorised Faceplate

electronics26.jpg
 
Lol I hear ya bro. I know I will have that very same head cotton when I start on this too. In fact I was going to just rely on a wire running down to my boot, yes my boot. I have done some testing into where I want my helmet switch. I walk about 10-15 miles a day in my job when on a full shift so I was able to make my self conscious of how often my big toe touchs the top on my shoe, in short it never does. So I though rather than have it in your glove where the action of using the switch is seen I want it to appear as if the helmet opens by its self. So the idea of having no wire appeals to me.
 
Xrobots, i saw your tutorial regarding using the picaxe. The only reason I opted for Arduino is because theres so much template code available all over the net and thousands of tutorials due to its rapidly expanding popularity. There probably is plenty for the picaxe too but arduino was grabbing my attention more regularly and it had one name to remember. My coding knowledge up until a month ago was absolutely zero. For all i know they could even be exactly the same code lol... Once i have made my first helmet and really grasped the whole concept then i may travel down the picaxe route and begin learning more. I do like the fact it is very tiny. Have you ever used Arduino yourself?

As for a foot switch Drack... Im a pro magician by trade, and the act of using the foot or a toe to trigger something that is intended to be unseen is a very widely used method for achieving sneakiness. It does mean you will have a wire running all the way from your head down to your foot though... I hate hookups, even in magic, they annoy the hell out of me.

In other news, ive just bought an IR sender and reciever to play around with when it eventually arrives, so like xrobots i aim to have everything self contained within the helmet (thanks for the inspiration on that idea).

I hope my brain actually survives all this learning.
 
I've never used an Arduino, but that's generally because I've never had to do anything that needed it's capabilities. Even my bipedal dynamically stable android project used Picaxe: XRobots.co.uk - Android 11

Arduino is faster and has more programming space, but moving servos is a fairly trivial task - it largely depends on what you'd like to do in the future and how you want to develop your skills.
 
Its popularity was the bait for me. I suppose there is no need for you to use it when you already have sufficient knowledge of other methods.

There are LOADS of picaxe products on ebay. Mind officially numbed
 
for myself.. the 'lure' of quick & easy start-up was appealing to me.

Is there a PICaxe IDE out there? (free) that many/everybody uses? say a common one that most/many communities support/use. (for beginners.. not an IDE like Eclipse... but specific to beginners and PIC?)

Many quick and easy 'copy/paste' code snippets/tutorials out there?

I have a PICKit2 programmer.. but havent really used it for much more than flashing other people's hex file to chip.. (not true programming)
Is there an 'interpreter' type language/layer that makes turning on/off pins..reading/writing to pins easy? or do you need to really need a thorough understanding of the programming/chip data/direct port manip..etc?

Im always open to try/learn new things... thanks! :)

Yes the Picaxe programmer software is free: Index of - Software - PICAXE

The code for everything is in the manuals: PICAXE Manuals - Getting Started - PICAXE

Yes the Picaxe uses BASIC, so commands are like: OUTPUT pin,pin, pin...

Index of - BASIC Commands - PICAXE
PICAXE Forum

These are used in UK secondary education, 11 years+ for learning electronics, so you can quickly achieve a project that does something. They have distributors worldwide including Sparkfun etc.
 
nice links!..

I'll give them a quick once over!..

ahh.. I see now, I knew so little.. I wasnt even 'really' aware of the PIC vs PICaxe differences..etc.. until now.

thanks! :)
 
I might check out those links when I get home.

Right I need confirmation on something:

If I install 1x5v power supply. Can I wire it directly to the arduino controller then directly to the eye LEDs in parallel and directly to the servos in parallel?
...Then just have the signal cables going to LEDs and servos from arduino.

Power supply is something that's really halting me once installation begins. I think once I've worked this out ill be confident to install once my new parts arrive.
 
Im not clear exactly what your trying to do.. but I'm going to say 'no' :)

1.) check what kind of vRegulator comes on the board (NANO) you ordered/want to use. If it works at +5v... probably has a 5v regulator on it.. meaning it needs more than 5v to operate.. probably at least 6v.

2.) yes you can directly wire in your 'correct' battery pack to the NANO board.

3.) I dont know what LEDS you are trying to use (or how many).... but you'll need to know the forward voltage (fV). Most likely 3v+ or so for most leds (excepts reds..etc).... you NEED to know your battery pack choice "AND" the vF of the leds you plan on using.... but you DEFINITELY need resistors on each led.. (or pair of leds) ;)

you could etch your own PCB.. or grab some protoboard from local radio shack/equivalent
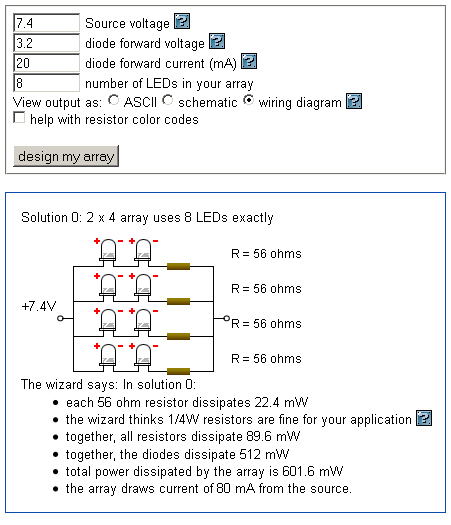
this is a good link for calculating the resistors for led ARRAYS

LED series parallel array wizard

(for single leds use this one: LED calculator for single LEDs)

but lets take this scenario:

Battery pack: 7.4v (Li-Ion)
Forward Voltage of LED: 3.2v @ 20mA
Total LEDS: 8 (4 per eye, but one long 'string' / 2 x connected eye pcbs/boards)

for every 2 leds in series, only need 1 resistor....and groups in parallel.

ledArray_example.jpg


you can toggle the servos directly from the Arduino.. and I think power them from the 5v lines too..

but not the leds... unless you are only using 1 per eye...(2 if using red or led with vF of around 2.1v or something).. you'll need to use a transistor or something. (component with 3 legs/leads) This lets you power the leds directly from the battery source..but toggle it with an Arduino pin
(the Arduino just doesnt have enough current to power more than 1-2 small leds per pin)
 
whats next? I'll help out as much as people want me to. :)

but since this isnt really 'my' project.. I cant really 'do my own thing'.. LOL..

(still would like to FIND a decent IM helmet for sale though.. FOR CEHAP!) :)

So I could do my own along side everyone else.


once everyone/someone nails down the question above.. we can move forward in that direction.
 
Still trying to decipher your previous message lol. That melted my brain. You can carry on bud, document your progress here. I'm waiting for my new hardware to be delivered.

Could you explain in the simplest of terms what power supplies we need for the above components and exactly how to wire them up... For simplicity we shall say 2 white LEDs per eye: 3.2v-3.4v.

What voltage goes to where. Whether we need multiple power supplies etc...
 
Last edited:
This thread is more than 4 years old.

Your message may be considered spam for the following reasons:

  1. This thread hasn't been active in some time. A new post in this thread might not contribute constructively to this discussion after so long.
If you wish to reply despite these issues, check the box below before replying.
Be aware that malicious compliance may result in more severe penalties.
Back
Top