jmedina's 2012 Halloween Costume Contest Entry

jmedina

Member
Hello everyone. My name is Jorge. I've been a member for a while. Mostly I've come to this site to see all of the amazing creations that talented people of here have to offer. This is my first time ever attempting to make a costume. I have to say its been a fun process and thankfully with the help and advice of the members here it was not as difficult as I thought it would be.

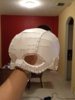
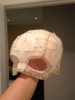
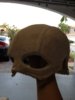
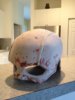
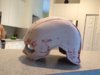
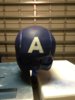
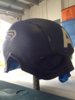
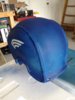
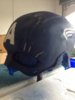
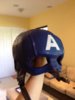
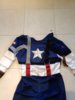
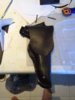
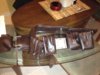
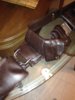
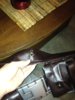
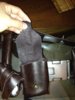
First I want to thank BlackKaos for providing me with pep file for the TFA Cap helmet. And Roblenzz for hooking me up with the template for the helmer liner. I also want to thank steamshovel for posting this amazing thread on his build for the TFA suit. If you all havent seen it yet you should check it out. It is very informative. I also want to thank Sandman0077 who has another amazing thread on his build for the belt and gun holster, which I used to helped with my build.

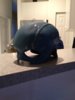
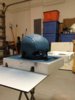
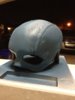
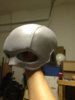
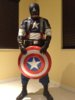
Ok now that I got all the shout outs done, lol, let me say that this is not a film accurate version of the suit. I started out buying a cheap suit from a halloween store. I was afraid to even attempt to sew because I have never done it before. Also other than a few sculptures I have made, I have never attempted to create a helmet out of resin and bondo. The whole project took a month to complete. It was alot of late nights, but well worth it.

With that all said.. lets get into the build.
 
Ok this is where I started. It looks worse in person than it does in the pic lol. The mask was cloth and had a velcro strap. The suit felt like a onesie and even comes with boot covers. It was horrible, but I only paid 65 for it so its my fault lol
 
Ok first and foremost I dont know how to sew at this point. I still dont really know how to sew.. but I can fake it now better than then lol. So I sent the suit to a seamstress to hem the suit up to fit me better. That way all the working out I had been doing for the past 4 months would actually show through, and I wouldnt look like I'm in a big man's suit. This gave me time to focus on the helmet. I acquired the pep files from BlackKaos. Awesome file. It took 2 times to get one that fit me ok. I say ok because I think i have an oddly shaped head. Its round from front view but when you look at my head from the side it looks like a deflated basketball lol. Anyway I had to go with it becuase I had a short time to work. So I built the pep files out of card stock. Coated it twice with resin. Added fiberglass and more resin and then applied bondo and sanded for a few days. Its not the best job. If I had more time I would have spent a month just working on the helmet. So since it wasn't perfect I decided to make it battle damaged for the finish.
 

Attachments

  • photo 1.JPG
    photo 1.JPG
    312.6 KB · Views: 133
  • photo 2.JPG
    photo 2.JPG
    401.8 KB · Views: 123
  • photo 3.JPG
    photo 3.JPG
    308.7 KB · Views: 127
  • photo 4.JPG
    photo 4.JPG
    310.2 KB · Views: 124
  • photo 5.JPG
    photo 5.JPG
    374.8 KB · Views: 119
Here are more pics of the helmet process
 

Attachments

  • photo 5.JPG
    photo 5.JPG
    365.4 KB · Views: 124
  • photo 4.JPG
    photo 4.JPG
    429.6 KB · Views: 114
  • photo 3.JPG
    photo 3.JPG
    446.6 KB · Views: 127
  • photo 2.JPG
    photo 2.JPG
    390.1 KB · Views: 116
  • photo 1.JPG
    photo 1.JPG
    541.3 KB · Views: 123
And even more pics of the helmet
 

Attachments

  • photo 5.JPG
    photo 5.JPG
    277.9 KB · Views: 146
  • photo 4.JPG
    photo 4.JPG
    391.2 KB · Views: 133
  • photo 3.JPG
    photo 3.JPG
    344.9 KB · Views: 111
  • photo 2.JPG
    photo 2.JPG
    395.8 KB · Views: 128
  • photo 1.JPG
    photo 1.JPG
    376.2 KB · Views: 114
And the finished helm. At this point I have recieved a template from roblenzz for the helmet liner. This was a big help because I had no idea at this point even how to make a template. I bought some pleather from Joann's and hand sewed the liner. I was still afraid to use the machine, lol. It took a while to hand sew everything but the result wasn't too bad for a beginner
 

Attachments

  • photo 2.JPG
    photo 2.JPG
    314.2 KB · Views: 119
  • photo 3.JPG
    photo 3.JPG
    262.9 KB · Views: 120
  • photo 4.JPG
    photo 4.JPG
    261 KB · Views: 115
With the helmet complete and my costume back from the seamstress I finally noticed a big issue... the straps are black!!! And the boot covers lol... they are cloth at don't go down far enough on me. I'm 6', it said it would fit someone up to 6 feet.. I guess that was not accurate.. either that or I'm still growing. I'm hoping for the latter, lol, always wanted to be 6'-3" :lol. So I started to replace the straps with gray straps and added some strapping where the costume was lacking. I also removed the boot covers and finally broke out the machine, YAY!!. I found some fabric that was close in color and extended the legs.
 

Attachments

  • photo 3.JPG
    photo 3.JPG
    427.5 KB · Views: 119
  • photo 2.JPG
    photo 2.JPG
    308.6 KB · Views: 125
Now the costume comes with flat plastic stars that are sewn on. For the chest and the arms. What I did here is I bought some Silicone Caulk from Walmart. Cost me $3. I also bought some glycerine and some blue acrylic paint. I mixed the entire tube with the glycerine and the Acrylic paint. If your gonna try this wear a mask. Lol, I almost knocked myself out. Anyway let me back up.. before I did this I sculpted 2 stars out of clay. I placed the stars in a cut out plastic cup and applied the mixed Silicone inside the cup. It cures fast. I was able to pull the mold out in about an hour. Had to let it sit for a couple of days to fully cure. Then I poured resin into the mold and got some pretty cool stars. Painted them silver and hot glued them to the suit.

For the center star I started to do the same process but I found out it would take a whole lot of silicone to make the mold. My wife at this point is not happy at the growing expense of the suit. Especially since I had just ordered some vintage WW2 combat boots, lol. So for the center star I made it out of foam and coated it with resin. Then painted it and glued it to the plastic star that exsisted on the suit.
 

Attachments

  • photo 4.JPG
    photo 4.JPG
    574.8 KB · Views: 118
Ok so as I said in the last post I ordered some WW2 combat boots. I aslo ordered a double buckle strap for What Price Glory. I velcroed the straps on the boots to increase the height of the boot. At this point I'm more comfortable with the sewing machine. So using Sandman0077 and steamshovels threads for ideas from the many pictures, I used the remaining pleather to sew the gun holster, leg strap, belt, pouches, and the arm gauntlets. I bought a pair of gloves at Burlington Coat Factory for six dollars. I tried to sew my own gloves. After 4 attempts I gave up for now. Going to revist that later. The costume came with a cloth belt and a velcroed buckle. I took the buckle off the old belt and attached it to the pleather belt I made. Came out pretty good
 

Attachments

  • photo 1.JPG
    photo 1.JPG
    318.5 KB · Views: 102
  • photo 3.JPG
    photo 3.JPG
    350.7 KB · Views: 99
  • photo 4.JPG
    photo 4.JPG
    229.5 KB · Views: 101
  • photo 5.JPG
    photo 5.JPG
    278.2 KB · Views: 131
Last edited:
Here is a pic of the pouches I made. Wish I could find the picture of the belt. I'll try to find that and add it to the thread
 

Attachments

  • photo 1.JPG
    photo 1.JPG
    475.6 KB · Views: 135
Ok so here is the finished product. I bought a plastic shield. I really wanted the bad ass aluminum ones I see online but no way was my wife going to allow that, lol. Here are some pics before we headed to Moonfest. Tried to enter the contest while I was there. No luck. Gonna try again next year. I am definitley hooked on this. Next one I'm going to try is Iron Man.
 

Attachments

  • photo 3.JPG
    photo 3.JPG
    357.6 KB · Views: 179
  • photo 4.JPG
    photo 4.JPG
    412.5 KB · Views: 237
Here is a pic I took at Moonfest. The other pics are from Halloween. My neighborhood had a Trunk and Treat so I took my nephews to it. My youngest nephew was the Hulk and the other was Bumble Bee. My friend brought his son as well and he came as Iron man. It was great. Kids were amazed with the costume. Before I knew it I had a line of people waiting to take pictures with me. I felt like a celebrity. Well thats it. I hope you all like it.
 

Attachments

  • photo.JPG
    photo.JPG
    409.9 KB · Views: 137
Ok so I couldn't find any pictures of the build for the belt. So I took some close up shots. I made the belt out of pleather. I reinforced the inside of the belt with this stiff fabric material I purchased at Joanns. I can't recall the name at the moment. To attatch the gun holster I used some aluminum wire that I use to make armatures for my sculptures. On the inside of the belt I added velcro to close the belt. I also used some Sam Brown Buttons, I think they are called to attatch the end of the belt to itself and also for the pouches and gun holster flap. The buckle was velcroed to the front of the belt. Lastly I made some wholes and used some snaps to close the holes. I then ran a bolt and nut to attatch the bottom buckle of the Y strap.
 

Attachments

  • photo 6.JPG
    photo 6.JPG
    726.8 KB · Views: 105
  • photo 7.JPG
    photo 7.JPG
    473.2 KB · Views: 101
  • photo 8.JPG
    photo 8.JPG
    460.3 KB · Views: 102
  • photo 9.JPG
    photo 9.JPG
    469.3 KB · Views: 113
Here are some pictures of the star close up, the gloves, and the back buckle. For the star as stated above, was made out of foam and then coated with resin and painted. The gloves were purchased and the gauntlets were sewed. I tried to make the gloves as one piece but wow was that hard lol. Besides having the gloves able to removed worked out better for answering the phone and making drinks lol. The back buckle I designed in Illustrator from various pictures.

http://www.therpf.com/f24/captain-america-tfa-back-buckle-measurements-161708/

There is a link to the thread. The measurements are to scale and worked out very well for me. I printed the design on card stock and traced it on foam. Afterwards I coated it in resin and painted the same way I did the star.
 

Attachments

  • photo 1.JPG
    photo 1.JPG
    375 KB · Views: 192
  • photo 2.JPG
    photo 2.JPG
    354.1 KB · Views: 107
  • photo 3.JPG
    photo 3.JPG
    382.5 KB · Views: 91
  • photo 4.JPG
    photo 4.JPG
    404.1 KB · Views: 111
  • photo 5.JPG
    photo 5.JPG
    389.7 KB · Views: 108
To you as well. Your shield work was awesome!! I wish I had the resources to try that out. Also your idea for the build on the helmet was very impressive. I wish I had thought of it. The helmet I would say cost more to make than the costume itself. Not to mention it took almost a week to complete. Well good luck buddy
 
Nice work buddy :thumbsup glad you were able to get some use out of those templates. Diggin' the pics with the kids :cool That's what it's all about!
 
This thread is more than 11 years old.

Your message may be considered spam for the following reasons:

  1. This thread hasn't been active in some time. A new post in this thread might not contribute constructively to this discussion after so long.
If you wish to reply despite these issues, check the box below before replying.
Be aware that malicious compliance may result in more severe penalties.
Back
Top