So the idea was set, Dad began virtual construction by taking Sam photos for reference then importing them into Blender, scaling to inches. Next black & white diagrams of Lego Mini Figures (used for patent application) were imported into Blender and used for general guideline of costume scaling. This turned out to be a mistake as the most critical dimension for the costume functionality was missed... (the width of the body to permit arms/shoulders out side of the body was not properly considered to start with, this forced a redesign of the costume by narrowing the body width to match Sam's shoulders and as a result also changed the scaling of the head.)
The Head part 1
With Blender drawings, scale & dimensions in hand construction of the head began. The idea was to take pink foam insulation, glue it into larger stacks, insert a threaded rod & then use a drill to create a “lathe” to sculpt the cylinder & curves of the top & bottom of the head. This turned out to be a struggle on many fronts because....
Glue/adhesive has different density/ sand ability properties than the foam.
The Drill “lathe” was not stable enough to work well, in the future a set of bearings on both ends are recommended.
Once the top & bottom were spun and sanded to size the were separated and a piece of blue foam (camping mat from Wal*Mart) was glued in the middle section, this sagged so some 3mm foam was glued to this to provide smoother sidewalls. At this point Bondo was applied as a filler, hardener & smooth surface for the next layer, fiberglass. Again this was a struggle to work with as Bondo did not adhere well to the pink foam especially when being “lathed”. The top cylinder was added by gluing a piece of blue foam curled into a cylinder on top of the head. Fiberglass mat & resin was applied to the entire head, then smoothed and filled with more bondo. By this time the weight of the head was becoming fairly massive, so much so that the drill struggled to turn the head at full speed while sanding.
Once the outer skin of Fiberglass was close to finished the interior structure of pink foam was removed as was most of the blue foam, in an effort to reduce weight.
The Hands....
Various lego costume hand examples are found on the web. In our costume the desire to have an actual usable hand is mandatory (otherwise how are we going to hold the booty bag while trick-or-treating?). So the concept of a cuff was used. This was constructed out of blue camping mat foam, glued with Permatex “body Trim” glue which is fairly flexible. Two layers were laminated together to create the “hand” portion, this alone was enough to retain the curve of the hand (I was considering imbedding rat wire or such but this wasn't required!). This was then painted flesh tone with an acrylic paint (American Flesh Tone or CraftSmart Coral). If I had to do this over I would consider using the Plasti-dip coating first. Also these never were sealed with a clear coat...
The Body....
The body was to be built out of corrugated cardboard which proved to be harder to source than I first anticipated due to the size of the costume. I stumbled across 2 pieces, 4 foot square, of corrugated plastic used for signage and put those to good use. The plastic works fairly well, probably cuts a bit easier than cardboard but is a bit stiffer when bending. I exported my 3D lego figure body work from Blender to 3DS format & then imported that into Pepakura Designer. Since the total body length was greater than 4 foot I ended up using 2 pieces cut from a single 4x4 sheet of corrugated plastic. The flaps provided by Pepakura were very valuable for cementing the costume together. I struggled with adhesive for this material. Styrene Cement did not work at all. The “yellow” Permatex epoxy (5 minute or 20 minute) did not work well either. JB Weld (5 minute or normal” both worked well. I used quite a bit of clamps, clothespins and blue painters tape to hold the flaps in place as the glue set.
The holes for the head and arms were rough cut by razor then smoothed with a Dremel grinder. These were then covered with plastic tubing (3/8” diameter black plastic) split length wise & then placed over the edges of the circumference. No glue was used. (but I did learn that you can't spray paint white vinyl tubing black as it never dries!).
The entire exterior of the body was spray painted glossy black. The tie, shirt & button holes were painted with a stencil made by importing a picture of the body into Libre Office Draw then scaling it to the dimensions (18” tall 16” wide) then exporting to a PDF that was printed using the “poster” option. The “poster” was taped together & white areas cut out with a razor blade for a spray stencil.
The final coat lines were added with a white paint pen.
The Legs....
Legs were constructed similar to the body but the Pepakura unfolding was not optimal, Dad redrew the patterns on the fly. The only new encounter on the legs was the curved (8” diameter) section of the top legs. To bend the small radius curve into the corrugated plastic it needed to be creased at ever corrugation.
Wear ability Test
The body fits well, tight, by design, requiring Sam to raise his arms to put on the body. Once on the body tends to tilt forward so this was remedied by inserting a baton of blue foam on the front inside around Sam's belt line to hold the body perpendicular to the ground.
The legs were too “floppy”, around the shoe and leg; as a result they would rotate sideways and be difficult to walk in. Blue foam was laminated & inserted into the shoe area to prevent the leg from rotating. A baton of blue foam was also placed in the lower calf area to keep the costume leg pushed outward as much as possible.
The Head part 2
With 3 days left to “H” day Sam confirmed that the head was “heavy”, too heavy and too big. So since we had been fortunate to source an extra roll of blue foam Dad decided to attempt a new head using just foam. Pepakura was neglected for this due to the overly complex unfolding. A glue gun and glue sticks had to be purchased as this is pretty much the only way to glue this material. This process worked well but the design for the top curve was not cut properly resulting in some gaps to a flat circle was cut from a dinner plate & inserted into the top. Where two cylinder intersected a dovetail was created to strength both dimensions.
It was decided that the mouth hole would function as the eye portal for Sam to see the world. The face details were created using a stencil made in a similar fashion as described for the body. Alignment of Sam's eyes to the new head were measured, marked and the face stencil was checked for position then the mouth drawn on the foam head. The mouth was cut out & the head checked for size, wear ability & position. At this point the head flopped about. Dad began construction of a “hat” to go inside to mold to the head & hold the foam head to the hairy head. This was built with the same foam, several blocks laminated to both sides. This was attached to the inside of the head using velcro so it may be repositioned if needed.
The edges were sanded, especially at the glued seams. It is always best to glue so that no glue is exposed on the exterior..... Plasti-dip was purchased from Home Depot for $6 for 11oz spray can – black. (Rustoleum has a $10 can of something similar in clear but not sure how well this works). Plasti-dip requires paint thinner to remove from your hands but appeared to work well coating the foam. I used the entire 11oz can on the head but I was not able to eliminate the wrinkle texture of the foam and I'm not sure this is the purpose of the plasti-dip? The black plasti-dip was easily painted with a white primer spray paint (for plastics). This was then brush painted with the same flesh tone acrylic paints used above. This was then clear coated with a spray.
In conclusion....
I wished I would have pursued the foam head design originally as quite a bit of work was invested on the fiberglass head that proved to be a bit impractical. I look forward to RONDO (fiberglass resin & bond mixture) coating of foam and further investigations into such designs as this looks to be both quick & very promising.
After Halloween
- The view from the head was too limited to permit wearing in dark “trick or treating” environment. (Known issue but Sam wouldn't accept otherwise).
- The legs were still difficult to walk in at best, the bottom of the leg should be raised higher from the ground (possibly curved some) to permit better stride.
- The blue foam in the body “belly” fell out, should have been hot glued.
- The fit of the hat on the head wasn't right when we went “trick or treating”, not sure why?
- The paint on the hands wore off very quickly, I assume the plasti-dip method would have prevented this?
- The limited motion of the hands precluded using a Pillow Case for candy collection, a rigid bucket or pot should have been used.
- Perhaps the hands should have been built to fit higher up?
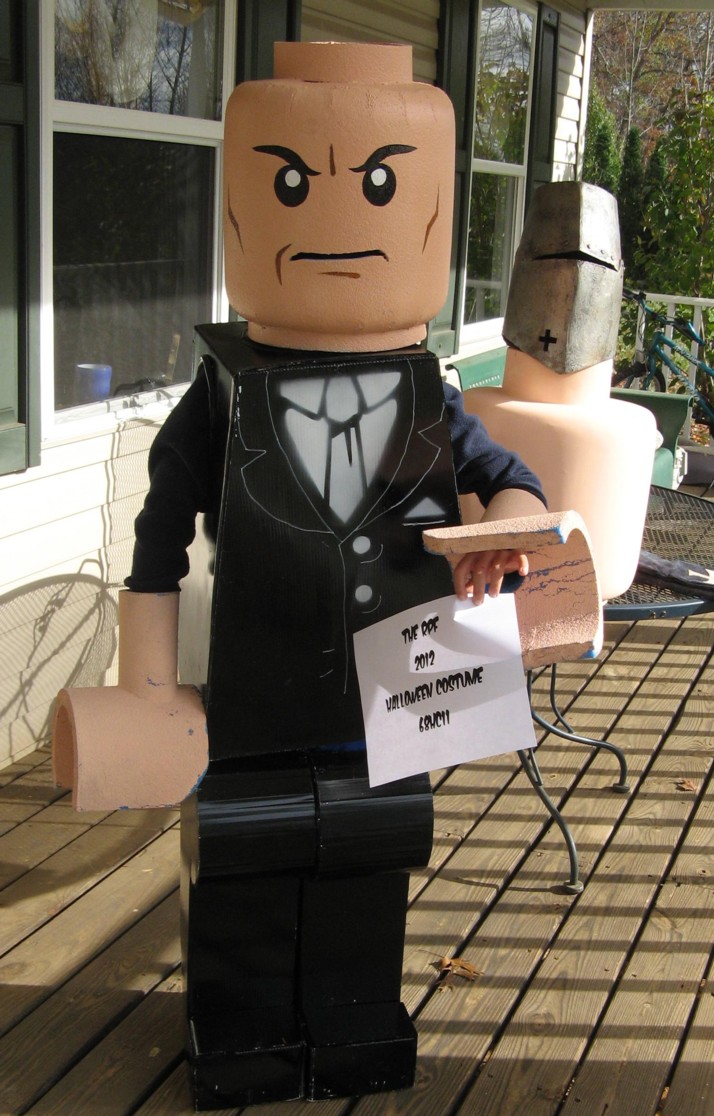
- More should have been done in examining the “practicality of the costume by the wearer”, the costume did have a good reception by those who saw it.
- May be possible to create “flexible” legs using foam rubber coated with Plasti-dip?
68hc11