Phase II Enterprise Study Model

Thanks!


I spent some time working on the weapon assembly this week. The parts are still quite rough, and the main thing I've been focusing on is getting them to fit the contours of the model. Right now it is made up of three parts... the assembly body, and the upper and lower supports. The lower support was the hardest part to build because it had to match the secondary hull.

Here is a few shots of the parts put in place, they aren't glued together yet, they are just set in place to make sure they all fit together.

p2_1701_055.jpg

I think I put off making the weapon assembly for as long as I have because I felt it takes away from the elegant lines of the design, but now that I have the parts in place it isn't as bad as I thought it was going to be.
 
this is a very inspiring thread
I love the work your doing
your thread is titled "study model"......do you have sites set for a larger model ? bth_smileycheer.gif
 
your thread is titled "study model"......do you have sites set for a larger model ? View attachment 226840
Actually, yeah.

This model is about one-third scale to the studio model. And even though a studio scale version would be really cool, it'd be a bit too big a model for me to keep around (or have space to build). But half or two-thrids scale to the studio model would be nice and large enough to light.

The main goal of this model is to learn the design. Even though I had been looking at this for years, I didn't really get to know the design until I had to actually build the elements. Between that and access to new data about the design and the original studio model, I figure I should be able to draw up a nice set of plans covering all aspects of the design by the time I'm done with this model.

One of the interesting things that came from doing this research is that I now have a really good idea of all the differences between the design that Jefferies had made and the studio model that Price/Loos were building. And there are enough differences that I'll be drawing up a set of plans for each.

But yeah, a larger model would be a cool project (and would better illustrate some of the cool aspects of Jefferies' design).
 
I made some more progress on the details around the front of the secondary hull. I'll take some images of those changes soon. I'm still debating attaching the three ramp features before or after I start the painting process. I'm leaning towards after because I want the inset areas they fit into to be darker than the hull color (almost black) to make them look more recessed.

Here are a few shots of the model resting upside-down on the plans (with the ramps resting in place)...

p2_1701_056.jpg

Similarly, while I'm planning on attaching the spine/fin feature to the primary hull, I'll keep the flat part off until I finish painting and weathering. The flat feature rests off the surface of the primary hull, so the underside I was going to paint black and shadow/weather around the primary hull under it.

These features (including the openings at the front of the vents on the nacelle supports and the front sides of the nacelles) seem to be something that a lot of people haven't emphasized in their attempts to bring this design to life. I get the feeling that Jefferies added these features to create areas of visual interest. Openings that go somewhere to do something all just out of view.

I think Jefferies did the same thing with the TOS Enterprise when he was forced to change the design at the last minute. Jefferies originally wanted a pretty featureless surface and had the sensor equipment behind a nose cone at the front of the secondary hull. Roddenberry, along with wanting a larger sized ship, wanted more detail. So when the Enterprise was scaled up, the rings and dish were added. The rings produced a similar effect of providing openings to something just out of view. The dish was supposed to move so it would add some more life to the otherwise static model (we never got to see the dish move and the issue of the model being too static was resolved with formation lights and the lights and fan blades in the nacelle domes). I believe part of the reasoning behind the dish being merged into the whole deflector assembly was the fact that it never did what it was intended to onscreen and he wanted to get back towards his original design.

Another area like that (Jefferies attempting to revisit his earlier design elements) is the fin/spine at the rear of the primary hull. It was part of both the smaller and larger Enterprise designs back in 1964, but ended up being reduced to the low profile spine we got with on the TOS models. He brought back the more fin like profile for the Phase II design.


Okay, so I'm sure you guys have all noticed that there isn't a lot left to do for most of the model. The real hold up is the nacelles. So here is the plan going forward…

I'm enlisting the help of my wife to help keep me on task and plan on setting aside a two day period to make the molds.

Why is this important?

Well, even after I finish the last touch up to the nacelle master and put a good couple coats of Crystal Clear Krylon on it, I'll be filling some edges around the master with clay. I don't want the oils in the clay to damage the master, so once I start that I want to move to the next step as soon as possible. The next step would be pouring the rubber, and then removing the divider and clay after it sets. But before I pour the other side I'll be coating the rubber on the first side with Vaseline. While I plan on being very careful, odds are that I'll get some on the master.

So this is a number of elements that I really don't want to have in contact with my nacelle master any longer than I absolutely have to, and this means that once I start I need to move to each of the next steps as they come up and not get distracted by other things. What I plan on is mapping out a pretty strict timeline of when I need to move from one step to the next and then having my wife help me stay on task.

Once the molds are made, I'll be heading into the home stretch. I have a couple more decal elements to finish before having them made, I think I've decided on a final color for the model (the actual studio model was going to be the same color as the 33 inch TOS Enterprise model, which in turn was the same color as the 11 foot TOS Enterprise). Because I need to add grid lines (which I'll be doing in white pencil) I'll be using Light Sea Gray rather than Gull Gray (which is my favorite substitute TOS Enterprise color). Light Sea Gray is actually the same brightness as the TOS Enterprise color and the lines should show up a little better than they did when I tested this idea on my USS Republic model (which I liked, but I need the lines to standout more on the Phase II design).

I know I've been working on this model for almost a year, but there was a lot of research involved and the model was always intended to help with the broader goal… a complete set of plans of the Phase II Enterprise (in this case, as Jefferies had intended it in his designs). I guess we'll see how soon I'm able to put out those plans, though I'm pretty sure I have all the information I need at this point and that I have a good understanding of the the design.
 
Thanks!


Small update…

I finally got around to making molds of the nacelle master. I still need to make one of just the front (to be cast in clear as a separate piece), but it can wait a while.

p2_1701_057.jpg

I also decided to use this batch of rubber to make molds of some other parts as I didn't have any extra around currently.
 
This is really neat. I knew a little about Phase II, but I didn't know there was a different design for the Enterprise until I saw this thread. I can't wait to see it finished.
 
Thanks guys!


ahem....kit
cough cough
kiiiit :)
Well, considering that I don't build many models (I'm averaging 1 model every two years for the last 8 years) and the last time I made my own parts this way was more than 20 years ago (around 1991), I think I'd be a poor candidate for building kits for other model builders.

I have thought about putting together two good nacelles (port and starboard) from these molds and giving them to someone else to use as masters. That way someone with experience in making quality parts can provide people with kits for modifying a AMT/ERTL kit.

In retrospect, I wish I had had the money to make molds of my primary and secondary hulls. When I started I had assumed that the modifications to those parts would be straight forward. And even after I got the kit and started comparing the curves I was still a little overly optimistic. As it turned out the amount of work on those two was nearly as much as if I had built them from scratch and now all that time and effort will be limited to a single model.

I'm going to take this experience into account when planning my next model. I need to make sure I have the funds available to make molds of all the major parts rather than sinking that work into a single model. I say that now even though I should have learned that lesson after my last major project.


Another small update…

I did a quick test pull from one of the molds (I have enough Alumilite White to try out some ideas) to see how it worked. Here is a shot of the master, a pull from one of the molds and one side of the one of the AMT/ERTL nacelles (for a size reference)…

p2_1701_058.jpg

I'm pretty happy with the results (though I don't think I'll use this pull in the final model).

The next step for the nacelles is to build the channel elements for the top of the nacelles. Once those are ready I'll be able to make the nacelle sides and cut openings along the tops to fit the channel parts. Then it should be pretty straight forward putting those three parts of each nacelle together.

I still haven't decided when to cut the front of the nacelles off. I'm thinking after I have them together, but it would be easier to do each of the side parts before assembly. I'll most likely try that out with my test pull to see how it turns out.
 
This begs the question though whether or not Phase 2 planned to light the nacelle fronts or not. The Mike Minor paintings I've seen don't seem to suggest it. But, I have to wonder if perhaps the Trek producers were considering perhaps a rotoscoped glow on the engine fronts? Star Wars had done that to pretty good effect with the glow of the Millennium Falcon's engines and the X-Wings (not to mention the lightsabers). So imagine how cool it might have been to see the Phase 2 E with some brilliant glow coming from the fronts of the engines when it goes to warp.
 
So far everything I've seen and heard was that the nacelles were going to use the same visual language as the TOS nacelles (the TOS nacelles were supposed to have a blue-green glow from the vents on the inner channels, but when the risk of damaging the left nacelle was brought to the producers' attention they abandon the idea). So we most likely would have had an orange energy glow (similar to that on the updated ST:p2 Enterprise CGI model), but I'm not sure how (or if) they planned on animating it in any way (which they skipped for the nacelles of the Enterprise D in TNG).

But, I have to wonder if perhaps the Trek producers were considering perhaps a rotoscoped glow on the engine fronts? Star Wars had done that to pretty good effect with the glow of the Millennium Falcon's engines and the X-Wings (not to mention the lightsabers). So imagine how cool it might have been to see the Phase 2 E with some brilliant glow coming from the fronts of the engines when it goes to warp.

It's funny, I've been watching a lot of period Science Fiction TV shows (Starlost, Space: 1999, Quark, Jason of Star Command/Space Academy, Buck Rogers and Battlestar Galactica) to try to get an idea of how the final effects shots might have looked. I'd like to attempt to replicate how the effects shots might have looked if the show had made it to air.


Quick update…

I'm working on the parts that will make up the channels along the tops of the nacelles. Because I need to cut openings for those in the nacelles, it'll be a while before I make any more progress on getting the nacelles together.

But as long as I have two nacelles, I set the model together upside down on the plans to take a look at all the major parts in their (approximate) final arrangement.

p2_1701_059.jpg

My only issue with it right now is that if I spend too much time looking at it I get a headache from the blood rushing to my head.
 
Oh man, that is looking INCREDIBLE! Seeing it all mocked up like that with the main sub-assemblies together really puts it into perspective.
 
WOW! Shaw, that is some incredible work you've put into this design, dude! Very awe-inspiring indeed *bows in respect*

You've clearly really done your due diligence in figuring out all of Jefferies' intentions with the post-TOS design, and even learned a few more things along the way to help broaden your (and our) knowledge of this rare subject piece. I'm eager to see the end result.

Though I haven't been able to make anything from the cleaned-up 1/350 blueprints I got before, you can definitely count me as interested in obtaining that new set of blueprints for this once you've got them all made up.

Just totally awesome! :D
 
Thanks guys!

Honestly, it is turning out better than I thought it would. I just have to keep trying to fit time to work on it into my schedule.

I did make a little more progress on the nacelles. I spent some time on the upper channels and sculpting part of the rear detailing. There is still a ways to go on them, but at least they are starting to look the part.

p2_1701_061.jpg
 
"Starting to look the part" is right! Those upper channels look good, dude. How are you sculpting the rear "fins", though? I've never done sculpting for any model, so I'm interested in the process and materials used.

Also, if you'll be offering castings of the nacelles at least (like others here, I seriously hope you are), are you going to add the protrusions at the front end of the nacelle grills on the starboard side? If not, it would be easy enough to do. Was just curious.
 
I've never done sculpting for any model, so I'm interested in the process and materials used.
Well, for this part of the nacelle, I started by standing the nacelles up on a flat surface and created a pencil (a pencil lead taped on a stack of pieces of foamcore board) to draw where the top and bottom edges would be. I then laid the nacelles on their sides next to each other and the plans to draw where the part would end. With those areas drawn out, I masked off the rest of the nacelles near those spots. I then cut a long piece of 0.06" styrene about as wide as the height of the areas on the nacelles. After that I cut that large piece of styrene into smaller pieces (about 1/4" long) and glued them side by side onto those areas (but not pressed tightly together, leaving a small gap between them). When the glue had set, I sanded along the top, bottom and outside of the series of pieces to get them working nicely together. When I was happy with that I covered the series of pieces with red putty. Once that set I went back and sanded again until I got a nice continuous shape.

I've since removed the masking and hit them with primer to see how they are looking. They need to be pointed up a bit, but they turned out nice.

Most of the time when sculpting anything I'll start with a base structure that approximates the shape I want and then slowly fill in the gaps. A good example of this on a larger scale would be my last model of the Enterprise where I was attempting to match my 33 inch studio model plans. This series of images shows how I slowly sculpted the contour of the underside of the primary hull starting with a base structure made of foamcore board…

1701-II_progress-001.jpg


1701-II_progress-002.jpg


1701-II_progress-003.jpg


1701-II_progress-004.jpg


1701-II_progress-005.jpg


1701-II_progress-006.jpg

And this is what I eventually ended up with. In that case I used the actual sculpted part as part of the model. For my next attempt at that model (as a one-to-one scale replica of the studio model) I'll use the sculpted parts as masters to make molds from.

That was most likely more than you wanted to know. :unsure

As for the feature towards the front of the nacelle, yeah, I'd most likely make it a separate part if I supply masters to someone to sell them. I know some people would want them both on the outward facing sides or both on the inward facing sides or on both sides of each nacelle. The easiest way to let people do that is to make them a separate piece. For what I needed, I could include it on the master on one side.
 
Wow! Kewl. Thanks for explaining the process involved. I was wondering if styrene had been used at all for the rear fins. Btw, what is red putty? I thought for a moment you'd used bondo or something given the redness of it, lol. Is it better than green Squadron putty? If so, what's the brand name, and where do you get it?

I like your technique for approaching the larger parts of a build with the layered craft foam formed to shape. Definitely does the trick. When I first attempted to begin building a 1/350 scale Phase II E I tried Steve Neill's technique of making a skeletal frame out of thinner craft foam (typically used for RC planes), but the results were less than stellar.

When I have a go at it again, I may just try your technique instead. Would probably work better for me than what I've tried.

As for the nacelles, should you get someone to mold/cast them so some of us can get a set, that sounds good. I know why the original studio model, and your study model, only have that detail on the port side of each nacelle as that's the side the model was to be filmed from. Personally, my interpretation of it is that detail would've been present on both sides of the nacelles, so would want to have it on both port and starboard :)
 
I've been using 3M's Bondo Glazing & Spot Putty, but for larger fills (like on the dorsal, impulse engine housing and nacelle support pylons) I used White Squadron putty. It seems like a good combination and I'm pretty happy with the final results as far as sharpness of details or evenness of larger areas.

For filling and sculpting the larger contours over a foamcore board structure (like my TOS primary hull) I used AMACO Sculptamold (a cellulose-based paper maché). I learned after my first attempt at working with it that you have about three days to a week window to work with that material before it hardens to the point where it is very difficult to sand. But as it dries, it gets lighter and harder, so I also use it as internal anchoring/support on some of my models.


Small update…

I added the weapons assembly to the dorsal. I'll be spending most of my time on finishing off the nacelle details in the near future and I need to add in the last small elements to the decal sheet and get that sent off. I'm still working out a painting strategy for this model, but I might start in on parts soon.

And I wanted to get a look at the model assembled outside the rigging box, so I set it up on it's own and took a few shots. The top picture is from just after I pulled the nacelles from their molds, the bottom one was a few days ago and the middle one is from yesterday morning. I figured you guys might want to get a better view, so this image links to a larger version…


And another couple shots of the model assembled (upside down) with the weapons assembly added on…

 
Thanks for the additional info, Shaw. Much appreciated. I take it the 3M and AMACO supplies can be found at any hobby store, correct?

As for the small update, the model's looking awesome! With it as it is right now, looks very much like the original filming model in pics we've all seen.

Gawd, she's such a fine-looking ship. The contours, surface details, everything about it is just so eye-catching. Shame they didn't use this for TMP.

Btw, how are the decals looking? I imagine a lot of those would've been conjecture on your part, since we never saw any applied to the original model.
 
I take it the 3M and AMACO supplies can be found at any hobby store, correct?
I think so, though I bought the 3M putty at a Sherwin-Williams Paint Store across the street from my local hobby store.

As for the small update, the model's looking awesome! With it as it is right now, looks very much like the original filming model in pics we've all seen.
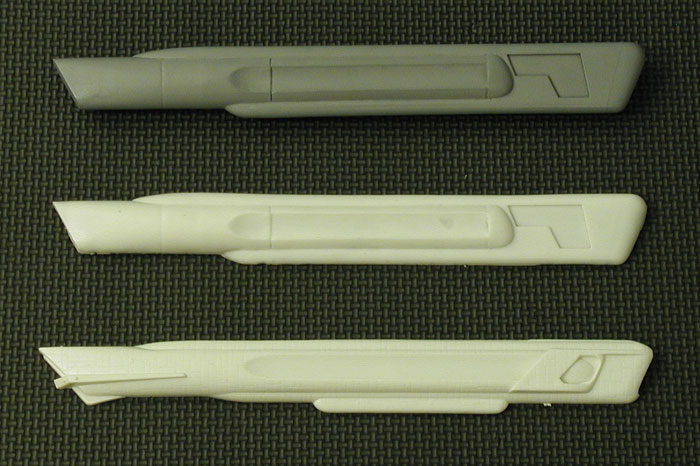
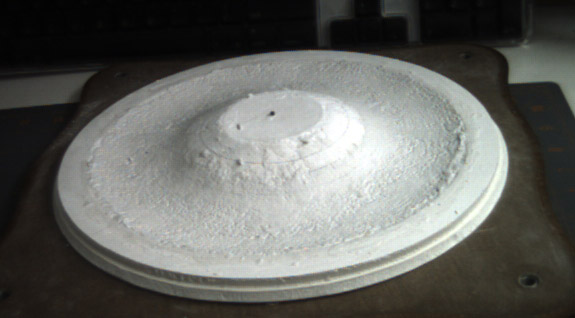
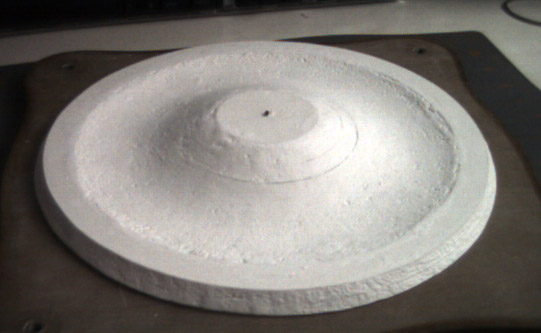
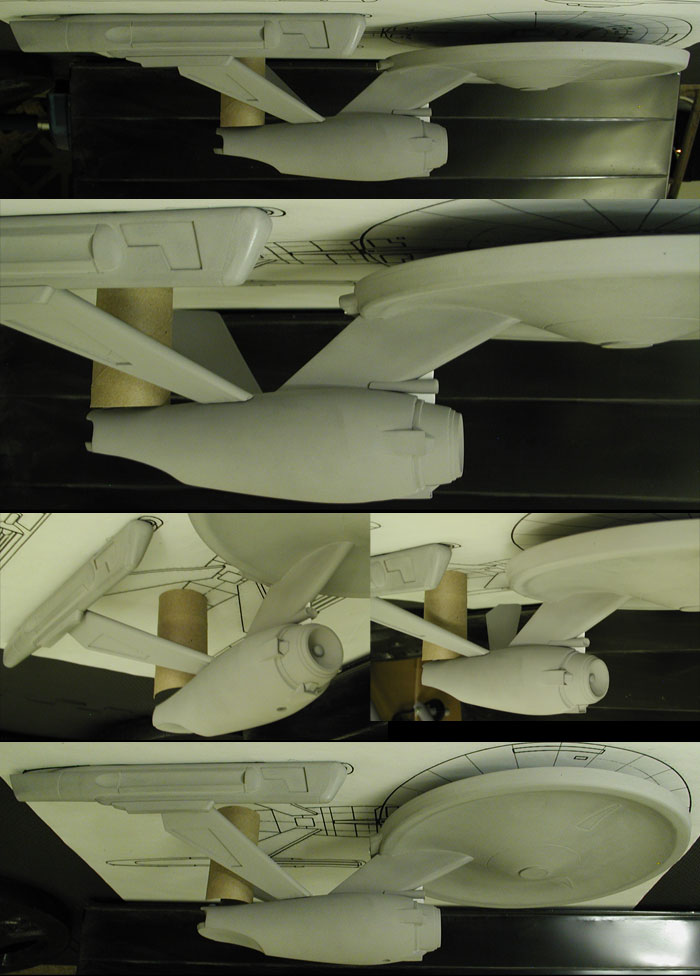
Thanks! I'm entering one of the harder phases of the building process for me to get through. I tend to really like how my models look as straight sculptures in their primer gray and have a hard time taking the next step towards painting, applying decals and detailing them.

Btw, how are the decals looking?
I just have to complete a couple elements that represent surface features I don't want to build/paint directly on the model, but the rest of the decal sheet is essentially finished. The final plans will illustrate where each of the elements on that sheet will end up.

Because this is Jefferies "idealized" version, I'm using a re-creation of the original TOS decal sheet because that was what was on the 33 inch TOS Enterprise that Jefferies had available (the decals on that model were a one-quarter scale printing of the decals used on the 11 foot model). This ends up being one of those "killing two birds with one stone" endeavors as I now have the start of the decals I need for my final build of the 33 inch TOS Enterprise.

I imagine a lot of those would've been conjecture on your part, since we never saw any applied to the original model.
Well, part of the reason I put this project off back in 2007 was that I found that I didn't have enough information to complete the plans without injecting too much speculation into them. And for me, I really don't want to put anything from me into a project documenting someone else's work. So until such time as I had access to more information, I'd leave it at just cleaning up the copy artifacts and separating out the symmetry elements.

I had thought about contacting some people and putting more effort into researching this, but I had other things I was working on that I figured I'd get done first. Then in the summer of 2012 I was contacted by someone with a lot of information on the design of the Phase II Enterprise and the construction of the studio model. After a few phone discussions, I decided that there was enough information available to do the design justice in a set of plans.

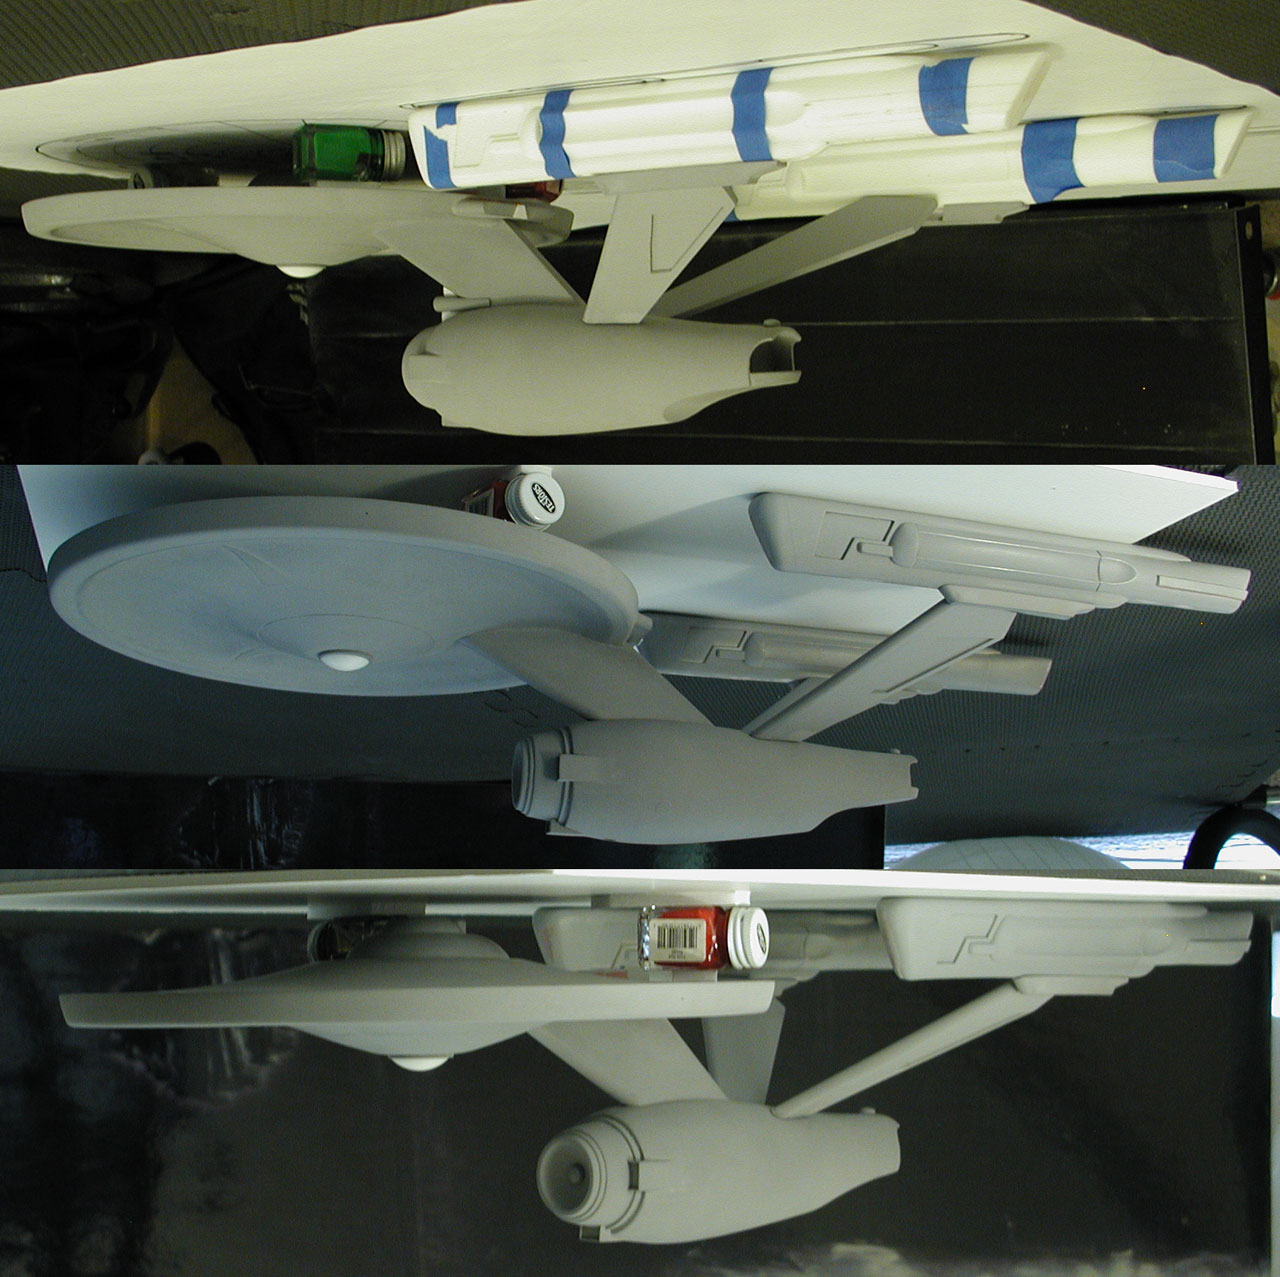
What I ended up figuring out was that while the studio model was really close to the designs drawn up by Jefferies, there were some significant differences. So what was originally going to be one set of plans has now become two, with me addressing the Jefferies design first (which is why the dorsal and nacelle supports on this model differ from the studio model).

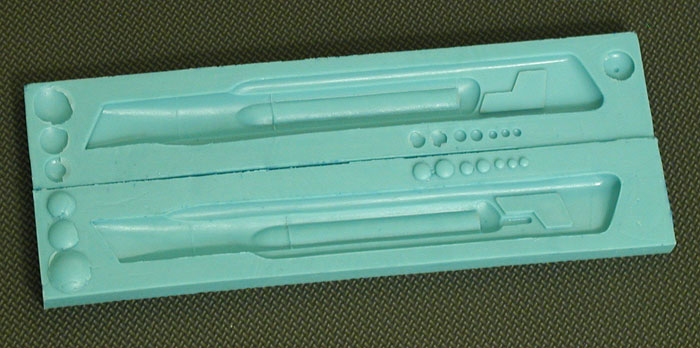
But yeah, the decals for the model were finished, the color of the model was picked out and ready… both of which were taken from their primary reference, the 33 inch TOS studio model which resided in Roddenberry's office at that point. Jefferies omitted things that would be essentially unchanged from that model on the Phase II design, and concentrated on the elements that would be different (after all, he was working on this in his spare time).

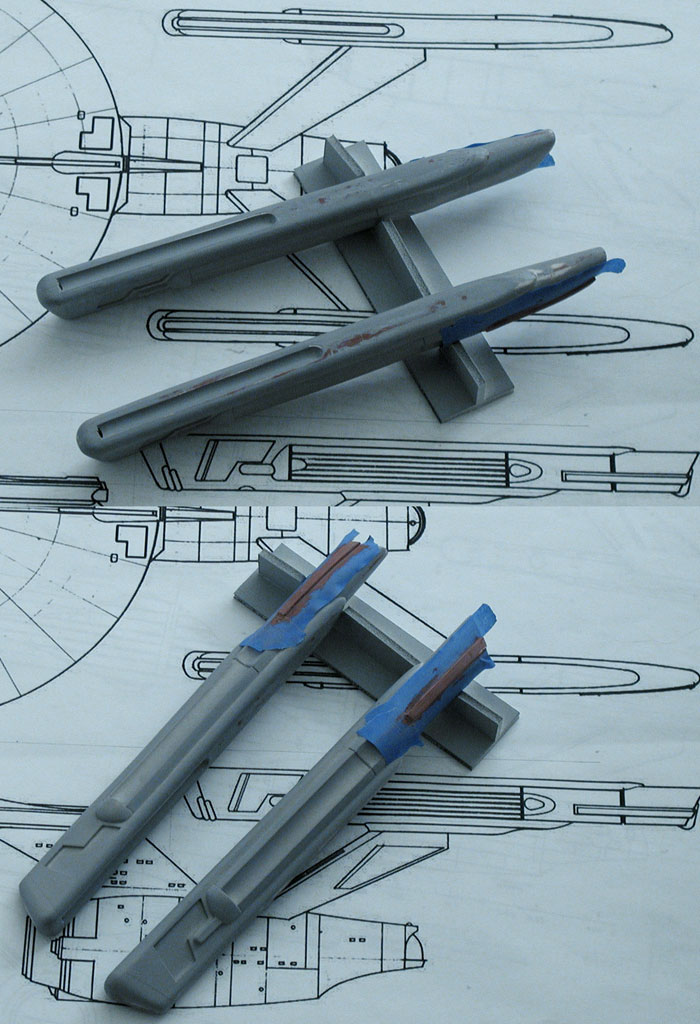
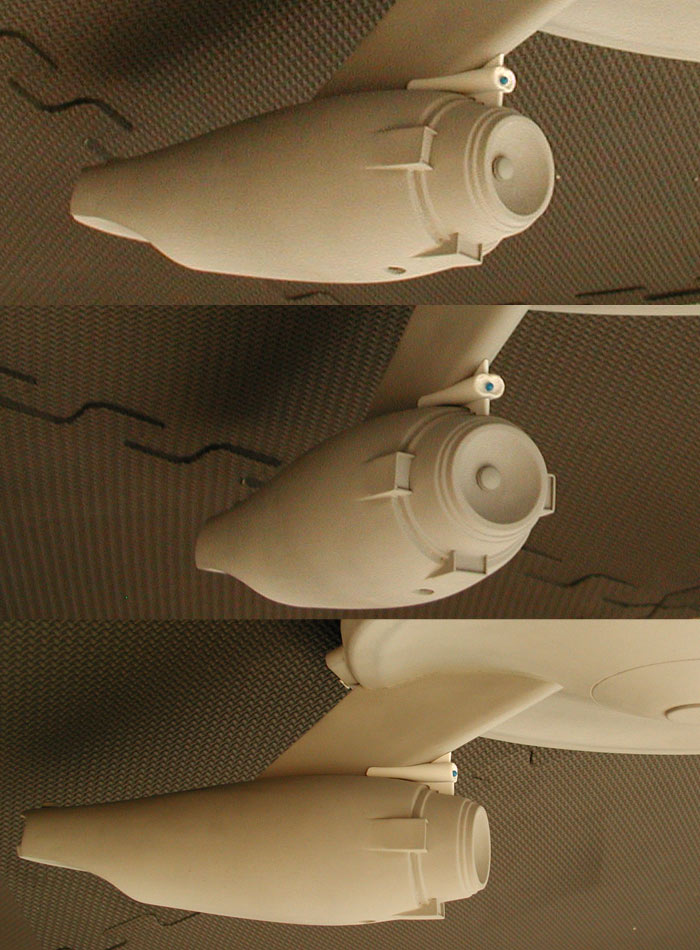
But things like the asymmetry of those elements on the nacelles were there on purpose, and the model was always going to be filmed from all sides. And even though the builds of the studio model missed some of Jefferies design elements, they did pick up on that and it was reflected in the molds for the final nacelles (which still exist today). I can understand why people think it would be symmetric, I thought it was supposed to be symmetric originally. But now I know that it was part of the design.

The biggest hold up is how much of my research I can share. I could just publish the drawings without any additional background information, but I really want to include as much of the background story as possible. But part of the agreement for access to this information was to keep some things off the record for now.

So yes, this model will be essentially (to the best of my abilities) how the Phase II Enterprise was supposed to have looked based on Jefferies designs… minus the lighting elements. The plans will outline how the model was supposed to have been lit.

Honestly, half the time I'm wanting to say so much more about this because there is a lot of cool stuff (both technical details and history of the artists involved). And I know that my model isn't doing the design the true justice it deserves, but I hope that the plans will let someone with real talent in this area bring the design to life someday.


:unsure Ummmm... yeah, that is just a long way of saying that there isn't as much conjecture here as one might think.
 
This thread is more than 8 years old.

Your message may be considered spam for the following reasons:

  1. This thread hasn't been active in some time. A new post in this thread might not contribute constructively to this discussion after so long.
If you wish to reply despite these issues, check the box below before replying.
Be aware that malicious compliance may result in more severe penalties.
Back
Top