laurend
Member
So I can't resist, jumping on the Iron Man bandwagon. I've been wanting to do a bigger build for a while and since that seems to be the one with the most reference out there I'm hoping it will be a good jumping point (since there will be plenty of help out there if I get caught up ") ). I'm on a bit of a budget in the sense that I'll have to buy all of my materials in bits and pieces so it will likely be a pretty slow build but, since my only real goal is NYCC/Halloween next year I'm not too worried about that. And yes, I'm just going with a straight Iron Man, I looked in to the feminized versions and in to Pepper's rescue armor but none of them really appealed to me. And at this point I'm just planning to build the waist out slightly and bind my chest down to make up for any weirdness in the dimensions.
). I'm on a bit of a budget in the sense that I'll have to buy all of my materials in bits and pieces so it will likely be a pretty slow build but, since my only real goal is NYCC/Halloween next year I'm not too worried about that. And yes, I'm just going with a straight Iron Man, I looked in to the feminized versions and in to Pepper's rescue armor but none of them really appealed to me. And at this point I'm just planning to build the waist out slightly and bind my chest down to make up for any weirdness in the dimensions.
So far I'm planning to do a foam, with plastic coat (xrobot method) build for the body and a pep helmet, though that may change later. I'm using the Stealth modified files for the foam and the shearkhead helmet, which i've started printing out (doubling the right/left parts for the foam pieces) and then cutting and taping in attempt to scale it since I'm going to have to mess with the shape in a few places-putting together a duct-tape-dummy this week to do most of this. But one question I did have, I know most people use bulk bought EVA foam or fatigue mats but I have a few packages of 6mm "Super Thick" foamies that I believe came from a Joann fabric and was wondering if those might work? Or will they be too porous for the PVA glue to get a good seal on?
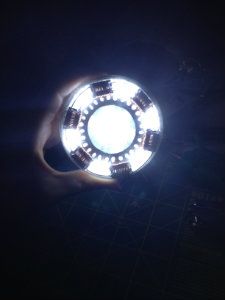
Anyway, now that I've rambled on far too long about nothing, some actual progress pictures. I've started with the arc reactor, mostly because I had 90% of what I needed hanging around the house already. As of right now I'm waiting on my LEDs to come in the mail so I'm kind of just waiting before I can do anything else with it.
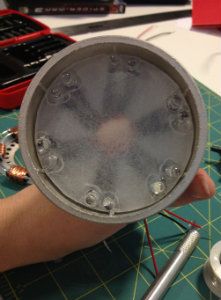
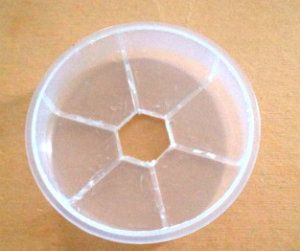
I started with an old bead organizer I had about 12 of kicking around the house.
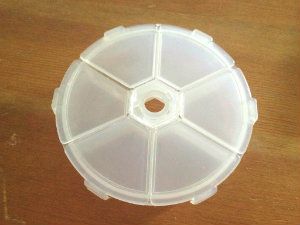
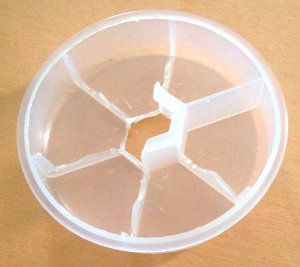
Pulled off the top and cut out all the little dividers and the middle piece with some wire clippers and a box cutter. This will eventually become my housing. (After some sanding and a brushed nickel paint job)
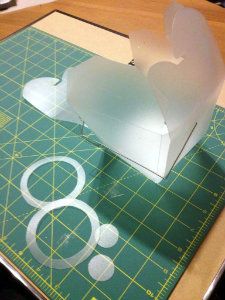
For the rings to cover the LEDs and disperse some of the light I found this frosted plastic "take out container" at Michaels for $.50 and cut it up, doubling each of the pieces to make it a little bit thicker. (hot glued them together in places the glue wouldn't be seen on the bigger one, over the whole surface of the smaller one)
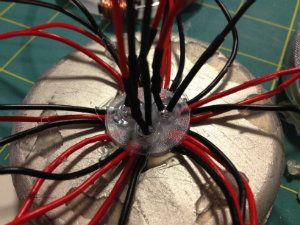
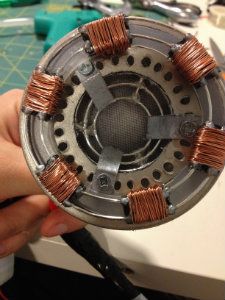
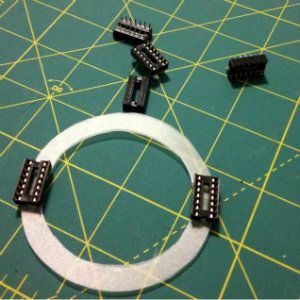
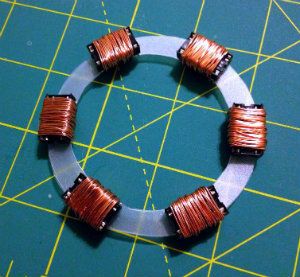
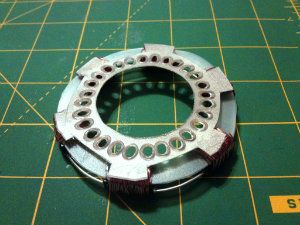
Then I found these little chip mounts at RadioShack, I think it was aout $1.35 for each pack which had two in it. I realized only after I had them home and opened that I probably should have gotten a smaller size (these are 14 prong, I should have gone with probably 8 or 6) since the actual reactor has 10 of these clip/copper wire bits and I could only fit 6 before it started looking strange and crowded. I might change that later but for now I'm just going to go with it.
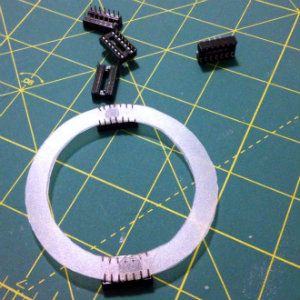
Once I had them all on (just held in place with the prongs folded over the plastic, it seemed to hold fine) I wrapped them in some copper colored craft wire, I think it was 24 gauge, about 36 inches is wrapped around each one and then hot glued in to place.
Then between each of those I hot glued two silver wires (I'm thinking 18 or possibly 20 gauge) I'm probably going to go over the hot glue with some silver paint at some point to make it look more like solder.
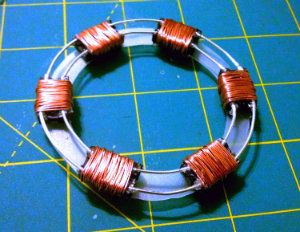
Then I used the same silver wire to make three rings that desceded in size toward the middle of the base and connected them with more hot glue and pieces of the silver wire (again, might paint this silver later to disguise some of the glue)
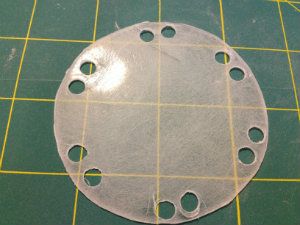
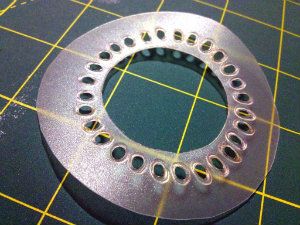
Then I had to make that odd little silver piece with holes in it that sits below the plastic/chip mount/wire bit. I tried a few different things but ended up going back to my little plastic take out container, cutting another piece the same size as the big ring but about twice as wide. Then I used an old wood burning tool with a round tip to melt the holes in it.
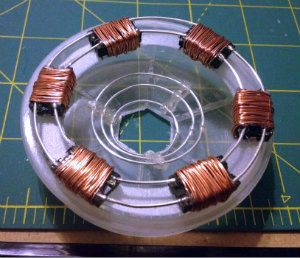
Once I had that piece done I painted both it and the housing (after sanding both lightly) with a brushed nickel type silver paint. Then after cutting out the spaces that would need to be clear for the light to shine through I glued it on to the back of the wire with the side that had accumulated the melted plastic facing out so it would be on the inside of the mount.
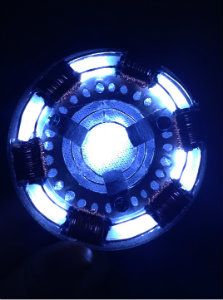
And at this point this is as far as I'm going to get. I've got an old picture frame backing I'm going to cut for a mount for those and some wire mesh that I'll incorporate in to the middle along with cleaning up a few bits and pieces before it's totally finished.

And I know, this won't actually show much, if at all, in the final suit but I'm thinking that if I do go to comic con with this thing I'll get tired of wearing the suit for four days and want to actually be able to move around in booths so I'll just pull a Tony or Natasha Stark one of the days as well so might as well go all out.
). I'm on a bit of a budget in the sense that I'll have to buy all of my materials in bits and pieces so it will likely be a pretty slow build but, since my only real goal is NYCC/Halloween next year I'm not too worried about that. And yes, I'm just going with a straight Iron Man, I looked in to the feminized versions and in to Pepper's rescue armor but none of them really appealed to me. And at this point I'm just planning to build the waist out slightly and bind my chest down to make up for any weirdness in the dimensions.So far I'm planning to do a foam, with plastic coat (xrobot method) build for the body and a pep helmet, though that may change later. I'm using the Stealth modified files for the foam and the shearkhead helmet, which i've started printing out (doubling the right/left parts for the foam pieces) and then cutting and taping in attempt to scale it since I'm going to have to mess with the shape in a few places-putting together a duct-tape-dummy this week to do most of this. But one question I did have, I know most people use bulk bought EVA foam or fatigue mats but I have a few packages of 6mm "Super Thick" foamies that I believe came from a Joann fabric and was wondering if those might work? Or will they be too porous for the PVA glue to get a good seal on?
Anyway, now that I've rambled on far too long about nothing, some actual progress pictures. I've started with the arc reactor, mostly because I had 90% of what I needed hanging around the house already. As of right now I'm waiting on my LEDs to come in the mail so I'm kind of just waiting before I can do anything else with it.
I started with an old bead organizer I had about 12 of kicking around the house.
Pulled off the top and cut out all the little dividers and the middle piece with some wire clippers and a box cutter. This will eventually become my housing. (After some sanding and a brushed nickel paint job)
For the rings to cover the LEDs and disperse some of the light I found this frosted plastic "take out container" at Michaels for $.50 and cut it up, doubling each of the pieces to make it a little bit thicker. (hot glued them together in places the glue wouldn't be seen on the bigger one, over the whole surface of the smaller one)
Then I found these little chip mounts at RadioShack, I think it was aout $1.35 for each pack which had two in it. I realized only after I had them home and opened that I probably should have gotten a smaller size (these are 14 prong, I should have gone with probably 8 or 6) since the actual reactor has 10 of these clip/copper wire bits and I could only fit 6 before it started looking strange and crowded. I might change that later but for now I'm just going to go with it.
Once I had them all on (just held in place with the prongs folded over the plastic, it seemed to hold fine) I wrapped them in some copper colored craft wire, I think it was 24 gauge, about 36 inches is wrapped around each one and then hot glued in to place.
Then between each of those I hot glued two silver wires (I'm thinking 18 or possibly 20 gauge) I'm probably going to go over the hot glue with some silver paint at some point to make it look more like solder.
Then I used the same silver wire to make three rings that desceded in size toward the middle of the base and connected them with more hot glue and pieces of the silver wire (again, might paint this silver later to disguise some of the glue)
Then I had to make that odd little silver piece with holes in it that sits below the plastic/chip mount/wire bit. I tried a few different things but ended up going back to my little plastic take out container, cutting another piece the same size as the big ring but about twice as wide. Then I used an old wood burning tool with a round tip to melt the holes in it.
Once I had that piece done I painted both it and the housing (after sanding both lightly) with a brushed nickel type silver paint. Then after cutting out the spaces that would need to be clear for the light to shine through I glued it on to the back of the wire with the side that had accumulated the melted plastic facing out so it would be on the inside of the mount.
And at this point this is as far as I'm going to get. I've got an old picture frame backing I'm going to cut for a mount for those and some wire mesh that I'll incorporate in to the middle along with cleaning up a few bits and pieces before it's totally finished.
And I know, this won't actually show much, if at all, in the final suit but I'm thinking that if I do go to comic con with this thing I'll get tired of wearing the suit for four days and want to actually be able to move around in booths so I'll just pull a Tony or Natasha Stark one of the days as well so might as well go all out.