booksandcorsets
Sr Member
While I am far from an expert, I now have 6 livecasts (head and shoulders) under my belt. (And two additional ones done TO me!) I wanted to share some tips and tricks that we discovered that might come in handy.
PLEASE NOTE: We completed eight livecasts over two days in a bit of a marathon. 6 people were involved. Almost all of us had experience with moldmaking and the materials at hand, and two that had done a livecast before. If you're doing this without any experience of the above at all, I highly suggest you familiarize yourself with the materials by more than just reading the specs sheet.
We worked with alginate rather than body double. Treated correctly, this can produce the same detail level of silicone for a fraction of the cost—but it’s a one-off, so if you want more than one cast, you’re sunk. (SIDE NOTE: If you are looking for multiple casts of a head, I would suggest using alginate for the initial mold, cleaning up the final cast, and then molding that final cast that’s now without those imperfections. And every livecast has imperfections.)
Materials you will need for one livecast:
Our final cast was a slushcast shell backfilled with foam. This produced an extremely light and durable final cast that could also be modified (with spot putty or sandpaper) to fill in/smooth out any imperfections. If you want to go this route, we used Smoothcast 300 and Foam-It 3. We needed very little of both, so a tester kit or pint kit would be sufficient. If you decide you want a plaster cast, which is much more common, you’ll need another 5-8 pounds of plaster.
In addition to the above, you’ll need to prep your area, have buckets and bowls, lots of paper towels, and a drop cloth to catch any drips. You’ll also need mold straps and binder clips, which will work just as well as clamps—and you can toss them later if they get covered in plaster.
PREPARATION
This is the stage that you will either have a successful cast or not. Prep your area as if there’s going to be an explosion of plaster and goo everywhere. There will be.
Use a comfortable chair that keeps the shoulders and head clear (so you aren’t working around a giant wooden block). It’s important to have some back support so the castee does not slouch halfway through. Also: Cover that chair in saran wrap so it’s not destroyed. Really.
Pile all your hair into the baldcap, mark your hairline on the cap in sharpee, and trim. And THEN glue it your head using prosaide to make sure it stays put. You should have your ears IN the baldcap; do them separately if you need them.
Use Vaseline on eyebrows, the edges of the bald cap, and the top of the bald cap. Use enough that you feel greasy. If it’s a gentleman who has facial hair, Vaseline that up as well—the longer the beard, the more you should use.
Go shirtless or use a destroyable tube-top shirt without sleeves (we actually used a pillowcase). Then cover that in saranwrap.
Figure out how you are going to breathe. Here’s some of your options.
A: Through your nose, without straws. This means you will trust your caster completely, and is not suggested if there is just one person doing the casting. DOWNSIDE: Your nose/upper lip will probably have distortion/look weird in the cast. UPSIDE: Easiest to breathe.
B: Through your nose, with straws. For me, this did not draw enough air in that I was comfortable doing it. You might find it comfortable. DOWNSIDE: Your nose will likely have some distortion (but should be less than option A). UPSIDE: Your lips should be distortion-free.
C: Through your mouth, with straws. We experimented with two ways to hold them in our mouths. 1: In the center, mouth slightly pursed, straws between teeth for security. This produced a slightly less relaxed cast with cheekbones a bit more prominent but a taut chinline. Downside: there was a TON of drool; expect this not to be pretty. 2: two straws on either side of the mouth, lips relaxed, straws between lips only not teeth. This produced a relaxed mouth with perhaps the best cast of the eight we completed, but the chinline was a bit saggy because the teeth were separated slightly. DOWNSIDE: Your lips will have some distortion in the cast. UPSIDE: Easy to breathe, and your nose will be distortion-free. If you’re going for an upper head mask, this is probably going to be your best bet.
Meanwhile, prep your alginate, muslin strips, and plaster so it’s ready to go when you need it. You want to minimize the time your castee is in the mold.
ALGINATE COAT
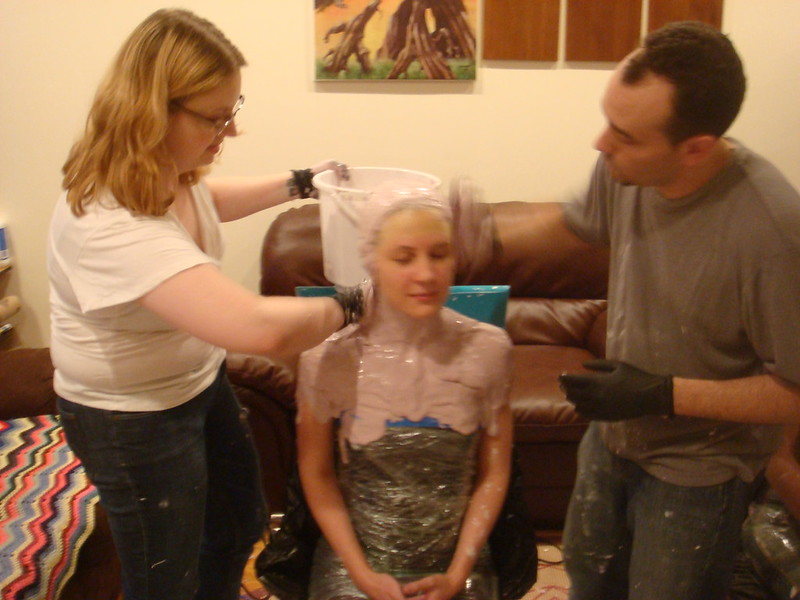
We did this in two layers. The first was the detail layer, and took roughly 1 ½ to 2 pounds of alginate. Whipped with equal parts warm-to-hot water (adding slowly and continually whipping with your hand, like bread batter), you have only so much time before the alginate starts to set. You don’t want to be working with it as it thickens, so once the stirring is done, get it on the head.
Some tips, most of which we ironed out while doing this all:
Here's us applying the first layer.
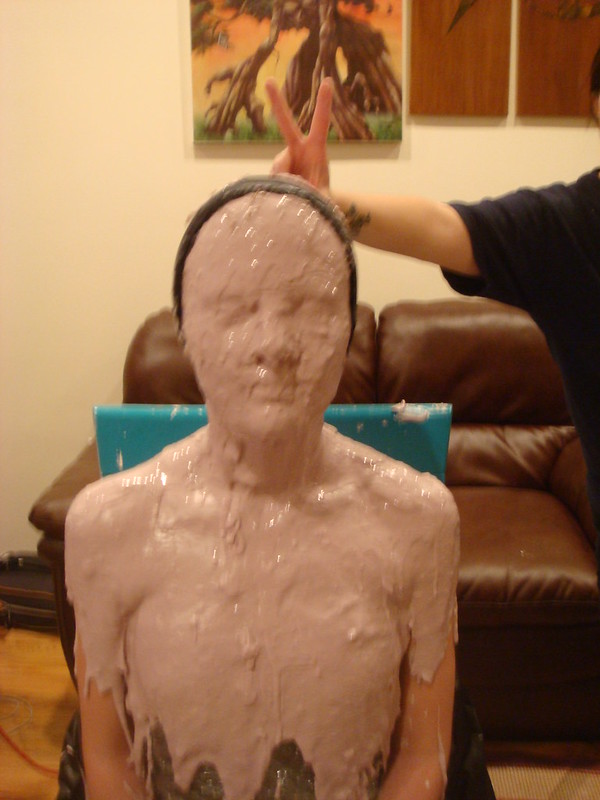
Second layer applied. Note the muslin strips we used for strength. (Actually, we ran out of muslin at this stage so I dove into my fabric supply; this is corset coutil.)
PLASTER COAT
The plaster creation is pretty straightforward. You’ll be creating a two-part mold, so you’ll want to examine the shape of the head so you can find the best place to separate the mold. We usually did the front section first. Your plaster should be the consistency of pancake batter, and remember: the warmer the water you use, the quicker it will set. Shoot for warm, but not hot.
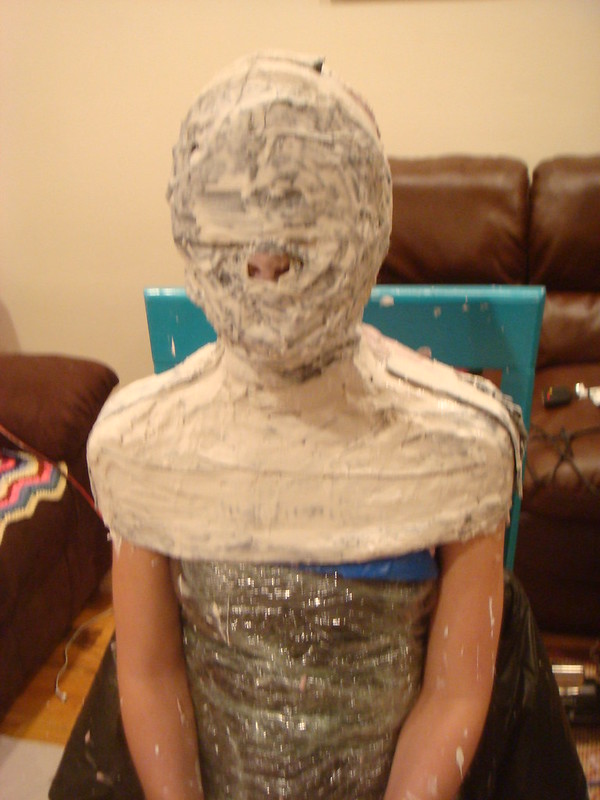
All bandaged up!
SEPARATING
Carefully work in a plastic scraper tool between the two parts of the plaster until it separates. Remove the back section and set it aside. Now comes the tricky part: demolding the front.
Slice up the back of the head, between your two strips of muslin you used for reinforcement, until it hits the strip you used to reinforce the top of the head. (THAT’S what they are there for!)
Having two people REALLY helps here. Ask the person in the mold to hold their face and bend over at the waist. You want the front part of the alginate to stay in the mothermold—this will help immensely to maintain its shape. Have the two people on either side carefully ease back the head and also hold their section of the alginate so it does not flop around/rip.
Watch the baldcap—sometimes it will want to stick to the alginate. If it’s not coming off, but the head is free, let it stay there and instead remove it from the moldee’s head.
We have occasionally also used an airbrush to carefully blow in blasts of air to loosen the alginate from the face.
Once the chin is free, it’s all about the wiggling. Once your castee is free, they will typically go “OMG EUW” and/or “IT’S SO BRIGHT.” Ignore them and rush the alginate over and put on the back piece of the master mold. Use binder clips/clamps to attach the alginate to the mold on all sides and set this aside to dry.
CASTING
You REALLY want it to dry out! We used Smoothcast to slush a light copy of the mold, and one of our castings reacted to the moisture left in the mold. (Water: bane of resins.) Use an airbrush if necessary, not towels.
Remember to plug your air holes and fix up your seam line by whipping together a tiny batch of alginate.
If you want to slush like we did, don’t start by moving the head around. Your first pour should be on the face only so you don’t get any distortion. Once it’s cured, then it’s off to slushing; we did about 5 slushes of 4-5 oz each. And then a quick 8oz pour of Foam-It 3 resulted in a very light, easy-to-use mold.
If you’re going the plaster route, your job here is easier: simply pour the plaster in once it’s mixed together. There will be no distortion due to slushing because the weight of the plaster will force out any sags.
AND YOU’RE DONE. Rip apart at your leisure, it's gonna be really hard to keep the alginate for a second casting.
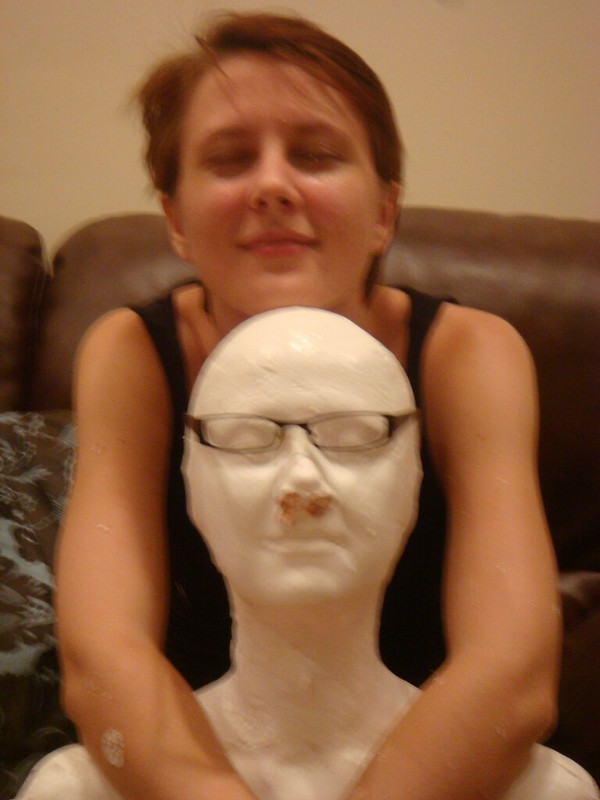
Don't be surprised if all your castings look depressed. (My friend's casting on the right is the one that reacted to moisture; a few dabs of spot putty the next day and it looked just fine.) Also, notice the sagging around the neck of the center casting; we did not reinforce the chin area with a muslin second layer, which would have stopped that. I highly recommend doing that!

PLEASE NOTE: We completed eight livecasts over two days in a bit of a marathon. 6 people were involved. Almost all of us had experience with moldmaking and the materials at hand, and two that had done a livecast before. If you're doing this without any experience of the above at all, I highly suggest you familiarize yourself with the materials by more than just reading the specs sheet.
We worked with alginate rather than body double. Treated correctly, this can produce the same detail level of silicone for a fraction of the cost—but it’s a one-off, so if you want more than one cast, you’re sunk. (SIDE NOTE: If you are looking for multiple casts of a head, I would suggest using alginate for the initial mold, cleaning up the final cast, and then molding that final cast that’s now without those imperfections. And every livecast has imperfections.)
Materials you will need for one livecast:
- bald cap (we attempted using a swimmers cap instead of a baldcap; results were disastrous. It would catch on the alginate and not work at all. Baldcap is the way to go; get the ears done separately.)
- frakton of Vaseline
- more fraktons of saranwrap
- tons of disposable gloves (sigh)
- prosaide or other skin-safe glue
- 2-3 pounds of alja-safe alginate (please test your subject for skin allergies BEFORE you have their full head encased!)
- 1 yard of muslin, cut into strips
- 2-5 pounds of plaster (you can get away with less plaster than you think, but it’s probably best to go thicker)
Our final cast was a slushcast shell backfilled with foam. This produced an extremely light and durable final cast that could also be modified (with spot putty or sandpaper) to fill in/smooth out any imperfections. If you want to go this route, we used Smoothcast 300 and Foam-It 3. We needed very little of both, so a tester kit or pint kit would be sufficient. If you decide you want a plaster cast, which is much more common, you’ll need another 5-8 pounds of plaster.
In addition to the above, you’ll need to prep your area, have buckets and bowls, lots of paper towels, and a drop cloth to catch any drips. You’ll also need mold straps and binder clips, which will work just as well as clamps—and you can toss them later if they get covered in plaster.
PREPARATION
This is the stage that you will either have a successful cast or not. Prep your area as if there’s going to be an explosion of plaster and goo everywhere. There will be.
Use a comfortable chair that keeps the shoulders and head clear (so you aren’t working around a giant wooden block). It’s important to have some back support so the castee does not slouch halfway through. Also: Cover that chair in saran wrap so it’s not destroyed. Really.
Pile all your hair into the baldcap, mark your hairline on the cap in sharpee, and trim. And THEN glue it your head using prosaide to make sure it stays put. You should have your ears IN the baldcap; do them separately if you need them.
Use Vaseline on eyebrows, the edges of the bald cap, and the top of the bald cap. Use enough that you feel greasy. If it’s a gentleman who has facial hair, Vaseline that up as well—the longer the beard, the more you should use.
Go shirtless or use a destroyable tube-top shirt without sleeves (we actually used a pillowcase). Then cover that in saranwrap.
Figure out how you are going to breathe. Here’s some of your options.
A: Through your nose, without straws. This means you will trust your caster completely, and is not suggested if there is just one person doing the casting. DOWNSIDE: Your nose/upper lip will probably have distortion/look weird in the cast. UPSIDE: Easiest to breathe.
B: Through your nose, with straws. For me, this did not draw enough air in that I was comfortable doing it. You might find it comfortable. DOWNSIDE: Your nose will likely have some distortion (but should be less than option A). UPSIDE: Your lips should be distortion-free.
C: Through your mouth, with straws. We experimented with two ways to hold them in our mouths. 1: In the center, mouth slightly pursed, straws between teeth for security. This produced a slightly less relaxed cast with cheekbones a bit more prominent but a taut chinline. Downside: there was a TON of drool; expect this not to be pretty. 2: two straws on either side of the mouth, lips relaxed, straws between lips only not teeth. This produced a relaxed mouth with perhaps the best cast of the eight we completed, but the chinline was a bit saggy because the teeth were separated slightly. DOWNSIDE: Your lips will have some distortion in the cast. UPSIDE: Easy to breathe, and your nose will be distortion-free. If you’re going for an upper head mask, this is probably going to be your best bet.
Meanwhile, prep your alginate, muslin strips, and plaster so it’s ready to go when you need it. You want to minimize the time your castee is in the mold.
ALGINATE COAT
We did this in two layers. The first was the detail layer, and took roughly 1 ½ to 2 pounds of alginate. Whipped with equal parts warm-to-hot water (adding slowly and continually whipping with your hand, like bread batter), you have only so much time before the alginate starts to set. You don’t want to be working with it as it thickens, so once the stirring is done, get it on the head.
Some tips, most of which we ironed out while doing this all:
- It’s useful to have two people working on this, so one person can pour from the top and the second person can work on the front only to fill in the detail areas before alginate pours down.
- Make sure you baby the areas where sag is likely: under the chin, eyesockets, in the nose (if you’re using straws).
- Have a small paintbrush nearby to clear alginate from straws/nose.
- Cover more than you need (further down the shoulders). You can always trim it back and it’s useful to get a straight line to trim.
- Once the first layer has set (stopped moving) get ready to do the second layer. You don’t want to delay on this. The second layer will only take a third of the alginate of the first one. You will also be using 5-6 muslin strips. We used these for reinforcement at important places: both sides of the seam line on the back of the head where we would cut open the mold; the top of head where the plaster would separate; under the chin; over the eyes; over the nose.
- Before placing on the muslin strips, put a small amount of alginate on where the strip is going to go so it has something to adhere to. Then cover the muslin with alginate (not a TON, you don’t want it to slip around).
- Baby all strips until the alginate fully sets.
Here's us applying the first layer.
Second layer applied. Note the muslin strips we used for strength. (Actually, we ran out of muslin at this stage so I dove into my fabric supply; this is corset coutil.)
PLASTER COAT
The plaster creation is pretty straightforward. You’ll be creating a two-part mold, so you’ll want to examine the shape of the head so you can find the best place to separate the mold. We usually did the front section first. Your plaster should be the consistency of pancake batter, and remember: the warmer the water you use, the quicker it will set. Shoot for warm, but not hot.
- Make sure your seam lines are nice and thick. Use a couple of doubled-up muslin strips to capture all edges before you go in and do the middle sections.
- Once the entire front mold is created, go in (if you have time and enough plaster) and add a layer of plaster over all sections to make it a bit thicker. Make the edges as smooth as possible.
- You’ll need to wait for the plaster to harden before creating the back section. This will be about 10-15 minutes of waiting around. In this time, clean up and prepare the next batch of plaster/muslin strips.
- REMEMBER to Vaseline up the mold seam before going in and doing the back mothermold! I always prefer to use more than you think is necessary. You can always wipe it off when it comes time to de-mold.
- Don’t demold until the plaster has dried enough that it echoes when you tap on it with a finger. Its job is to hold the shape of the alginate, so if it’s too soon, it will warp. If it’s taking a while, use a hairdryer.
All bandaged up!
SEPARATING
Carefully work in a plastic scraper tool between the two parts of the plaster until it separates. Remove the back section and set it aside. Now comes the tricky part: demolding the front.
Slice up the back of the head, between your two strips of muslin you used for reinforcement, until it hits the strip you used to reinforce the top of the head. (THAT’S what they are there for!)
Having two people REALLY helps here. Ask the person in the mold to hold their face and bend over at the waist. You want the front part of the alginate to stay in the mothermold—this will help immensely to maintain its shape. Have the two people on either side carefully ease back the head and also hold their section of the alginate so it does not flop around/rip.
Watch the baldcap—sometimes it will want to stick to the alginate. If it’s not coming off, but the head is free, let it stay there and instead remove it from the moldee’s head.
We have occasionally also used an airbrush to carefully blow in blasts of air to loosen the alginate from the face.
Once the chin is free, it’s all about the wiggling. Once your castee is free, they will typically go “OMG EUW” and/or “IT’S SO BRIGHT.” Ignore them and rush the alginate over and put on the back piece of the master mold. Use binder clips/clamps to attach the alginate to the mold on all sides and set this aside to dry.
CASTING
You REALLY want it to dry out! We used Smoothcast to slush a light copy of the mold, and one of our castings reacted to the moisture left in the mold. (Water: bane of resins.) Use an airbrush if necessary, not towels.
Remember to plug your air holes and fix up your seam line by whipping together a tiny batch of alginate.
If you want to slush like we did, don’t start by moving the head around. Your first pour should be on the face only so you don’t get any distortion. Once it’s cured, then it’s off to slushing; we did about 5 slushes of 4-5 oz each. And then a quick 8oz pour of Foam-It 3 resulted in a very light, easy-to-use mold.
If you’re going the plaster route, your job here is easier: simply pour the plaster in once it’s mixed together. There will be no distortion due to slushing because the weight of the plaster will force out any sags.
AND YOU’RE DONE. Rip apart at your leisure, it's gonna be really hard to keep the alginate for a second casting.
Don't be surprised if all your castings look depressed. (My friend's casting on the right is the one that reacted to moisture; a few dabs of spot putty the next day and it looked just fine.) Also, notice the sagging around the neck of the center casting; we did not reinforce the chin area with a muslin second layer, which would have stopped that. I highly recommend doing that!
Last edited:
")