StarCraft 2 - Jim Raynor's Pistol (DONE, pics inside)

Epona_Rhi

Well-Known Member
Hi gang!

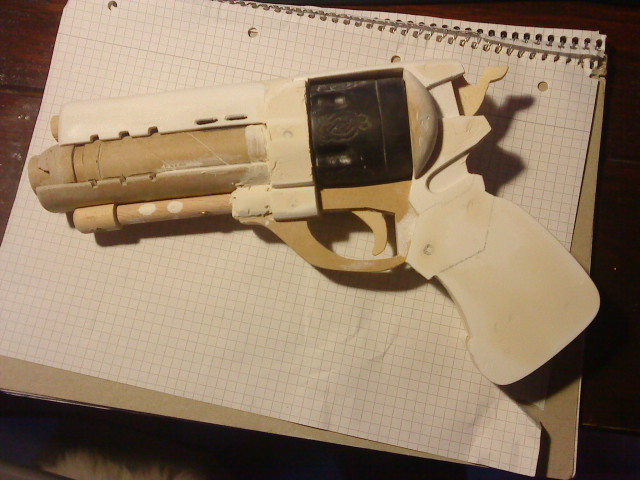
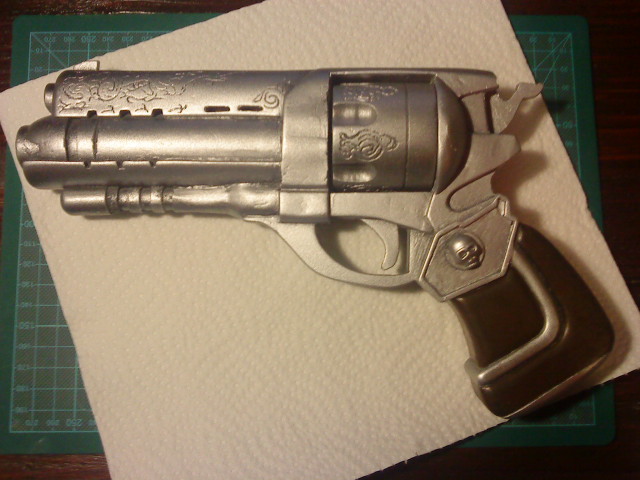
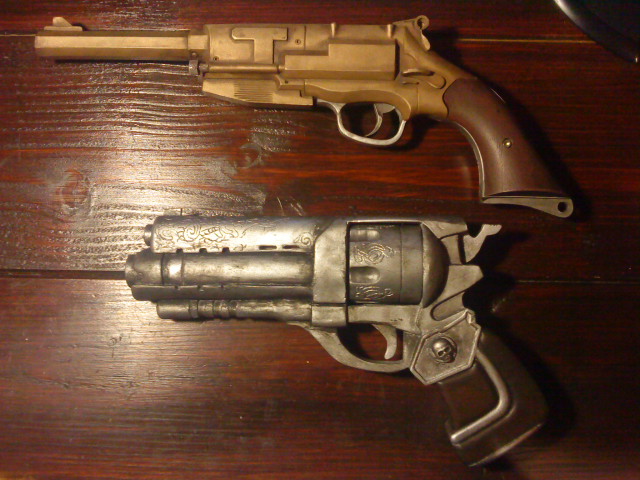
Thought I'd share some progress pics regarding my recent little project: Jim Raynor's Revolver. This will be part of a whole Raynor-inspired costume including gun-belt, tactical/biker-vest, boots and gloves.
Well, not a movie replica but it seems videogame-props have become very popular over the last years (Portal, Fallout, Mass Effect). So I think this one will fit here just fine.

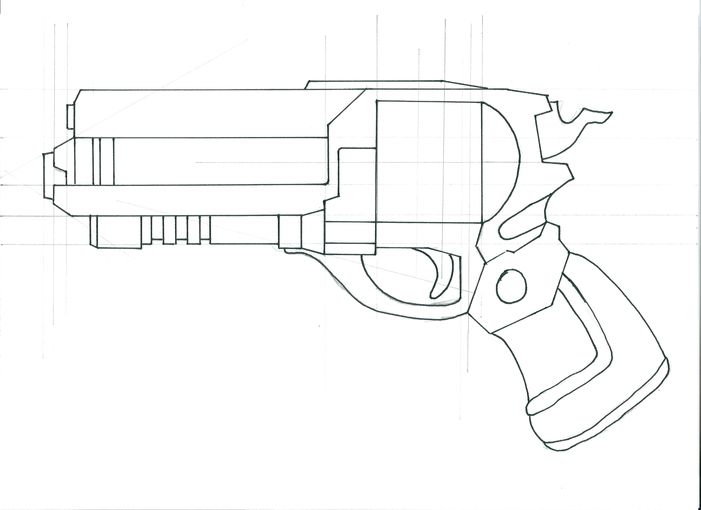
I started with a quick drawing, scanned it and cleaned it up:

JR-Gun.jpg


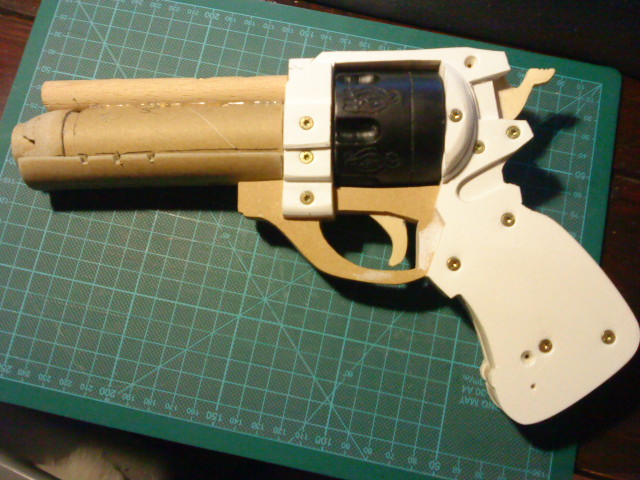
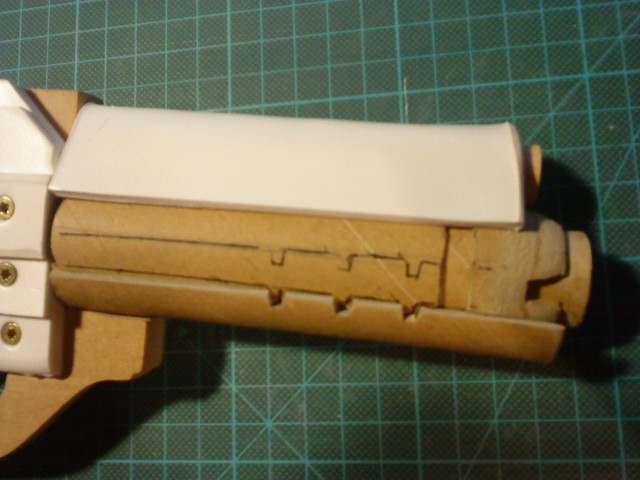
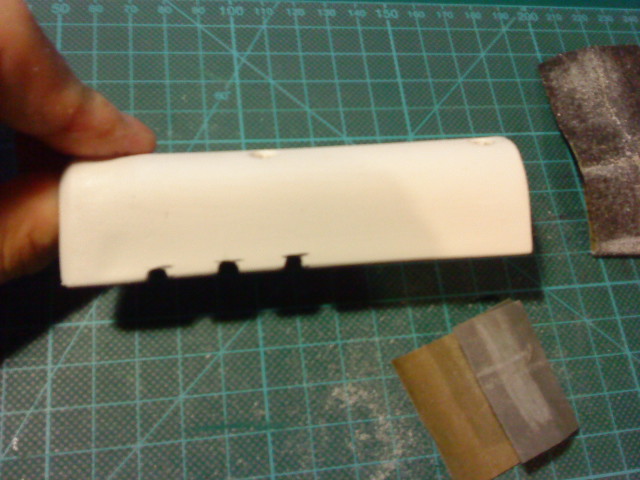
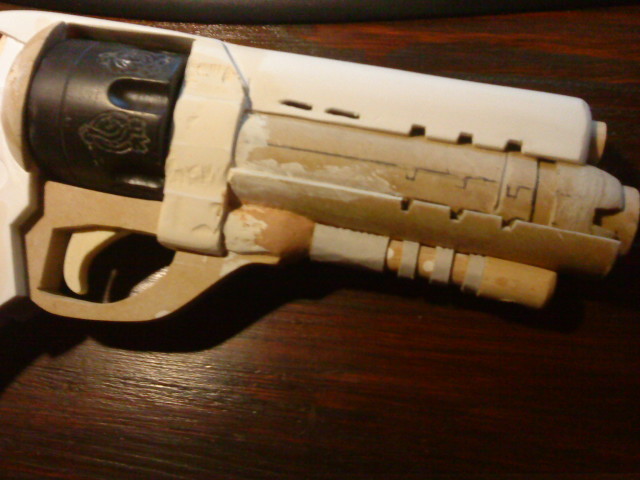
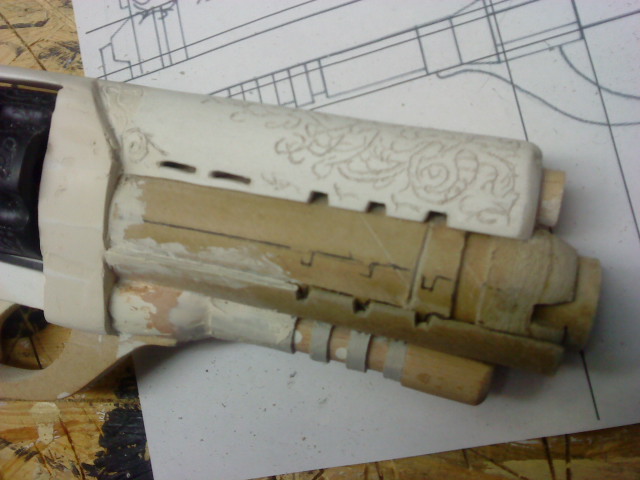
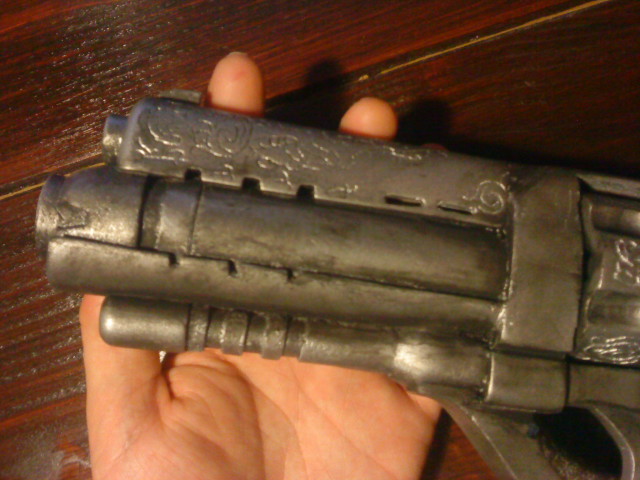
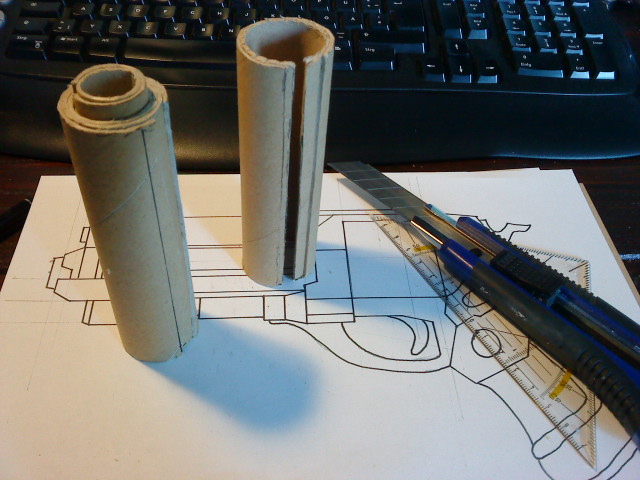
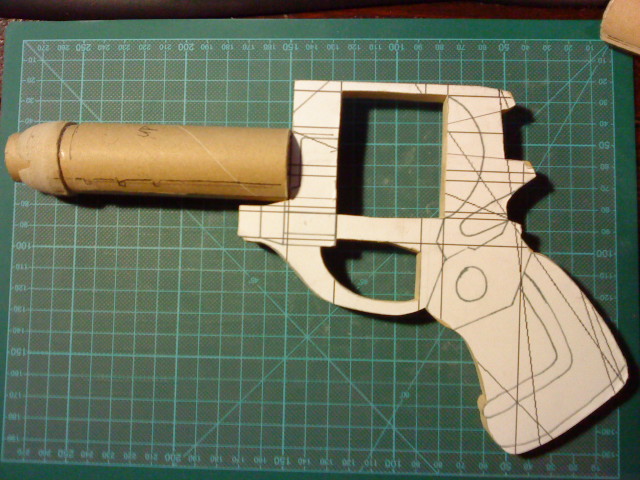
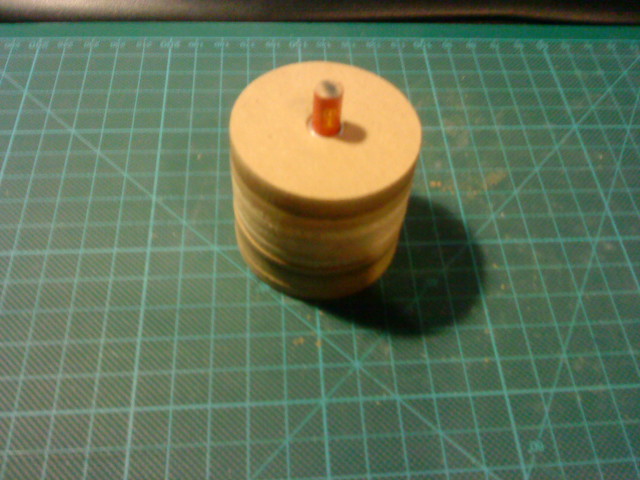
Next I thought about a way to create the first barrel. In the end the easiest way was by using cardboard-roles from empty paper-towel-roles. I cut them open and pushed them inside one another until the barrel had the right diameter and overall thickness.

Barrel_01.JPG


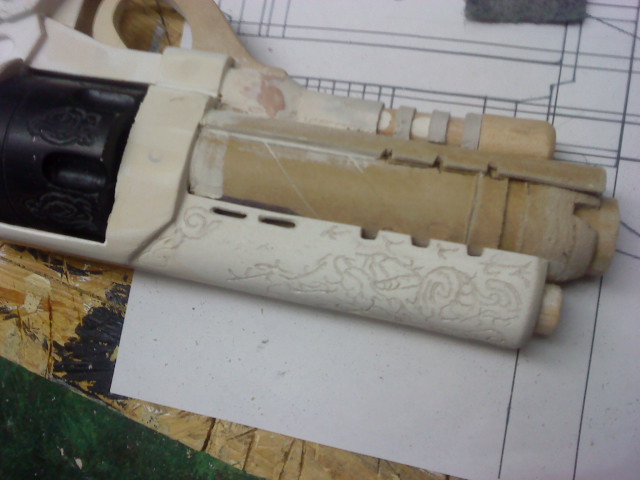
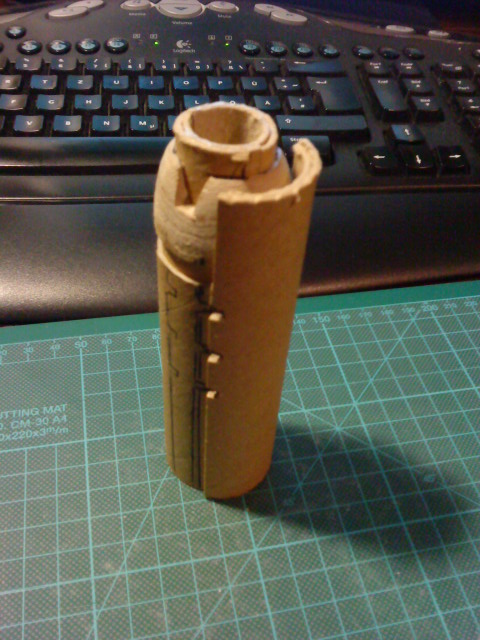
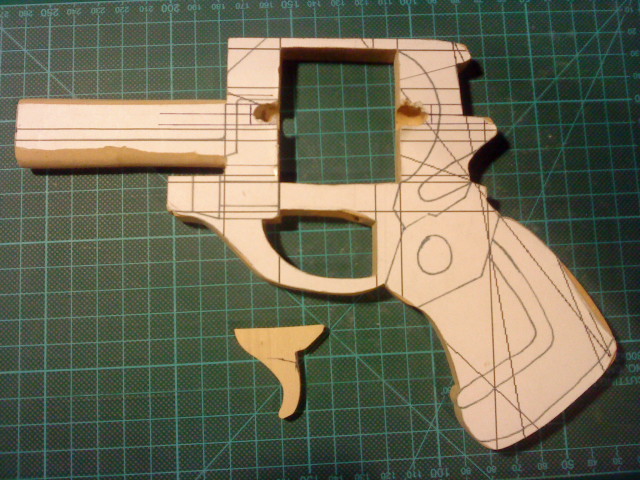
Some sanding later the barrel looked like this:

Barrel_02.JPG


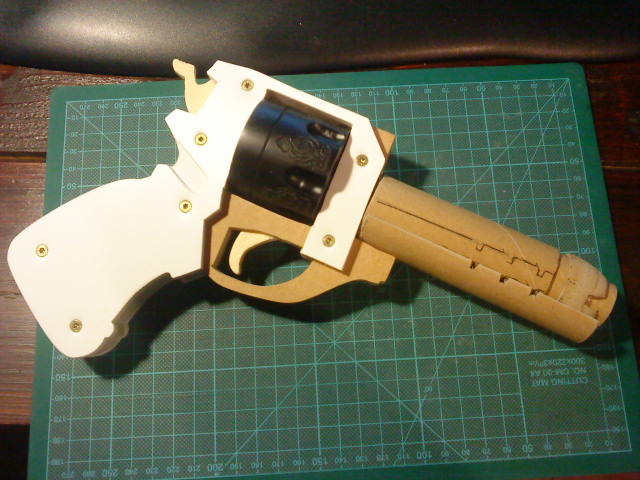
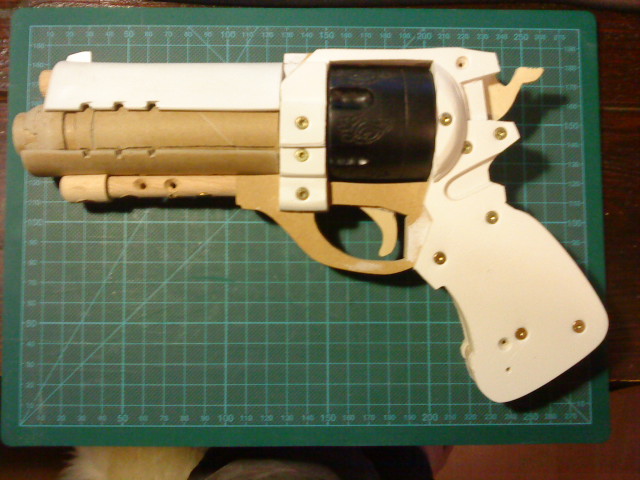
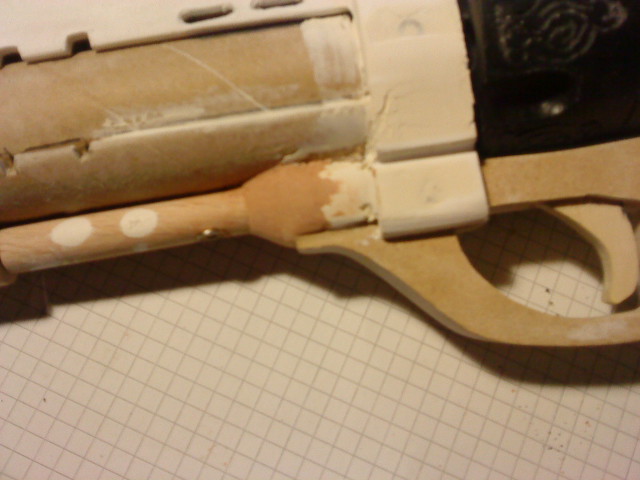
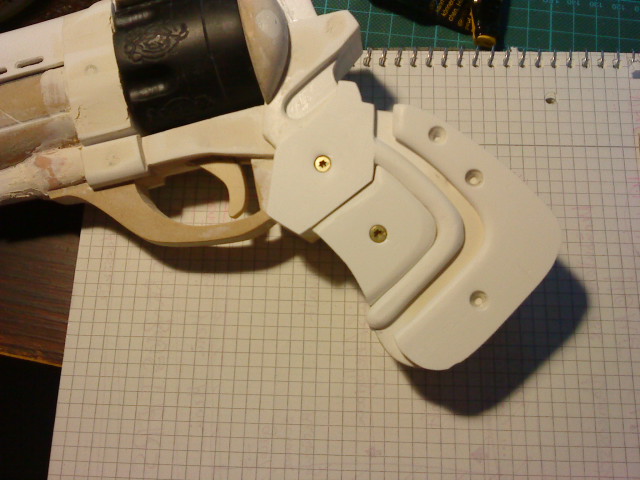
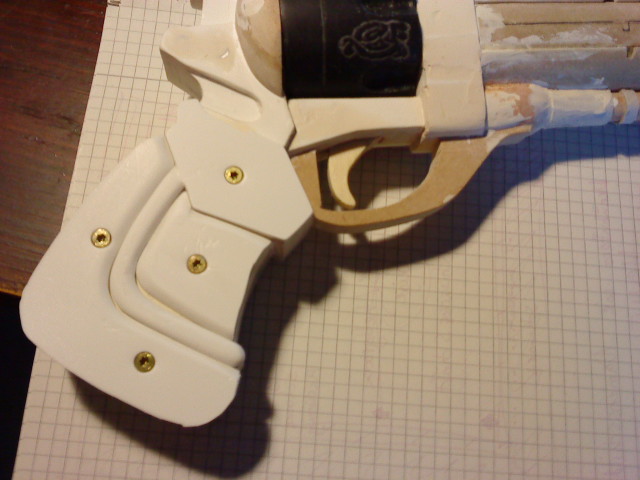
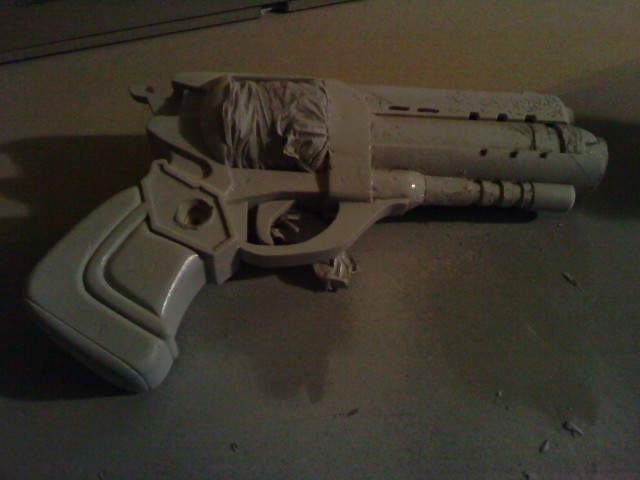
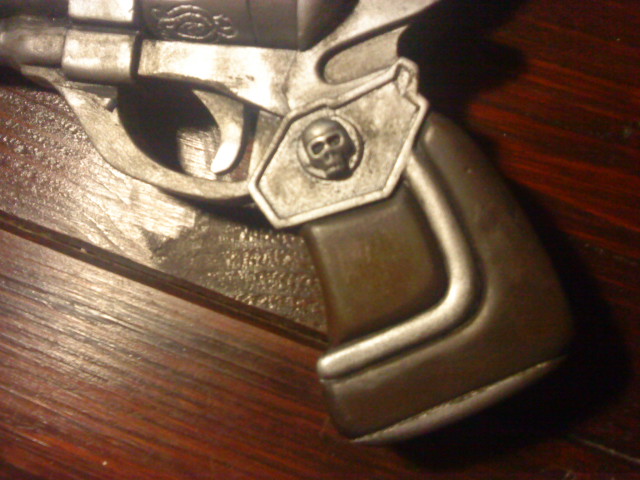
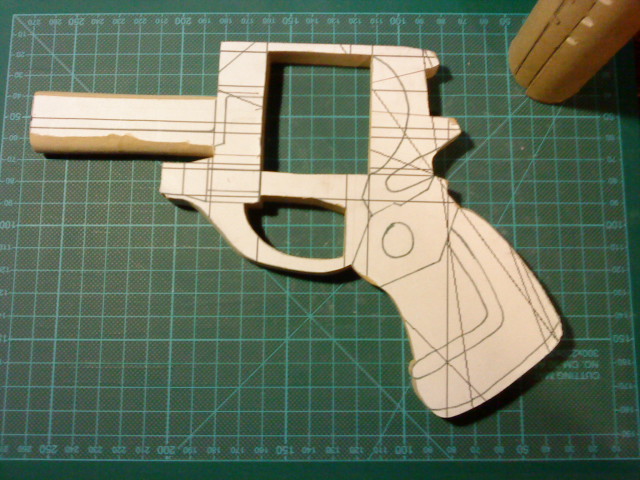
Then I concentrated on the gun-frame. This was cut from MDF (fantastic stuff by the way :cool). Satisfied with the outcome I started toying around with the idea of adding an actual revolvable cylinder.

Corpus_01.JPG


Corpus_02.JPG


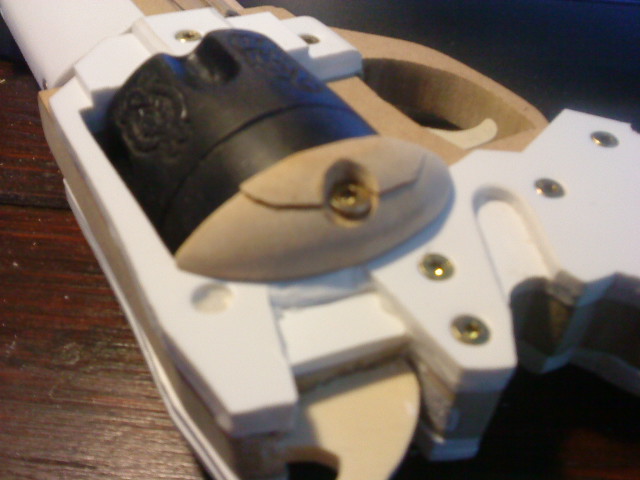
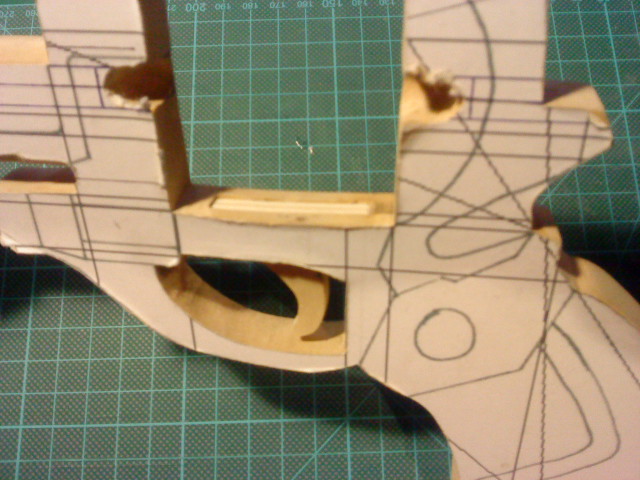
I added the necessary notches and started work on the cylinder...

Trigger_01.JPG


Trigger_02.JPG


Cylinder_01.JPG


Cylinder_02.JPG


Cylinder_03.JPG


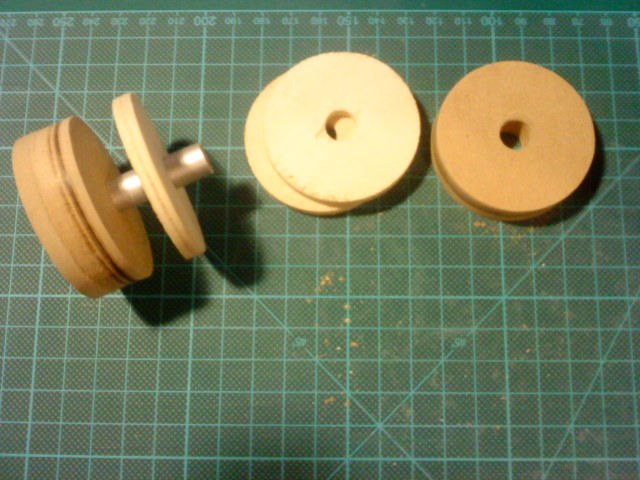
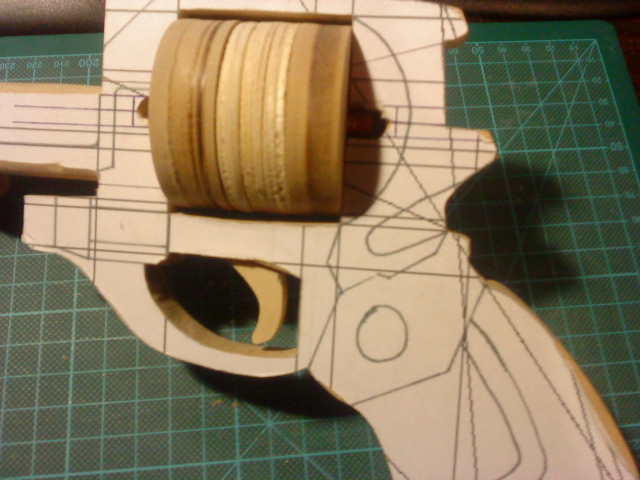
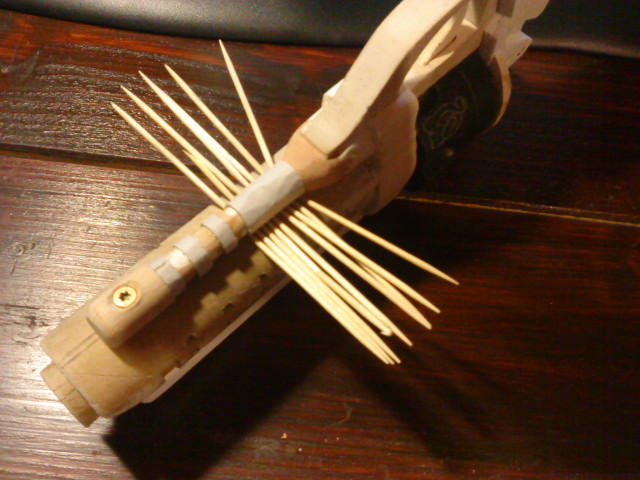
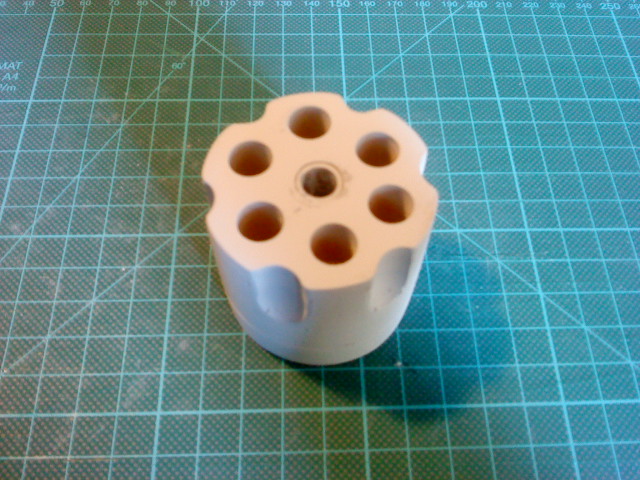
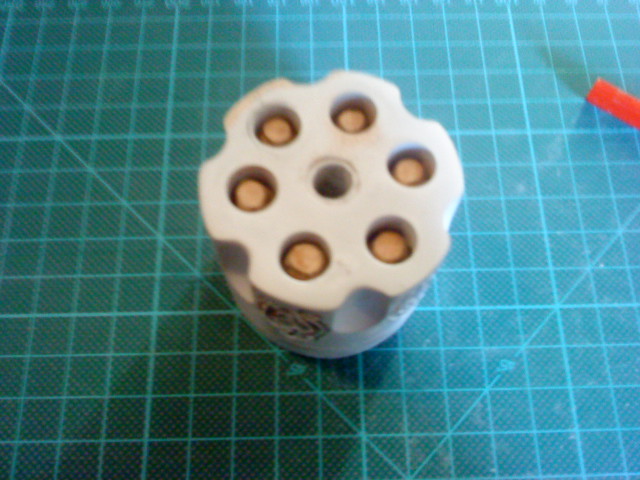
After some adjustments and some sanding it fit perfect. I will be using a shortened crayon as the axis. Since it has six edges the cylinder will be braked when turning. This already works well although I have not attached the axis to the frame. This weekend I focused on the cylinder entirely:

Cylinder_04.JPG


Cylinder_05.JPG


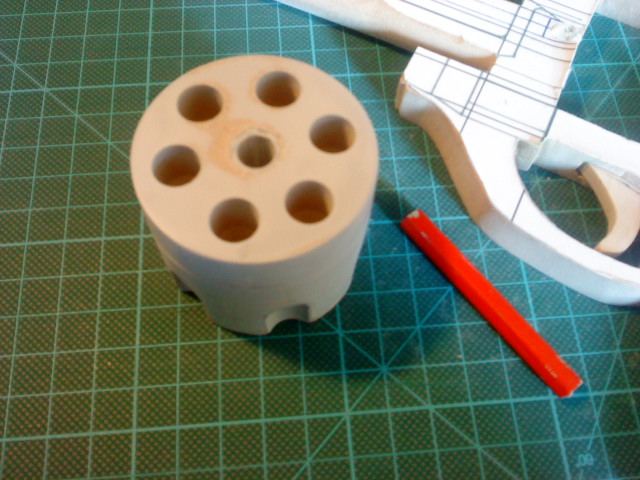
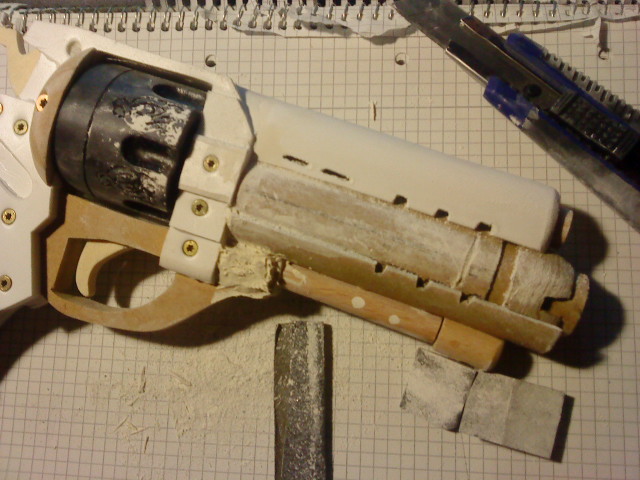
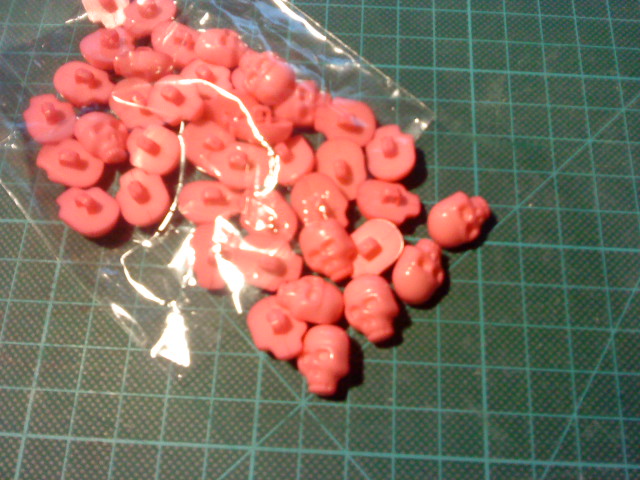
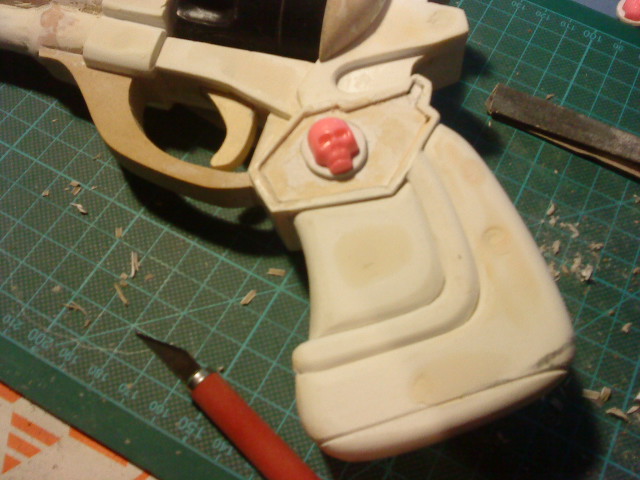
Since I am not sure if the holes for the bullets will be visible in the end I thought I'd add some bullets... just in case:

Cylinder_06.JPG


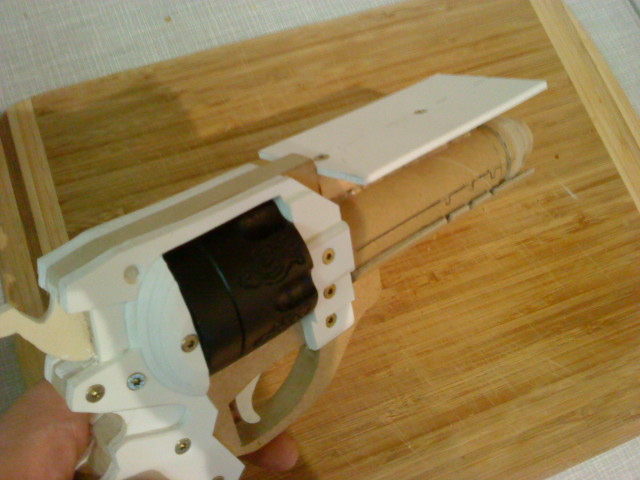
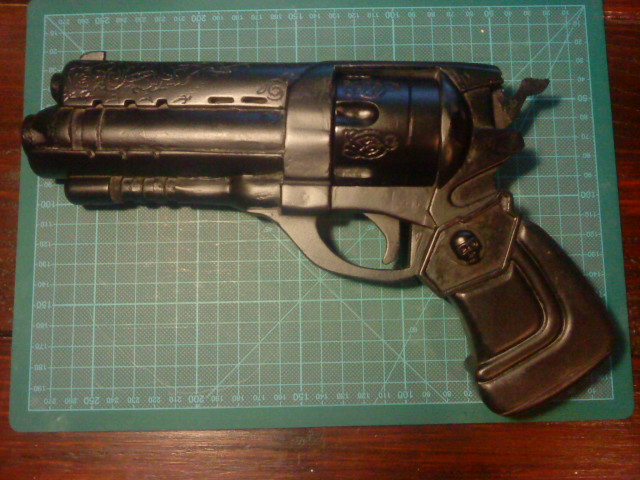
And that's it so far. Next I will cut some layers of plastic sheet to thicken the frame where needed and add the cylinder to the frame...

What do you think so far?

Stay tuned for more :)
 
Last edited:
Re: StarCraft 2 - Jim Raynor's Colt (WIP)

Hi sean. Thanks for the kind words! Here comes a new update. I primed the cylinder black and cut some additional frame parts from plastic sheets to add some depth to the gun. I have to say: This beast gets heavy!
In the pic below barrel and cylinder are not yet attached to the frame and can still be removed (I just put everything together to show what I got so far). Tomorrow I will continue sanding everything and add some more details.

Parts_attached_01.JPG


Thanks for watching! :)
 
Re: StarCraft 2 - Jim Raynor's Colt (WIP)

Looks great so far, like the detail on the cylinder! My goal is to make one as well but still in the gather information and design stage. Looking extremely forward to your finished product!
 
Re: StarCraft 2 - Jim Raynor's Colt (WIP)

I have been nothing but impressed with the drive and attention to detail by some folks on this website. Ever thought about buying a 3D printer? Of course doing it by hand is much more rewarding but I'm thinking of buying a 3D printer for just this type of project.
 
Re: StarCraft 2 - Jim Raynor's Colt (WIP)

Thanks for your compliments, guys!!

Good work,
i like your use of this material, simple and successful. :D

It has its limitations though. The plastic sheets broke several times because they are kinda soft and when you drive the screw too deep they just get ripped apart. That's why I am going to replace some parts with MDF tomorrow.

By the way: Another update! :)

The last two days I added more layers of hobby plastic to the build to get a feeling of the overall form. Details will be added with filler next weekend.
I also added the second barrel:

Barrel_03.JPG


Afterwards I cut a piece of hobby plastic and attached it to the barrel. Then I heated up the sheet and bent the sides down to cover the barrel like seen at the reference.

Barrel_04.JPG


Barrel_05.JPG


Some sanding later the cover looked like this:

Barrel_06.JPG


Then I added the ejector rod. As you can see it took me more than one try to really put it in the middle ....well, I guess I can fix the additional holes with putty as well ;)

Overview_01.JPG


More soon!
 
Last edited:
Re: StarCraft 2 - Jim Raynor's Colt (WIP)

I have been nothing but impressed with the drive and attention to detail by some folks on this website. Ever thought about buying a 3D printer? Of course doing it by hand is much more rewarding but I'm thinking of buying a 3D printer for just this type of project.

Sometimes I think about it but then it is like you said: It is much more satisfying if you craft it all yourself. Plus: It's a great excuse to enter the hardware store several days a week and buy some new tools as well :D
 
Re: StarCraft 2 - Jim Raynor's Colt (WIP)

Hey there,

time for a new update. Although I am afraid I have not that much to report regarding progress on this baby.
I replaced some of the hobby-plastic-sheets with MDF with the goal to gain more stability... and ended up with some splinted MDF. Never underestimate the power of a screw in combination with a battery-powered screwdriver I guess :unsure

Crack_01.JPG


Fortunately this was easy to fix with some wood glue. Afterwards the long and exhausting process of filling and sanding began. And since this is a really dirty job I did not have that many opportunities to take pictures. My goal is to get the sanding done during the next days so I can apply the rudimentary paint job outside before it gets to cold and windy.

Two pics from the sanding-process:

Sanding_01.JPG


Sanding_02.JPG
 
Re: StarCraft 2 - Jim Raynor's Colt (WIP)

Well, it has been some time since the last update. I confess: Another project came in the way but now I am back on track :)

So this is what happened in the meantime:

I started detailing the small axis below the barrel. For this I mainly used modeling clay and some bondo.

EjecRod_01.JPG


The small rings in the front are made from thick cardboard. I wrapped it around and glued it in place:

EjecRod_02.JPG


EjecRod_03.JPG


When this was done I figured it was time to get the details on the grip plates done. For this I used another layer of plastic sheet. It was cut into three pieces and each of them was sanded individually. Took me some time but the result speaks for itself I guess:

Grip_01.JPG


Grip_02.JPG


In the digital version of the gun the handles are decorated with some small skulls as well. I tried different methods to get the look right (modeling clay, card board) but in the end it did not look quite right. So I did some research online and found small plastic buttons that did seem to have the right size... five bucks and 4 weeks later I was the proud owner of 50 skull buttons... Pinkie Pie Style! :lol

Detail_Skull_01.JPG


What can I say? They fit perfectly! :cool

Detail_Skull_02.JPG


...and that is it so far. All that's left is the carved details on the barrel I guess... We will see how this turns out, next time.

Stay tuned!
 
Re: StarCraft 2 - Jim Raynor's Colt (WIP)

Great update! The skulls do add a nice touch. :)

Indeed they do! Except for the color, maybe :lol

Yesterday I pushed my luck trying to engrave the barrel but the hobby plastik is a real pain in the... when it comes to this. I used a Dremel with engraving cap and the plastic sheet did not offer any resistance. Instead the engraving cap heat up and sunk into it. This made the whole process a little more complicated...

Barrel_Details_01.JPG


Barrel_Details_02.JPG


Later yesterday evening I started to paint the gun using several layers of sprayable filler. It looks a lot different now painted in mono-gray but I will have to add some more filler by hand. I underestimated the consistency of the spay filler (sorry for the crappy shot):

Painting_01.JPG


If you are wondering where the skulls are: I did not add them yet because I was afraid the filler from the can might destroy the details. The skulls will be glued in place before adding the prime coat.
 
Re: StarCraft 2 - Jim Raynor's Colt (WIP)

New update incoming...

After attaching the skull buttons I started priming the gun in black. The last coat dries while I write this post...

Overview_05.JPG


I also headed to the hardware store and bought some shades of (metallic) gray :lol These will be added tomorrow.

Stay tuned...
 
Re: StarCraft 2 - Jim Raynor's Colt (WIP)

Hey there! Thanks for the kind words! I am glad you like it! :)

...and I would say "Wait until it's done!" but you don't have to wait any longer!

Here is a pic of the basic paintjob before I added the dirt-effect:

Overview_06.JPG


...and here she is in all her glory...

Overview_07.JPG


Some close-ups:

Closeup_01.JPG


Closeup_02.JPG


...and last but not least a size comparison with the QMX-Mal Reynolds-Gun:

Size_Comparison.JPG


What do you think? I hope you like it.

Thanks for watching :)
 
Re: StarCraft 2 - Jim Raynor's Colt (WIP)

Hmm... does anyone know how to change the title of the thread? I'd like to go from "WIP" to "DONE" :lol
 
This thread is more than 11 years old.

Your message may be considered spam for the following reasons:

  1. This thread hasn't been active in some time. A new post in this thread might not contribute constructively to this discussion after so long.
If you wish to reply despite these issues, check the box below before replying.
Be aware that malicious compliance may result in more severe penalties.
Back
Top