Back To The Future 2015 Set (CG Model)

Let me know if you need HD screencaps, too, as I am happy to help.

Parking meters, misc. things like that...

Do you have a good shot of Hyata's?

I only have one good photo of Hyatas, which has been a lifesaver! Here's today's progress. I think I've got it fairly accurate, but I've still got some fixing up to do.


hyatas.jpgtest139.jpg
 
I actually have it slightly higher res than that, but I scaled it down to make it easier to work with (if it's larger than my monitor's res, 3DS Max is a bit of a pain with how it copies it to the clipboard).

The unfortunate thing about that photo is that it doesn't quite show the left side of the building, so I made the faulty assumption that the building was symmetrical, but the "center" door is actually 4" right of center, so I had to rebuild the whole thing.
 
Awesome job so far, it's looking amazing!

You mentioned about camera matching reference photos - this is something I'm interested in learning more about.
I presume you are using some known dimensions initially to create a base reference model and then using these as control points to then solve the unknown camera parameters? Does that sound about right?
What software are you using to achieve this (if you don't mind me asking)?

I use 3DS Max (2014) for all of my 3D work. They just added a new camera match method in the latest version which I've been using recently including for this building, so there are two different methods of camera matching available.

The existing camera match method works basically as you've described. You place known markers in your 3D scene, then assign them to the corresponding spot on the reference image you are matching, then it tries to solve it to give you a camera. It takes a bit of setup, and it does require some known measurements, but it works pretty well.

The new camera match method is much simpler, and works much better for architectural stuff like this. It gives you 3 pairs of lines, one pair for each axis, and you just drag the end points of the lines to match the perspective of the image (so with a building, you'd just match the lines up to the edges of the building for each axis). This method has its limitations, but it's easier to set up and tweak and works in situations the other one doesn't, and so far has given me good results.
 
Ah Cool, thanks for the explanation. I didn't think about using perspective to solve the cameras.
As you say - perfect for this particular application :thumbsup
 
Mostly done on this building now, and I'm quite happy with it!
I tried to get the sign as close as possible (you can compare these images to the reference image I posted a few posts back to compare). I even did a nifty trick to create the texture of the sign from the reference image, so it's about as perfect as I could possibly get it. Not bad for a sign you can't even properly see in the movie, huh? :lol

test146.jpg test146_textured.jpg test147.jpg
 
Just read through this thread, loved it! You're doing great work here, so keep it up! I can't wait to see this come to fruition.

- Master Tej -
 
I've spent the past couple of days working on the Pontiac dealership. I've had a lot of trouble camera matching it for some reason, so I'm not too happy with the accuracy so far. But I've still managed to make some decent progress.

pontiac.jpg test148.jpg
 
Thanks, guys. :)

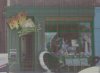
Working on the Blast From The Past antiques store at the moment. I've got the glass done, and the basic dimensions.

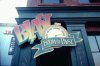
I'm having some trouble finding good reference for the big sign though. I've attached the closest thing to a direct front-on shot I have of it, and even from this blurry low res pic, it's obvious that it doesn't match up to the logo from the receipt/bag all that closely. If I have to, it will make a starting point, but before I do, I thought I'd ask if anyone has some good reference on it? (Only reference of the sign itself, and not the receipt or bag logo, as I have plenty of those, and they're not quite the same)
I think I've got most of what's available on the internet, but it can't hurt to ask. :)

Yes, the big sign and the bag/receipt logo are different in colors and details. That sign is on my to-do-list. I have a lot of more important things to do at the moment, but if you can wait a few weeks, I will make a vector graphic of it.


Time has come - I'm working on that sign. :) And aside from the digital version I want to build an actual sign, 3-D and in real size, but I still need the dimensions. All I know is the aspect ratio of the sign, which is exactly 4:3. Do you know the exact width or height of the sign or at least the dimensions of the BFTP building, so I could calculate the dimensions of the sign myself?
 
I haven't even looked into the sign myself yet (and don't have time right now to calculate it myself), but I've got the BFTP building itself at 17' wide, if you're measuring from the brick building foundation itself just above the building. If you're measuring by the top section of the BFTP building, which protrudes slightly out from the building, it's 17'8".

Here's a quick screenshot of the wireframe of the building from my 3D program with a 1ft grid, in case that helps.

bftp.png
 
I haven't even looked into the sign myself yet (and don't have time right now to calculate it myself), but I've got the BFTP building itself at 17' wide, if you're measuring from the brick building foundation itself just above the building. If you're measuring by the top section of the BFTP building, which protrudes slightly out from the building, it's 17'8".

Here's a quick screenshot of the wireframe of the building from my 3D program with a 1ft grid, in case that helps.

View attachment 272595


It helps a lot! Using your measurings I came to the conclusion that the sign is exactly 7 feet wide and 5.25 feet high (84 x 63 inches). Over 2 meters, wow! That's larger than expected. :eek

By the way: you did a great job. If you put a photo of the store over your wireframe, you can see how accurately it is. Only the right column is too wide and therefore the window too short on your wireframe (the left column of the door is wider than the right one on the real building).

back-future-2015-set-cg-model-back-future-2015-set-cg-model-bftp.jpg-272648d1389442771


back-future-2015-set-cg-model-hv21.jpg-272649d1389442836
 

Attachments

  • back-future-2015-set-cg-model-bftp.jpg
    back-future-2015-set-cg-model-bftp.jpg
    86 KB · Views: 799
  • hv21.jpg
    hv21.jpg
    47.3 KB · Views: 1,536
It probably still needs a bit of adjusting, although it looks like you've scaled it too wide on the right side too, scaling it to the depth of the sign, and not of the brick that you've aligned to on the left side (ie. not at the same depth). Because of the narrow depth of field and the angle of the camera, the depth can make a bit of difference.

And that is a huge sign!
 
... Because of the narrow depth of field and the angle of the camera, the depth can make a bit of difference. ...

I know it's a small photo, but it's the best I could find on the internet where you can see the full front view of the store. :) But I have a few original production slides in my collection, one of them with the BFTP sign. Here you can see it as well - the left column is wider than the right one. ;)

(Sorry for the bad quality, but my slide scanner is not the best. If necessary, I could let them digitalize by a professional photo studio.)

back-future-2015-set-cg-model-slide1.jpg-272666d1389452305


back-future-2015-set-cg-model-slide2.jpg-272667d1389452330


back-future-2015-set-cg-model-slide3.jpg-272668d1389452348


back-future-2015-set-cg-model-slide4.jpg-272669d1389452368
 

Attachments

  • slide1.jpg
    slide1.jpg
    31.8 KB · Views: 803
  • slide2.jpg
    slide2.jpg
    26.2 KB · Views: 754
  • slide3.jpg
    slide3.jpg
    31 KB · Views: 755
  • slide4.jpg
    slide4.jpg
    32.6 KB · Views: 752
Ah yes, so it is! I hadn't spotted that yet. :)
I've only had movie screenshots to work from on that building, which aren't great quality. That first pic is by far better than any reference I've found of that sign, so with that I could probably camera match the image and reverse the perspective on it to give a square-on image (although you could do just as good a job in Photoshop anyway).
Do you have any other slides of the 2015 scene? You're not holding out on me are you? :p
 
... so with that I could probably camera match the image and reverse the perspective on it to give a square-on image (although you could do just as good a job in Photoshop anyway).

Could? I have already. :D Next step is vectorizing. :)

... Do you have any other slides of the 2015 scene? You're not holding out on me are you? :p

I wish I had more. Unfortunately these are my only four. If you need them in a higher resolution, I would send them to a studio.
 
I have this one, too. But I'm not sure if it's from BTTF 2. Do you recognize it anyway?

back-future-2015-set-cg-model-slide5.jpg-272672d1389454807
 

Attachments

  • slide5.jpg
    slide5.jpg
    32.9 KB · Views: 827
Yep, that's the 7-11 store underneath the Texaco building. You barely see it if at all in the movie, but there's a good tour video on Youtube I found that shows it in pretty decent detail, and that's along the very back wall.
 
This thread is more than 7 years old.

Your message may be considered spam for the following reasons:

  1. This thread hasn't been active in some time. A new post in this thread might not contribute constructively to this discussion after so long.
If you wish to reply despite these issues, check the box below before replying.
Be aware that malicious compliance may result in more severe penalties.
Back
Top