bird in flight or not

:cool Hell of a build, peza! Nice work getting the cockpit together :thumbsup. How much do you still have to do yet, before this becomes a fully fledged, uber cool, "fastest hunk of junk in the galaxy"? Look forward to the next update, mate. :)

eh up noddy,well i`ve got the cockpit interior,all the side details,the quad guns top and bottom and the gunners seats and tunnel detail,and the engines to light and finally the paintin,but i`m toyin with doin the mind ya head red lights that are around the bottom..cheers dude i`ll post something later on..peza
 
eh up all,
i got abit more finished off today.i got the copper grillin all cut and mounted to the tunnel.
GEDC2952.JPG
but i did`nt like the size of the gaps inbetween the grills,so i went back over it fillin in the gaps with newly cut pieces(very fiddly)
GEDC2955.JPG
and finally i got it finished off tonight i`ve been doin bits of it for the last 2 days,i had covered the edges with electrical tape so i did`nt scratch it when i started filin the tops of the new fins down to size.
GEDC2960.JPG
i`m happy with the way it`s turned out! so i shot it with some primer but i have`nt got an image of that i will once it`s dried.hope ya llike the progress,
i think i`m gonna get back on the sealin problem tomorrow now i`ve got some milliput from a model show i went last week.cheers peza:cheers
 
Peza my friend; that is some delicate work you got going there. Love this ship and you are doing a fine job on her. Can't wait to see more.
 
Peza my friend; that is some delicate work you got going there. Love this ship and you are doing a fine job on her. Can't wait to see more.

cheers buddy,it`s bein a real labour of love!with it`s up`s and down`s:D &:facepalm.thank you myfriend..peza
 
eh up all.
i`ve got abit more done today i managed to get the cockpit fitted to the tunnel,
at the beginnin of the week i cut the tunnel back because with the new tunnel and the cockpit on it stud out too far,
so i had to take off the armour plates and use my dremel to cut it back,evan after all the care i could i cut it all wrong.
GEDC2963.JPG
GEDC2964.JPG
so after linin it out with some half mm thick styrene i got it all glued up and then mixed up some milliput white(superfine) and with some water and a wooden icelolly stick i applied it to fill in the gap.
GEDC2965.JPG
GEDC2966.JPG
then i had to put the armour plates back on,some fitted and some had to be cut down to size and i had to make up 3 new ones
GEDC2968.JPG
GEDC2969.JPG
and finally i gave it a coat of primer and hey presto.
GEDC2970.JPG
GEDC2971.JPG
so that`s it for the cockpit for now,i`m gonna leave the interior just for now,i`m gonna start on the side details and the dockin rings first,then i`m gonna tackle the mind ya head light`s around the bottom half,hope ya like the progress cheers peza:D
 
eh up all.
i`ve been doin abit more this week,
i`ve been tryin to tackle the porsche parts on the side of the mandibles,i know there are people out there that are makin copies of the original
part but on my shoe string budget,i`m forced to make myself.all the way though this build i`ve been dreadin this bit!
i started off makin a skin for the whole side out of 1mm thick styrene,just so i could size up the bit i`m buildin.
next i got the base piece cut to size and put the circular piece in.you can see the photo image i`m used as ref
GEDC2972.JPG
next i started to knock up the ribs on the inside of the skin.
GEDC2974.JPG
then i put a double skin of 1mm styrene around the circular shape just because the top is sanded with a curved edge.and i`ve skinned the ribbed section

GEDC2975.JPG
next i put the skin on of the circular area,and sanded down the edges.
GEDC2977.JPG
and with a coat of primer it came out ok.
GEDC2978.JPG
and finally for the night i made a start on the outer fins on the gearbox.
GEDC2980.JPG
well thats all for tonight,hope ya like the progress..cheers peza
 
eh up all,
i`ve been workin my way through the ribs on the outside of the gearbox,
here are some of my progress images,i`m nearly finished all i`ve got to do is let the
milliput dry so i can finish off the last of the ribs,and give it a coat of primer..
hope ya like....cheers peza

GEDC2985.JPG
GEDC2987.JPG
GEDC2990.JPG
GEDC2994.JPG
so thats it til the putty dries,so i`ll finish it off and primer it tomorrow!
 
eh up all.
here is my next update,i finished off the Porsche gearbox part and got the rest of it done and primered.
GEDC3049.JPG
GEDC3057.JPG

next i started on the dockin bay port on the same side,only so on the show it looks like i`ve done more than i have.
here is the gap i have to fill,but because i`ve got the model so it can open up for maintenance for the lights inside i`m gonna have to put these on with magnets so thats the plan so far.
GEDC3056.JPG
so i knocked up the base plate.out of some 1mm styrene.
GEDC3059.JPG
next i made the ring it`s self just followin the profile off a mcdonnalds beaker for the shape and some styrene cut to shape for the inside.
GEDC3060.JPG
GEDC3061.JPG
well that`s it for the update but i`m gonna do some more tonight!!cheers folks....yours peza
 
Yeah you're thundering ahead now

Beautiful shot in the first couple of photos, you've done a great job

Brilliant peza

J
 
Peza mate! Are you sure this should be in the studio scale section?! You haven't used original kit parts or paints or sacrificed a goat to the gods I really don't think it counts...
 
Peza mate! Are you sure this should be in the studio scale section?! You haven't used original kit parts or paints or sacrificed a goat to the gods I really don't think it counts...

LOL!cheers dude it`s not the summer solstice?sorry for my spellin it`s pretty poor!but love ya compliment,happy days mym8 it`s gettin close but it`s still way off yet!!
thanks dude.i`ve just got back from great yarmouth on holiday with the family,by ****** it was sunny but cold mym8!
 
eh up all.
here is another post for ya,i`ve not done over the last 2 weeks until the last couple of day`s.
i`ve been continuing with the dockin ring,first off i made my blaster mark with my dremel and a sharp knife.
GEDC3112.JPGnext i made a start on the inner and outer details,off afew sketchy images i had,
GEDC3114.JPG

and here is the final image of my progress so far!
GEDC3119.JPG
well that`s it for now i should get back on it tonight......maybe!:darnkids
cheers all..peza
 
Looking good !

But before you do more work on the cocking rings, the walls look perpendicular, they should taper...

eh up buddy,thank you for the kind words dude.there is a angled taper on the walls,it just can`t really be seen by the photos
i used a Mcdonalds beeker for the profile,there has to be at least 10mm difference from back and front diameters...cheers mym8
.....peza:)
 
I'm envy of your patience,you've put so much effort on scratch build every single part,great job:)

Don
cheers don,it`s not so much patience.....more of an escape,when the kids are freakin out or my day`s gone FUBAR..
thanks for the kind words very much appreciated...one happy peza
 
eh up buddy,thank you for the kind words dude.there is a angled taper on the walls,it just can`t really be seen by the photos
i used a Mcdonalds beeker for the profile,there has to be at least 10mm difference from back and front diameters...cheers mym8
.....peza:)

Gotcha ! I had the same problem when I took pic of the AT-AT foot master with my iPhone, it looked like a cylinder lol.
 
eh up julien sorry for not answerin sooner but i`ve had to take some time off my build through work and home life..
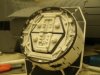
i have started back on the falcon last week i managed to get the docking ring finished with all the detail complete

GEDC3120.JPG


in the last post i showed the blaster damage,now i`ve primered it,i`m really happy with it a little paint and weatherin it will look mint..

GEDC3123.JPG

next i started on the the magnets on the back of the dockin ring and the area that it mounts to,and im happy to say that it all
works,i`ve run out of magnets now so im gonna order some more to continue with the other side and the 2 parts that are next to the
ring they are little armour plated parts by the side wall detail..

my next project was the blaster and meteor damage on the top section.first off i did the meteor damage.
GEDC3125.JPG

next the blaster damage which i had a little problem with due to me bein alittle heavy handed with my dremel.i went right through the skin into
the model and made a hole,so i had to insert some plastic tube and then dremel that back down without poppin it out,so very gently
this time with by fingers crossed went at it again..

GEDC3126.JPG
GEDC3128.JPG
and finally i started on all the little tiny square and rectangular parts that go on the armour plates i`ve already done the bottom half
so i`m just got the top to do i think i`m gonna start on the side details by the cockpit next so i`ll do another post once i start on that..
thanks for havin a look at my progress..cheers peza:cheers
 

Attachments

  • GEDC3121.JPG
    GEDC3121.JPG
    1.7 MB · Views: 81
This thread is more than 6 years old.

Your message may be considered spam for the following reasons:

  1. This thread hasn't been active in some time. A new post in this thread might not contribute constructively to this discussion after so long.
If you wish to reply despite these issues, check the box below before replying.
Be aware that malicious compliance may result in more severe penalties.
Back
Top