DR. Who - Atom Accelerator, the three-in-one prop!

NTBBCPD

Well-Known Member
Now that I have settled in after my big move... and my health is on an upswing I decided to work on an interesting prop that has appeared on Doctor Who, Torchwood and Primeval.

On Doctor Who it is the Atom Accelerator, a part of the 11th Doctor's Console,
14676-atom-dw.jpg


It showed up as a prop on Jack's desk on TorchWood,

14677-atom-torchwood.jpg


And on Primeval It is part of the Anomaly Locking Device...

13553-s2-gallery9-590x445.jpg


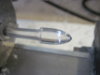
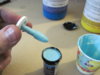
I figure it's part of a multi-head spray unit, but I've checked around on a few boards and no one yet has found the item it was make from.
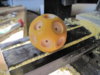
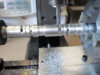
 

Attachments

  • S2_gallery9_590x445.jpg
    S2_gallery9_590x445.jpg
    66.3 KB · Views: 576
Last edited:
It's an art object. I think ThinkGeek might still carry a budget design, but it's purely sculptural and serves no purpose IRL. Let me see if I can track down the manufacturer.

Thomas

Found it. It's an early, mass market, Chris Bathgate ThinkGeek doesn't carry them any longer, and they aren't in his portfolio. But it's a lead. Maybe second hand resale?
 
Last edited:
So, using close-ups of the screen caps I was able to create a 3d rendering to show what I wanted to make.

14709-rift-thingy-small.jpg


I figured out the sizes of the tips, pins and center piece and then decided to use a pool ball for the center because it was right size, and was made of resin so I knew I could mill it easier.

I marked the location for the holes on the ball and then drilled into the ball using my new mill.

14683-img-0268.jpg


Once the holes were drilled I switched over to a fly cutter to make the flat areas on the center piece.


Using the mill made it easy for me to move from spot to spot and make short work of this part of the build.

14685-img-0275.jpg


Next I switched back to an other cutter to drill the holes for the pins to fit into.

14686-img-0280.jpg


Enough for now, tomorrow the pins....
 

Attachments

  • IMG_0280.JPG
    IMG_0280.JPG
    107.2 KB · Views: 178
  • IMG_0262.JPG
    IMG_0262.JPG
    100.6 KB · Views: 213
Last edited:
I so do like action build shots, of members prop projects.
Excellent machining work, and good use of the old one pool ball.

Sure makes a mess machining that stuff hey.
 
It's an art object. I think ThinkGeek might still carry a budget design, but it's purely sculptural and serves no purpose IRL. Let me see if I can track down the manufacturer.

Thomas

Found it. It's an early, mass market, Chris Bathgate ThinkGeek doesn't carry them any longer, and they aren't in his portfolio. But it's a lead. Maybe second hand resale?

I don't think that is it, There were multiples of the item used on Primeval and a member of the Tardis builders found a picture of a console from a BBC traveling press show. It has the core without the pins.

14720-newconsole-panel-02-altclose.jpg
 
Ok, center piece taken care of, Next I worked on the metal pins.

I worked out te measurements and then started cutting them out on the lathe.

14678-img-0251.jpg


I needed to make 17 of these for the one prop, so I got a cheap chisel and ground the profile of the pin into the face of the chisel.

This would allow me to rough cut all of the pins faster and then spend more time doing the finish details.

14679-img-0256.jpg


Next I lathed out two pins at a time and then used the mill to drill the holes and cut the side slot into each pin.

14681-img-0259.jpg


14682-img-0262.jpg


Next it was back to the lathe to drill out the shaft, polish the pins and then seperate the two pins.

Here's one with a sample tip I was testing...


I screwed most of the pins into place on the center piece just to see how I was doing.


Next bit of fun, Mould making and pouring Resin...
 
Last edited:
I so do like action build shots, of members prop projects.
Excellent machining work, and good use of the old one pool ball.

Sure makes a mess machining that stuff hey.

Thanks, thinking about it now I guess I should have used the 11 ball.:lol:lol
 
Were was I...

Oh, ya, the coloured tips.

I turned a sample out on my lathe,

14688-img-0339.jpg


made a rubber mold
14691-img-0344.jpg


and made a resin part using the mold,
14695-img-0356.jpg


But I wasn't happy with the shape... it looked too much like the bullet on a Baker Sonic's halo.

So I remade it on the lathe, made 3 molds and spent several days mixing, pouring, de-molding, cleaning... then doing the same over again and again.

So now I am at this point in the project..

14697-img-0372.jpg


All that's left is to paint the center with brass paint and to apply some colour tints to the tips.

Unless I decide the make a base for it.
 

Attachments

  • IMG_0339.JPG
    IMG_0339.JPG
    61.9 KB · Views: 173
  • IMG_0344.JPG
    IMG_0344.JPG
    81.9 KB · Views: 223
  • IMG_0356.JPG
    IMG_0356.JPG
    87.3 KB · Views: 181
  • IMG_0372.JPG
    IMG_0372.JPG
    105.9 KB · Views: 451
Last edited:
That's some damn fine machining work you completed there. Excellent job!!


Well thank you sir,

The Royal We (a bunch of fans) found out that the tips are in fact bullet-shaped Tire valve caps.

I was able to get a hold of one so I've made a new master to mould and cast replacements for the current ones.

Here's a photo of the old master, a valve cap and the new master.

Edward
 
Here's a photo taken(not by me) at the Doctor Who exhibit.

I think some fans got over touchy or it was damaged during setup.
 
This thread is more than 8 years old.

Your message may be considered spam for the following reasons:

  1. This thread hasn't been active in some time. A new post in this thread might not contribute constructively to this discussion after so long.
If you wish to reply despite these issues, check the box below before replying.
Be aware that malicious compliance may result in more severe penalties.
Back
Top