My Rocketeer helmet

Filandrius

Sr Member
New project! I recently acquired a Rocketeer helmet from a fellow RPF member, which was already finished and painted, complete with lenses and Valor liner. But, my OCD yelled at me until I decided to re-paint it! So here's my progress. Please note that it's not a re-paint per se; it's more a re-weathering, because I've kept the primer and the base coat, which was perfectly fine as-is. ;) By the way, I chose to try and replicate dualedge's painting method, which blew my mind all across the room when I did research. So here goes!

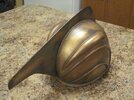
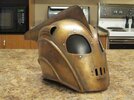
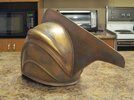
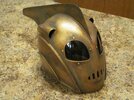
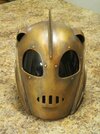
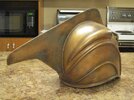
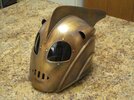
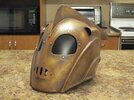
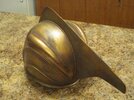
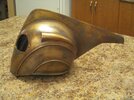
First things first: I starting things up by applying a nice, thick, not-too-even coat of rub'n buff (Antique Gold) all over the helmet. The previous owner had chosen to let the black primer show through in some places to emulate weathering, especially in the welds and such. I'd never used rub'n buff before, and boy is it fun to use. It's real easy, and does miracles. Here's the result:
 

Attachments

  • 10333511_10152404426107736_6740866450540735502_o.jpg
    10333511_10152404426107736_6740866450540735502_o.jpg
    287 KB · Views: 28
  • 10338497_10152404426577736_1936195919281633027_o.jpg
    10338497_10152404426577736_1936195919281633027_o.jpg
    329.9 KB · Views: 36
  • 10338497_10152404426762736_3315503978007120623_o.jpg
    10338497_10152404426762736_3315503978007120623_o.jpg
    271.3 KB · Views: 34
  • 10542690_10152404426347736_6560119736296561239_o.jpg
    10542690_10152404426347736_6560119736296561239_o.jpg
    303.6 KB · Views: 36
  • 10553932_10152404425542736_7908048016062462339_o.jpg
    10553932_10152404425542736_7908048016062462339_o.jpg
    334 KB · Views: 33
  • 10556843_10152404425547736_2578055259096612461_o.jpg
    10556843_10152404425547736_2578055259096612461_o.jpg
    320.9 KB · Views: 35
  • 10608572_10152404426697736_4874589649097092357_o.jpg
    10608572_10152404426697736_4874589649097092357_o.jpg
    373.2 KB · Views: 35
  • 10636552_10152404425532736_5578057338579293338_o.jpg
    10636552_10152404425532736_5578057338579293338_o.jpg
    339.8 KB · Views: 39
  • 10644132_10152404426437736_2968818095675982642_o.jpg
    10644132_10152404426437736_2968818095675982642_o.jpg
    377.1 KB · Views: 35
  • 10644744_10152404426242736_5650474157410418420_o.jpg
    10644744_10152404426242736_5650474157410418420_o.jpg
    399.3 KB · Views: 36
  • 10648380_10152404425777736_7436689337066384820_o.jpg
    10648380_10152404425777736_7436689337066384820_o.jpg
    338.8 KB · Views: 34
  • 10658534_10152404425927736_6174694311136867841_o.jpg
    10658534_10152404425927736_6174694311136867841_o.jpg
    303.3 KB · Views: 37
Last edited:
Step two: a big fat wash of a "dark muddy color" to use the words of the master. I used Tamiya acrylics mixed with some water (flat black, white & brown) and I washed the whole helmet with it. Then I mopped up the excess with a dry rag, making sure that it didn't go on too thick. Also that's when I decided to mask the lenses instead of taking them off. The previous owner did a great job of installing them, after all.
 
Step three: another couple of washes, of brown & dark brown, this time a little thicker (I used a whole lot less water) By this layer the mottled look is really starting to take form. I brushed the mixture over the whole helmet, dabbing the paint unevenly, then I waited for it to dry and wiped the excess off with a wet rag.
 
Step four: latest (and last) batch of washes, this time with some red brown/rust colors. Once again I applied the washes all over the helmet with a large brush.
 
Since I went a little overboard with the washes, I decided to tone down the red-brown color (the helmet is supposed to be goldish, not brownish) So I rubbed off the brown paint from all the flat surfaces, leaving only the uneven finish. I also applied a few touch-ups with the rub'n'buff (the stuff had rubbed off to the primer in some places) The "base" weathering is now done, only thing left to do is to apply some random dabs of paint all over to emulate dirt, burn marks and patina.
 
Thanks for the kind words, it means a lot.
The helmet looks really good.
Are you doing the full suit with rocket packet?
I'm not planning the full suit, the helmet was a prop that I wanted to own for a long time now. But I don't know if I'll be able to resist building the pack someday. ;)

Another update: I just finished the next-to-last step in weathering that thing. I used a diluted mixture of black, rust and brown to do the burn marks (or whatever those are on the screen-used helmet) I dabbed the mixture all over the helmet, spreading it with a rag to make the finish as uneven as possible. Just a thought: how the hell is the helmet that dirty, if Cliff Secord was the Rocketeer only for a couple of days? :lol
 
Wow. Thanks for sharing the step by step photos. I have a helmet kit on order and can't wait to start on it. Your work is really helpful - and providing a LOT of ideas.
 
Last edited:
It's my pleasure! I'm glad to know that my thread is helpful. :) And thank you for the kind words!

OK so last weathering step: the patina! I mixed up some greyish blue, greyish green, a little white and a lot of black until I got a great mushroom-like color. Then I randomly covered the helmet with it (mostly in the edges, to be frank) The look is really starting to come together, methinks. Only one step left: the clear coat! No, I'm not nervous at all. :p
 
The clear coat is done! Turns out I was worrying for nothing; the Testor Gloss Cote worked beautifully, and was surprisingly easy to use (I had a few bad experiences with clear coats) Also, it behaved exactly as I hoped it would: darkening the weathering a bit. After the coat dried I removed the masking tape, re-installed the Valor liner, and voilà! Completed Rocketeer helmet. What do you guys think? (Sorry about the picture overload, BTW. I couldn't help myself. :lol)
 
Last edited:
Thanks, man. The weathering pattern isn't exactly like the one on the hero helmet (hard to be precise with heavily diluted paint) but I'm still pretty satisfied with the final look. Plus, it was fun! :lol
 
Thanks a lot guys! I'm feeling less guilty about the picture overload all of a sudden. :lol
Amazing paint! I would never guess this to be a resin helmet!
I'll take that as a very nice compliment. :) It was cast in rotocast urethane by HMS.
Spectacular!
Right back at you, good sir. Your liner is a work of art.

Speaking of works of art, I'd like to thank dualedge for making his technique public. I used his method pretty much verbatim, and without him my helmet wouldn't look a tenth as nice. Thanks a lot!
 
Thanks a lot guys! I'm feeling less guilty about the picture overload all of a sudden. :lolI'll take that as a very nice compliment. :) It was cast in rotocast urethane by HMS. Right back at you, good sir. Your liner is a work of art.

Speaking of works of art, I'd like to thank dualedge for making his technique public. I used his method pretty much verbatim, and without him my helmet wouldn't look a tenth as nice. Thanks a lot!

I want to send you one just to paint for me! Haha
 
This thread is more than 9 years old.

Your message may be considered spam for the following reasons:

  1. This thread hasn't been active in some time. A new post in this thread might not contribute constructively to this discussion after so long.
If you wish to reply despite these issues, check the box below before replying.
Be aware that malicious compliance may result in more severe penalties.
Back
Top