You are using an out of date browser. It may not display this or other websites correctly.
You should upgrade or use an alternative browser.
You should upgrade or use an alternative browser.
The "I'm painting a Captain America Shield" thread
- Thread starter GeneralFROSTY
- Start date
jeffreygullett
Well-Known Member
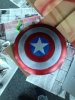
Second attempt at painting. Not flawless but I think pretty good considering I'm not a professional painter!
Next, to attach Valor's awesome brackets.

Next, to attach Valor's awesome brackets.
lovelyandy
Well-Known Member
Second attempt at painting. Not flawless but I think pretty good considering I'm not a professional painter!
View attachment 379494
Looks awesome.
lovelyandy
Well-Known Member
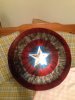
here's how it's looking, got a little more weathering to do and then a top coat, satin or gloss. probably satin eh.

jeffreygullett
Well-Known Member
here's how it's looking, got a little more weathering to do and then a top coat, satin or gloss. probably satin eh.
http://www.therpf.com/attachment.php?attachmentid=380021&d=1411472723
Looks great!
I went with a semi-gloss clear coat on my new shield. I did satin on the first one. I think I like the semi-gloss better.
Dozer3677
Well-Known Member
Where are you guys getting all these shields from? I'd be interested in getting a stealth shield done if possible.
We make them. Out of all kinds of things. Some people get spun metal discs, others take metal sleds and manipulate them and strip them down. Some people make them out of plastic. Infact I saw someone a few threads back making one from 2X4's. Mine is a spun metal disc from a shop. I'd like to think 7 out of 10 people got their metal from the same source. I know I did. Check around. I'd hope the guy in Miami still makes them. Good quality stuff.
We all start out with just a piece of metal.
lovelyandy
Well-Known Member
Looks great!
I went with a semi-gloss clear coat on my new shield. I did satin on the first one. I think I like the semi-gloss better.
never even heard of semi-gloss
i have both, i think over the battle damage gloss would look too weird.
Leaning towards satin for Battled amaged and gloss for a clean shield.
jeffreygullett
Well-Known Member
never even heard of semi-gloss
i have both, i think over the battle damage gloss would look too weird.
Leaning towards satin for Battled amaged and gloss for a clean shield.
I like the semi-gloss because it maintains the shininess on the bare metal ring and star. The satin I found dulled them more than I liked. But it doesn't have the super mirror like finish of the gloss clear coat. Best of both worlds in my opinion.
http://www.rustoleum.com/product-catalog/consumer-brands/painters-touch-ultra-cover-2x/clear
kirks007
New Member
Finished this a while ago, but haven't had the chance to post pics until now. The first photo was Instagrammed, so the color is a bit darker. Used Duplicolor Metalcast red and blue. Made the brackets, straps, and star on my own (based on Valor's tutorials) and got the data plate from Brotherfoster.


For the detachable straps, I ended up using 3M's high strength velcro to attach the straps to the brackets (types 250 and 400, it's a stronger bond if you combine the two different velcros). Man, that stuff is strong. The shield is in no risk of dropping off and it takes quite a bit of strength to pull the straps free. All in all, I was pretty pleased with the way the strapped worked. One downside:


On their own, the straps themselves did't quite make it all the way over my shoulders. You could wear the shield like that, but you'd need to maintain a constant effort to make sure it stayed on. To remedy that, I ended up making another strap to go across my chest and pull the shoulder straps taut. The additional strap connects to the hinges using the same velcro that attaches them to the brackets.

I still don't have 100% range of movement in my shoulders with the shield on (can't reach across my chest), but it feels relatively comfortable. If I could do it over, I'd probably move the brackets inwards by about one inch on each side. That would give you more freedom of movement around your shoulders. Oh well.
In any case, I'm super happy with the shield. It's certainly not perfect, but I know I made it, so that's really satisfying. Special thanks to Valor, GF, Brotherfoster and the many others on these boards who helped me with this project!
For the detachable straps, I ended up using 3M's high strength velcro to attach the straps to the brackets (types 250 and 400, it's a stronger bond if you combine the two different velcros). Man, that stuff is strong. The shield is in no risk of dropping off and it takes quite a bit of strength to pull the straps free. All in all, I was pretty pleased with the way the strapped worked. One downside:
On their own, the straps themselves did't quite make it all the way over my shoulders. You could wear the shield like that, but you'd need to maintain a constant effort to make sure it stayed on. To remedy that, I ended up making another strap to go across my chest and pull the shoulder straps taut. The additional strap connects to the hinges using the same velcro that attaches them to the brackets.
I still don't have 100% range of movement in my shoulders with the shield on (can't reach across my chest), but it feels relatively comfortable. If I could do it over, I'd probably move the brackets inwards by about one inch on each side. That would give you more freedom of movement around your shoulders. Oh well.
In any case, I'm super happy with the shield. It's certainly not perfect, but I know I made it, so that's really satisfying. Special thanks to Valor, GF, Brotherfoster and the many others on these boards who helped me with this project!
jeffreygullett
Well-Known Member
Finished. Thanks to everybody on this thread. Especially Valor for his amazing brackets and star.


")
4505marcel
Active Member
Lovin the info on this thread, brought two shield blanks. I'm going battle damaged and stealth. After all the reading on here I know what I want to do with the battle damaged. But the stealth is confusing me, from the film it looks like a standard coloured shield with a blue over spray on the lot? Yet I've seen guys just replacing the red with Tampa blue, anyone know what the screen accurate paint job is?
I'm a little confused about attaching the first bracket to the shield blank, I was planning on spot welding them on. But I'm concerned the silver ring on the shield front will get burnt or discoloured and will ruin the spun look. Is there a specific method of welding these?
I'm a little confused about attaching the first bracket to the shield blank, I was planning on spot welding them on. But I'm concerned the silver ring on the shield front will get burnt or discoloured and will ruin the spun look. Is there a specific method of welding these?
If you're going to weld, you must use a TIG welder, but welding isn't necessary in my opinion. JB Weld or heavy duty mounting tape hold up just fine.
Vew
Member
Hey guys. Decided to start making a Captain America shield like all of you. Thanks to everyone that's provided all the great information so far. I decided to go with an aluminum spun shield from Rolando and a star and bracket set from Valor. Key differences I used was I dyed the leather straps dark brown, and I used aluminum solid rivets to fasten all the pieces.
Anyway, I used an Imgur link and added all the descriptions there.
http://imgur.com/a/Oo7HR
Here is a final product shot though.

Anyway, I used an Imgur link and added all the descriptions there.
http://imgur.com/a/Oo7HR
Here is a final product shot though.
BananaBlitz
Active Member
*Swoon*
Thanks for the heads up on the flush rivets, hadn't gotten quite that far yet. What did you use as your source? McMaster?
Vew
Member
*Swoon*
Thanks for the heads up on the flush rivets, hadn't gotten quite that far yet. What did you use as your source? McMaster?
No problem. I got them from work. We use a lot of sources for solid rivets including BE Aerospace and Wesco. You can get them at McMaster Carr just fine though. Just be mindful when you place to start if you're match drilling so you don't end up drilling thru a bracket like I did. Again, I used a button head A rivet, with a 5 length shank. If you get something too long, you can always trim it before installing the rivet.
Similar threads
- Replies
- 10
- Views
- 1,317
- Replies
- 4
- Views
- 1,414
- Replies
- 1
- Views
- 521
- Replies
- 10
- Views
- 2,031
- Replies
- 6
- Views
- 1,492