My BTTF Inspired Bag V2 Page 4

I've been following this post since the start and man do I love the effort you have put into this so far. Its all about the preparation to get the mint result :).
Can't wait to get in on this and keen to know what shipping would be within Aust as heading over to Sydney at Christmas time from Auckland so it could be a rather nice Christmas present to my self (insert evil laugh here).
Cheers Mat
 
Tomorrow will be another test with Perspex as it behaves differently from Polycarb. I will combine the vacuum system with the heater system.
One of two things will happen. Either something will break or I will make something awesome. Lets hope for the 2nd.

Good luck! Let me know how heating perspex goes. I believe most perspex is thermoplastic meaning it will be able to be bent/shaped when heated but since you're going to try it anyway......... (want to make a clear holder for Star Trek Starships calendar which displays horizontally)
Want to know what happens before investing in a heat gun and perspex :)

- - - Updated - - -


Very true! If anyone ever complains that something's not right the first time, just tell them 'it's the prototype'. Bet Adam Savage made lots of prototype things over the years :D
 
There are no fails, just learnings (so long as we do understand where we went wrong) and they are always correctable if we take the proper action steps.

I set this up today, but I rushed it.

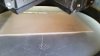
1. The front right heater was not on for the 1st 10min of heating so the left side had started to get sucked in, but the right was not moving. I broke the seal too early resetting this.

2. I discovered a leak on the fitting that connects the main chamber to the surge tank. Thread tape should fix this. The surge tank Idea works a treat, but because this fitting sucks air, does not hold the vacuum in the main chamber long enough. I will need to spend time and test a full vacuum before I can continue.

3. I am using 4 x 500W lights for heaters. I had made a wooden spacer to raise the heater off the plastic. It was taking too long and so I removed it. The heaters were now too close and burned the plastic. Something about slow and steady wins the race? I noticed the other day there were 200W versions of the same lights I am using. Part of me thinks that 8 x 200W (1600W) is actually going to be better than the 4 x 500W (2000W) I have now as I will get more surface area coverage.

I will need to run a test to see just how long this Perspex takes to heat. It won't matter if I burn it again now that it aready compromised.
When I think back to the dome I pulled from 3mm, I am thinking that process was over 20mins now...

attachment.php

attachment.php
 

Attachments

  • 20161117_093437.jpg
    20161117_093437.jpg
    78.2 KB · Views: 535
  • 20161117_104017.jpg
    20161117_104017.jpg
    55.6 KB · Views: 528
Ran some heating tests today and added a small fan to move the hot air around inside the heater. This got the temp up a bit.

attachment.php


We have a few problems. Yesterday I ruined the main tool in the vacuum former. Actually it was my spare, but the pipe was also heated with the plastic and once suction was applied, got squashed out of shape.

Today I tested some thing neat. By heating a smaller piece, I was able to lay that over a form, then use rubber sheet to hold it in place until it cooled. If you want to see some thing amazing, check this out.


Good news is, I found the same rubber sheet local to me.
 

Attachments

  • 20161118_114824.jpg
    20161118_114824.jpg
    129 KB · Views: 515
Last edited by a moderator:
OK after a few re-draws, it looks like the only way this will happen is to have the end cap machined ($40/hour plus materials), then mold and cast this part (probably in an epoxy as it is nice and hard and can be pigmented black.

Based on the tight tolerances needed to allow the lids to move, I think thermoforming is out.
 

Attachments

  • Tube Bag Revision 3.jpg
    Tube Bag Revision 3.jpg
    71 KB · Views: 67
Question for the forum: This tube bag is supposed to be 22" long and 11" round (dia).

Is that 11" the dia of the tube, or the largest part of the end caps?
 
If I am to spend money on tooling, I want this right.

Please provide feedback. I've reduced the angle on the tapered lid from 10 degrees back to 5 degrees. And I am liking 5 more than 10 right now.
 

Attachments

  • FOOTWEAR Tube Bag Lids Revision 3 end caps 1.jpg
    FOOTWEAR Tube Bag Lids Revision 3 end caps 1.jpg
    20.3 KB · Views: 71
It may be 11 overall outer diameter, its just big enough for MJF's sized shoes
https://thngs.co/things/6942

Yeah that is what I thought too. People want screen accurate (and in my opinion, that SHOULD include a 1:1 scale) yet also want this to be practical. Most of the people that buy this tube will have shoes bigger than US7.

If we run with 11" overall diameter, then the PVC pipe that I have on hand (and I want to use to make the body) is perfect. But that won't hold a pair US10MAGs with bending them. It does however fit in the overhead locker on a plane :)

I will create two models, 11"OD and 11" ID.

Any thought on the angle?
 
And two versions - the one on the left with an ID of 11 inches and the version on the right with an OD of 11 inches. Both are the same length.
 

Attachments

  • Tube Bag Revision 4 image 2.jpg
    Tube Bag Revision 4 image 2.jpg
    104.9 KB · Views: 84
Update:

After speaking the guy that I normally get machined parts done through, he has suggested converting my file into .stl and having it 3D printed. This has been done and I am now awaiting a quote. Not sure what this will cost to print or what material options there are.
 
Update:

After speaking the guy that I normally get machined parts done through, he has suggested converting my file into .stl and having it 3D printed. This has been done and I am now awaiting a quote. Not sure what this will cost to print or what material options there are.

One step closer!
 
Yep, this has to happen. And 3D printing means nice tight tolerances on the moving parts.

Lets just hope they don't come back with something dumb like $1000 to print this part.

Yeah especially since it's a fairly big piece. But maybe you can get a discount for the amount of work you will give them? I wouldn't feel guilty asking for a deposit like other prop builders do on their high ticket items.
 
What I want is a black plastic that is light and strong and not affected by chemicals like acetone (the way ABS is). But I also don't want print lines. So if printing the parts is cost prohibitive, then I will have master parts printed, then mold and cast them for production parts.

Either way, this project just got seriously expensive, so yes, at some point those that want in are going to have to pony up with a deposit.

Sent from my SM-G900I using Tapatalk
 
So the quote came back at over $1200 just for one end cap. What a joke. Apparently my model is a solid part, and it will be cheaper if I can draw it as a hollow part with saya 2mm wall thickness.
 
So I have enlisted the help of a industrial designer to get the STL files drawn for 3D printing.

These parts will then be molded and cast in a hard plastic.

The more I look at these parts, the more I see ways to make this whole project stronger so you can actually use it.
 
This thread is more than 5 years old.

Your message may be considered spam for the following reasons:

  1. This thread hasn't been active in some time. A new post in this thread might not contribute constructively to this discussion after so long.
If you wish to reply despite these issues, check the box below before replying.
Be aware that malicious compliance may result in more severe penalties.
Back
Top