My BTTF Inspired Bag V2 Page 4

Here's my try. :) The logo is 16 1/4 inches wide.

PDF file: NIKE_FOOTWEAR_Bag_Logo_Sticker_remade_by_Roland_Zubcic.pdf


Preview:


my-bttf-inspired-bag-v2-page-4-preview.png-310056d1397164598
 

Attachments

  • preview.png
    preview.png
    18.8 KB · Views: 1,407
Last edited:
I will find out costing next week. The 2mm ABS is actually cheap and I need to get the template redrawn as my version is polygons, and I want the curves to be arcs.
 
Last edited:
Another step closer. I did a few small revisions and have sent the file off to a friend with much better CAD programs than I have to have the poygons corrected to circles (something I can't seem to do) and then off to the laser cutters :)
 
File came back this morning with all polygons changed to proper circles and arcs.

10302305_10152385525343841_7638126354750726619_n.jpg


Next step, off to the laser cutter.
 
Been a bit slack on this project, so today I got it happening. The laser cutter said this should be ready in about a week. Originally I was going to use 3mm black ABS, but today I found sheets of black polypropylene in 1.4mm. Strong and light and able to be folded and glued much easier.
 
The Polyprop idea was a fail, so it was back to the drawing board.

Over the last few days, I have been doing a little bit of work on the earlier PVC V2 parts.

10614211_10152692382613841_8464868512827213137_n.jpg


Since this photo was taken, I've trimmed the handle back to be half cylinder and am now working on the recess under the handle.
 
Moving on to the graphics. I found this on line
https://fbcdn-sphotos-c-a.akamaihd....5_10152333344133841_7285617467256851856_n.jpg

I thought the font looked wrong and after a bit of a play I came up with this

https://fbcdn-sphotos-a-a.akamaihd....7_10152333852478841_3660507035834242934_n.jpg

The Os in the FOOTWEAR still look a but too square so anyone has the proper art work that they are prepared to share, please post it in this thread.
The white rectangle is the handle cutout.

For those wondering, the font name is Annonce Regular.
 
Hey man! First post here. Anyway, I've been making my own bag and luckily can across this thread where the owner is still at least active. I've been making my own bag and the tube is easy yet it's the ends that are complicated and retard the process. I have only two questions as of now: How to do get the slightly larger in diameter ends? My sources of tubing jump diameter by 2 inches. Is getting a bag and the ends nearly screen accurate possible without this machinery? You seen to have such industry available at your disposal and I do not. Thank you so much! And you asked for a link to Annonce Regular: ($25) ... http://www.linotype.com/482960/AnnonceRegular-product.html I can't seem to find a free download for this one.
 
Last edited by a moderator:
Hey man! First post here. Anyway, I've been making my own bag and luckily can across this thread where the owner is still at least active. I've been making my own bag and the tube is easy yet it's the ends that are complicated and retard the process. I have only two questions as of now: How to do get the slightly larger in diameter ends? My sources of tubing jump diameter by 2 inches. Is getting a bag and the ends nearly screen accurate possible without this machinery? You seen to have such industry available at your disposal and I do not. Thank you so much! And you asked for a link to Annonce Regular: ($25) ... http://www.linotype.com/482960/AnnonceRegular-product.html I can't seem to find a free download for this one.

Yeah I am active.

To answer your questions -

1. I was lucky that the place I bought my pipe had the cuff still on the end and were willing to sell it to me.
2,.I never had "machinery" when I made mine. I had some hand tools and borrowed a power tool.

I am looking into the possibly of reverse vacuum forming the parts for my next bag.
 
Last edited by a moderator:
Since discovering the amazing possibilities of reverse vacuum forming, I have decided to look at doing my Tube Bag this way.

Initially I was thinking positive vacuum forming and my experiments with this have given mixed results - where both heat and suction have been an issue at one time or another.
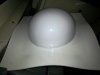
Check this out.

attachment.php


So this is 3mm Perspex and note how perfect the edge is. This dome is about 5" tall and I would suggest that only best vacuum forming machines would be cable of such a result. No DIY'er would be doing this in this material on a positive form.

So reverse vacuum forming is similar to positive vacuum forming with a few advantages. From my testing, time, heat and suction are always the crucial 3 elements that you have to work with positive vacuum forming. If you don't have all three, you don't get a very good pull.

With reverse vacuum forming, time is not as issue at all because once the seal is made, you can let the part cool down and re-heat it later. Suction becomes the most important part. Because I have a vacuum chamber and pump that can pull a full -30", I have all the suction I will ever need.

attachment.php


So there are several ways to make the molds. Typically for both positive and reverse vacuum forming, the bucks or molds have to be able to withstand both heat and pressure. You can use pretty much anything that won't break or crack when subjected to the process.

With positive vacuum forming, your seal is made once the plastic sheet is pulled down onto the Platen. You typically have under 2 seconds to get a seal and evacuate all the air and why timing, heat and suction (and making the seal) are so important. If one fails, the whole thing fails.

With reverse vacuum forming, you make the seal first, then apply heat. Now you can take your time. The vacuum pump is only needed if the vacuum drops off - IE as the plastic pulls in, I noticed the gauge move and I turned the pump on briefly to maintain the suction. Once at the desired level, the pump was shut off again.


my-bttf-inspired-bag-v2-page-4-a-nike-footwear-tube-bag-v3-7-jpg-456289d1427358599


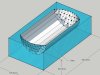
My Tube Bag has lids that wrap around the body. I really need two molds - one for the main body and one for the lids. The lids also have the recessed handles.
So with a reverse vacuum form, I can make the mold slightly over sized and place a layer of rubber inside to reduce the size for the small main body.
Because the lids have the recessed handle, I can make a second liner that has this part attached which faces into the cavity.

A type of silicone rubber is definitely going to be needed to make seals and I am working out the cost to make whole mold from silicone.
 

Attachments

  • NIKE FOOTWEAR Tube Bag V3 7.jpg
    NIKE FOOTWEAR Tube Bag V3 7.jpg
    216.3 KB · Views: 1,116
  • Reverse Vacuum Form Mold 1.jpg
    Reverse Vacuum Form Mold 1.jpg
    93.8 KB · Views: 930
  • 20150319_090535.jpg
    20150319_090535.jpg
    114.4 KB · Views: 914
Last edited:
This thread is more than 5 years old.

Your message may be considered spam for the following reasons:

  1. This thread hasn't been active in some time. A new post in this thread might not contribute constructively to this discussion after so long.
If you wish to reply despite these issues, check the box below before replying.
Be aware that malicious compliance may result in more severe penalties.
Back
Top