You are using an out of date browser. It may not display this or other websites correctly.
You should upgrade or use an alternative browser.
You should upgrade or use an alternative browser.
1/24 X-Wing near 100% from scratch
- Thread starter Moska
- Start date
Aurora
Well-Known Member
Hey Rafa, that is one incredible rear end mate, x-wing that is:lol.
Truly awe-inspiring work here, it's just flawless.
You must have so much more satisfaction scratching the parts, rather than assembling some resin kit Rafa.
Love it:cool
Stu
Cant imagine the carpal tunnel
Last edited:
Moska
Sr Member
Hi Stu, imkold and Aurora.
Many thanks for your words. And my carpal tunnel is ok by the moment… I think… not sure…:lol
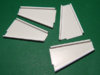
A new update.
I'm working on the details that complete the front and rear sides of the wings.
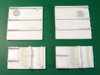
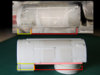
The four parts of the Sealab were easy to copy, the Hummel parts is another matter.
Through a friend who works in a signage company, I got the pieces that has that toothed circular hole, made from acrylic and laser cut. The pieces are perfect.")
I also tried the same process for the heatsinks, but their fins are too thin and the heat itself that emits the laser distorts the piece. Too bad once again I'll have to work from scratch.:confused
The other pieces of the Hummel am making from scratch. I will make three pieces: two for the fronts of the wings, and one for the rear which then I have to copy in resin to complete the four required. I will also need to resin copy the machine gun of the Sherman to obtain the four copies needed for the front sides of the wings.
Thanks for looking.:love
Rafa
Many thanks for your words. And my carpal tunnel is ok by the moment… I think… not sure…:lol
A new update.
I'm working on the details that complete the front and rear sides of the wings.
The four parts of the Sealab were easy to copy, the Hummel parts is another matter.
Through a friend who works in a signage company, I got the pieces that has that toothed circular hole, made from acrylic and laser cut. The pieces are perfect.
I also tried the same process for the heatsinks, but their fins are too thin and the heat itself that emits the laser distorts the piece. Too bad once again I'll have to work from scratch.:confused
The other pieces of the Hummel am making from scratch. I will make three pieces: two for the fronts of the wings, and one for the rear which then I have to copy in resin to complete the four required. I will also need to resin copy the machine gun of the Sherman to obtain the four copies needed for the front sides of the wings.
Thanks for looking.:love
Rafa
Attachments
Last edited:
Moska
Sr Member
Beautiful job as always Rafa, you da man for this scratch building lark.
Stu
Many thanks Stu. I try…:cheers
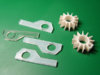
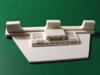
New update.
1 - The Hummel pieces for front and rear sides of the wings already been completed.
2 - Also the pieces that combine parts of Hummel and Sherman to the rear sides of the wings.
3 - I took that I was working with these pieces of the Sherman to make a new Milliput mold and obtain copies of the necessary details for the guns.
4 - I'm currently working on Sealab parts that go into the back of the outer surfaces of the wings.
Sometimes the pieces that seem easy require more time than you might think. :behave
Thanks for looking.
Rafa
Attachments

atom
Well-Known Member
Hey! Moska-san!
You did magnificent job on all parts.
What are you gonna make next? Saturn engine bell? Or phantom engine and engine parts? Anyway I’m looking forward to your wonderful work from now on.:thumbsup
Changing the topic, IMO, about the pic of the rear section of MAXI-BRUTE contributed by you in another thread, I watched it for the first time, umm... I think it is apparent MAXI-BRUTE was made in reference to RED2. :unsure
Moska
Sr Member
Hey! Moska-san!
You did magnificent job on all parts.
What are you gonna make next? Saturn engine bell? Or phantom engine and engine parts? Anyway I’m looking forward to your wonderful work from now on.:thumbsup
Changing the topic, IMO, about the pic of the rear section of MAXI-BRUTE contributed by you in another thread, I watched it for the first time, umm... I think it is apparent MAXI-BRUTE was made in reference to RED2. :unsure
Hello atom-san.
I'm very grateful to receive such kind words from someone as talented as you are.
I'm not sure what will be my next step. Probably I start to work on parts that go next to the guns supports. I think they come from a Tamiya Sherman.
An area that is beginning to worry me about is the bricks texture. I thought it would be easy to find something that would work in hobby shops, but the textures that sell for railroad modeling have little relief and I haven't found anything I like. If you or anyone knows a good solution, I appreciate suggestions.
Speaking now of the Maxi-Brute back plate, it seems clear that is based on Red-2. The shape of the rear end of the fuselage is very characteristic of this model… as you know very well.:love
I'm very glad to talk with you.
Best regards.
Rafa
Moska
Sr Member
Hello friends.
New updates:
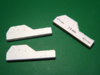
1 - Sealab parts ended.
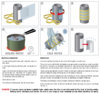
2 - First steps in building the Tamiya Sherman part. I did the grating using my scribbing tool on a piece of 1mm styrene.
3 - First attempt to get the hinges. To get the rounded shape of the bolts, I used a lighter, slightly approaching the flame to the end of a thin stretched plastic rod.
4 - The finished piece. Finally, I decided to make new hinges with unrounded bolts ends, because the heat rounded ones were too big.
5 - A full gun support. I think the E shaped piece is too thick (2.5 mm). Also lacks good height to accommodate the body of the guns. The base of the E shaped support is also too thick (2 mm), I think.:confused
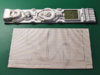
6 - Until recently, I always thought that the guns were centered on its E shaped supports but, most models show that it isn't true. I have drawn this outline of how I think it's right but not absolutely sure. :confused
7 - Here I put some pictures of the different configurations that show the IL&M models.
As you can see, I'm not pretty sure about this question so, I'll appreciate any clarification.:confused
Thanks for looking.
Rafa
New updates:
1 - Sealab parts ended.
2 - First steps in building the Tamiya Sherman part. I did the grating using my scribbing tool on a piece of 1mm styrene.
3 - First attempt to get the hinges. To get the rounded shape of the bolts, I used a lighter, slightly approaching the flame to the end of a thin stretched plastic rod.
4 - The finished piece. Finally, I decided to make new hinges with unrounded bolts ends, because the heat rounded ones were too big.
5 - A full gun support. I think the E shaped piece is too thick (2.5 mm). Also lacks good height to accommodate the body of the guns. The base of the E shaped support is also too thick (2 mm), I think.:confused
6 - Until recently, I always thought that the guns were centered on its E shaped supports but, most models show that it isn't true. I have drawn this outline of how I think it's right but not absolutely sure. :confused
7 - Here I put some pictures of the different configurations that show the IL&M models.
As you can see, I'm not pretty sure about this question so, I'll appreciate any clarification.:confused
Thanks for looking.
Rafa
Attachments
Yes, that's the way I've always seen it imkold. It sits on the box-like part and the outter piece just stabilizes it.
Moska
Sr Member
Good news!
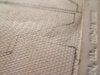
The brick sheet that Scott Graham so generously sent me has come into my hands today.
What a blast! the relief is very good. Only the original stuff looks really like original stuff.
I have no words to thank enough the generosity and great help from Scott. Thanks to him, my long and laborious project is better now.
Thanks again to Scott and to this forum where I found so much valuable information and support.:love
Rafa
Attachments
I'm glad to have helped, Rafa!
FYI: those outlines of the piece used on the wings are based on rubbings over the pyro casting I have. They might not be accurate for you!
FYI: those outlines of the piece used on the wings are based on rubbings over the pyro casting I have. They might not be accurate for you!
Moska
Sr Member
Hi all.
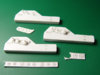
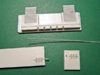
During the past few weeks I've been pretty busy but I got some moments to continue my project.
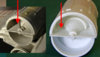
I built all the pieces for the front engine (except the parts that goes into the inner wells of the wings).
No problem to dress the engine covers. Apollo parts only need a few extra panels applied with ease using self-adhesive vinyl tape. I pay much attention to fix the small mold defects in the striped sections of these pieces using a small triangular file.
Moreover I built the pieces that make the basis for the above, paying close attention to the thickness and the length of that base to match the original model. The semicircular front closure has the depth corresponding to a hero model, and I constructed the rear closure with thicker plastic to be a strong support for the rear engines.
The greeblies inside the intakes aren't any problem and just need to cut to the proper length.
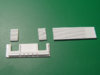
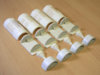
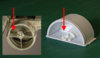
The second halves of the intakes, which originally come from Sealab III kit, were entirely scratch built. This involved the need of bending some rectangles of styrene, and I've used the technique described in the attached image.
In these inner halves I've included the horizontal piece that makes the separation between the two halves and, in the background of these pieces, I also included the strip can be seen in the images of the original models.
Well, another little step that brings me closer to my goal.:cool
Thanks for looking.
Rafa
During the past few weeks I've been pretty busy but I got some moments to continue my project.
I built all the pieces for the front engine (except the parts that goes into the inner wells of the wings).
No problem to dress the engine covers. Apollo parts only need a few extra panels applied with ease using self-adhesive vinyl tape. I pay much attention to fix the small mold defects in the striped sections of these pieces using a small triangular file.
Moreover I built the pieces that make the basis for the above, paying close attention to the thickness and the length of that base to match the original model. The semicircular front closure has the depth corresponding to a hero model, and I constructed the rear closure with thicker plastic to be a strong support for the rear engines.
The greeblies inside the intakes aren't any problem and just need to cut to the proper length.
The second halves of the intakes, which originally come from Sealab III kit, were entirely scratch built. This involved the need of bending some rectangles of styrene, and I've used the technique described in the attached image.
In these inner halves I've included the horizontal piece that makes the separation between the two halves and, in the background of these pieces, I also included the strip can be seen in the images of the original models.
Well, another little step that brings me closer to my goal.:cool
Thanks for looking.
Rafa
Attachments
Retep1701a
New Member
Lot of fine details. Keep the pictures coming.
Similar threads
- Replies
- 2
- Views
- 440
- Replies
- 3
- Views
- 614
- Replies
- 12
- Views
- 1,228