You are using an out of date browser. It may not display this or other websites correctly.
You should upgrade or use an alternative browser.
You should upgrade or use an alternative browser.
Ghostbusters: The Video Game Proton Pack
- Thread starter mburkit
- Start date
-
- Tags
- ghostbusters
mburkit
Well-Known Member
Nice work on the bumper. Have you considered gas power for the slime mode and for the cyclotron tubes? If you do I would mount them in the slime tank. Just a thought
Nope, we are most likely going electronic. We pretty much have it figured out, we just need to buy components, get them installed and working!
mburkit
Well-Known Member
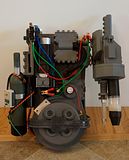
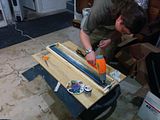
One more small update just because I was able to take some nice pictures that really show of this thing shaping up to be a video game pack. I mounted the metal tube that will be the HGA, letting me put pneumatic fittings on it which lead to all the pneumatic hosing now being on the pack. I also mounted slime blower nozzle onto the wand. Anyway, enough jibber-gabbing, here's the pictures (the point of this whole post):


mburkit
Well-Known Member
I hope you're ready to "taste the rainbow"!
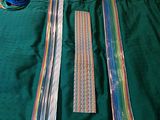
Just like everything else on this freaking build, we had to scratch build our own ribbon cables because the ones in the game just don't exist in the real world. They are kinda a weird mix between the GB1 and GB2 ribbon cables.
Here's a close up of the color pattern we went with:
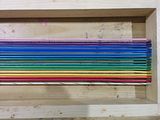
As you can see, we made our own make-shift jig. We didn't want to go too crazy since we only needed a few.
We used the same method BlkMesaHero from GBFans did with the heat shrink tape and it turned out pretty good considering we never really did this before!
Here's a little comparison shot of a GB1, GB2, and GB:TVG ribbon cables all next to each other.
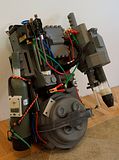
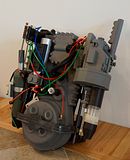
And last but not least, what it looks like on my grey proton pack, haha
I will get a tighter wrap on it when the pack is finished, but I wanted it on there to see what it looked like. The blues/purple/pinks are a little darker than in the game but over all, I think we got pretty close to what we wanted. I'm also debating about hitting the back side of the cable with satin aluminum spray paint to give it more of a silver color like in the game, especially up where the cable is tightly wrapped; but we'll see.
Anyway, kinda a small update but I wanted to share what we accomplished today. Its freaky as this thing begins to look more and more like a video game pack. . .
Thanks!
Just like everything else on this freaking build, we had to scratch build our own ribbon cables because the ones in the game just don't exist in the real world. They are kinda a weird mix between the GB1 and GB2 ribbon cables.
Here's a close up of the color pattern we went with:

As you can see, we made our own make-shift jig. We didn't want to go too crazy since we only needed a few.
We used the same method BlkMesaHero from GBFans did with the heat shrink tape and it turned out pretty good considering we never really did this before!

Here's a little comparison shot of a GB1, GB2, and GB:TVG ribbon cables all next to each other.

And last but not least, what it looks like on my grey proton pack, haha

I will get a tighter wrap on it when the pack is finished, but I wanted it on there to see what it looked like. The blues/purple/pinks are a little darker than in the game but over all, I think we got pretty close to what we wanted. I'm also debating about hitting the back side of the cable with satin aluminum spray paint to give it more of a silver color like in the game, especially up where the cable is tightly wrapped; but we'll see.
Anyway, kinda a small update but I wanted to share what we accomplished today. Its freaky as this thing begins to look more and more like a video game pack. . .
Thanks!
mburkit
Well-Known Member
Update time! Its been a while since I've posted anything here and the project is steadily moving along as I want this sucker done from Dragon Con.
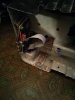
After we made ribbon cables for ourselves, there are only a few more bits and bobs needed to finish the pack side of this build. While finishing up scratch building and molding these pieces (I'll get to them in a second), I decided to do a little bit of SCIENCE! to figure out what we wanted to use as our slime. We wanted to use something that was relatively pH neutral, yet would not evaporate over time and was relatively on the thicker side of "slime". Then I remembered the making of "Alien" and how they used KY Jelly for the saliva of the Alien monster! And considering what KY is usually used for, it has to be safe for coming in contact with human skin, so it hopefully won't eat through our hosing. And since it is water based, it takes food dye really well as well, without staining the hose.
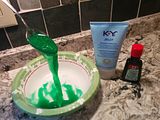
And I tested some of it in some of our hose.
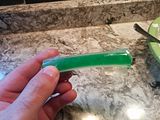
Looks like this is little plan will work for our needs! Now onto those last few parts that we needed to make. . .
The last 2 parts we needed to make for the pack were the slime tank pump box and the venting nozzle for the pack. My buddy Jack and I each scratch built them and dipped them in silicone. Here are my casts from that venture:
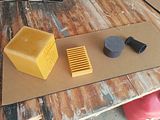
And with those parts made and dry fit on the pack. . .
I Literally had no excuse not to paint the damn thing!
.:Skip Ahead 7 Hours:.
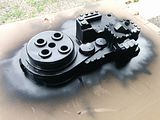
Now it looks something like this:
There's still a few things I'm still waiting on for the pack side of the build: sockets for the vacuum tubes Jack cast; the HGA end-cap we designed to show up in the mail; as well as my buddy Jon to finish up the labels so I can slap them on. Here's so more glamour shots so you can see how it looks so far from different angles:
Without the wand:

And one last one with the wand in its current state attached to the pack:
Now that I've hit this landmark, I guess I'm gonna move onto finishing up the wand while we wait on some things to show up in the mail, then I'm going hardcore on the electronics because I hope to have this thing done for Dragon Con.
Thanks for looking!
After we made ribbon cables for ourselves, there are only a few more bits and bobs needed to finish the pack side of this build. While finishing up scratch building and molding these pieces (I'll get to them in a second), I decided to do a little bit of SCIENCE! to figure out what we wanted to use as our slime. We wanted to use something that was relatively pH neutral, yet would not evaporate over time and was relatively on the thicker side of "slime". Then I remembered the making of "Alien" and how they used KY Jelly for the saliva of the Alien monster! And considering what KY is usually used for, it has to be safe for coming in contact with human skin, so it hopefully won't eat through our hosing. And since it is water based, it takes food dye really well as well, without staining the hose.

And I tested some of it in some of our hose.

Looks like this is little plan will work for our needs! Now onto those last few parts that we needed to make. . .
The last 2 parts we needed to make for the pack were the slime tank pump box and the venting nozzle for the pack. My buddy Jack and I each scratch built them and dipped them in silicone. Here are my casts from that venture:

And with those parts made and dry fit on the pack. . .

I Literally had no excuse not to paint the damn thing!

.:Skip Ahead 7 Hours:.
Now it looks something like this:

There's still a few things I'm still waiting on for the pack side of the build: sockets for the vacuum tubes Jack cast; the HGA end-cap we designed to show up in the mail; as well as my buddy Jon to finish up the labels so I can slap them on. Here's so more glamour shots so you can see how it looks so far from different angles:
Without the wand:


And one last one with the wand in its current state attached to the pack:

Now that I've hit this landmark, I guess I'm gonna move onto finishing up the wand while we wait on some things to show up in the mail, then I'm going hardcore on the electronics because I hope to have this thing done for Dragon Con.
Thanks for looking!
Ultimate Badass
Well-Known Member
As someone who has witnessed aspects of this build, I can say that it's going to be THE standard for GB video game packs...certainly can't see anyone topping what's being done. Now if only we had an Ecto-1b...I'll start looking.
mburkit
Well-Known Member
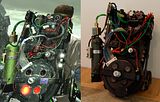
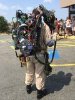
Sorry for the delay in updates; I spent all of August rushing to get this thing ready for Dragon Con. I succeeded, and I want to share the process that was involved and the end result.
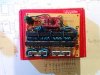
First, I did my best to get the pack physically done for a Dan Aykroyd Signing back at the end of July. Here is how it looked at that point:


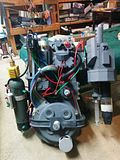
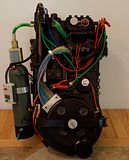
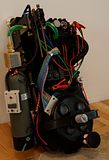
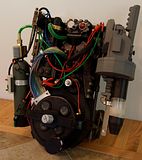
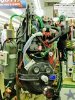
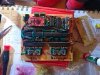
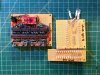
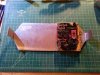
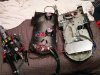
Then as soon as I got home from Dan signing the pack, I began my month from Hell! I spent several hours everyday designing and soldering together electronics point to point for Dragon Con. Here are some photos of the electronics and how they are mounted in the pack.


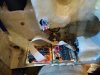
And here is everything mounted in the pack!


After these photos and video, I also installed a E-Cig so my pack could smoke when it vents just in time for the convention. In my next update, I'll show that off too. But for now, I think I have you guys all caught up!
First, I did my best to get the pack physically done for a Dan Aykroyd Signing back at the end of July. Here is how it looked at that point:
Then as soon as I got home from Dan signing the pack, I began my month from Hell! I spent several hours everyday designing and soldering together electronics point to point for Dragon Con. Here are some photos of the electronics and how they are mounted in the pack.
And here is everything mounted in the pack!
After these photos and video, I also installed a E-Cig so my pack could smoke when it vents just in time for the convention. In my next update, I'll show that off too. But for now, I think I have you guys all caught up!
Attachments
-
 th_10556280_867837989911939_1183281974425237119_n_zps9c8678fd.jpg7.7 KB · Views: 107
 -
 th_IMG_9385501328617_zps45baa064.jpg9.8 KB · Views: 86
 -
 th_IMG_20140812_183008_zps68dd4dbf.jpg7.8 KB · Views: 92
 -
 th_10556280_867837989911939_1183281974425237119_n_zps9c8678fd.jpg7.7 KB · Views: 67
 -
 th_10556280_867837989911939_1183281974425237119_n_zps9c8678fd.jpg7.7 KB · Views: 100
 -
 th_10556280_867837989911939_1183281974425237119_n_zps9c8678fd.jpg7.7 KB · Views: 72
 -
 th_IMG_20140816_230040_zps7b05a7be.jpg7.9 KB · Views: 72
 -
 th_IMG_9385501328617_zps45baa064.jpg9.8 KB · Views: 82
 -
 th_10556280_867837989911939_1183281974425237119_n_zps9c8678fd.jpg7.7 KB · Views: 76
 -
 th_IMG_9385501328617_zps45baa064.jpg9.8 KB · Views: 68
 -
 th_IMG_9385501328617_zps45baa064.jpg9.8 KB · Views: 68
 -
 th_IMG_20140811_214516_zpsccd9fcff.jpg6.6 KB · Views: 72
 -
 th_IMG_20140812_183008_zps68dd4dbf.jpg7.8 KB · Views: 78
 -
 th_IMG_9385501328617_zps45baa064.jpg9.8 KB · Views: 64
 -
 th_IMG_20140812_183008_zps68dd4dbf.jpg7.8 KB · Views: 75
 -
 th_IMG_20140812_183008_zps68dd4dbf.jpg7.8 KB · Views: 77
 -
 th_IMG_20140816_230040_zps7b05a7be.jpg7.9 KB · Views: 60
 -
 th_IMG_20140812_183008_zps68dd4dbf.jpg7.8 KB · Views: 65
 -
 th_IMG_20140816_230040_zps7b05a7be.jpg7.9 KB · Views: 62
 -
 th_IMG_20140811_214516_zpsccd9fcff.jpg6.6 KB · Views: 58
 -
 th_IMG_20140804_083846_zps49c03784.jpg6.7 KB · Views: 59
 -
 th_IMG_20140816_230040_zps7b05a7be.jpg7.9 KB · Views: 65
 -
 th_IMG_20140816_230040_zps7b05a7be.jpg7.9 KB · Views: 76
 -
 th_IMG_20140811_214516_zpsccd9fcff.jpg6.6 KB · Views: 58
 -
 th_IMG_20140811_214516_zpsccd9fcff.jpg6.6 KB · Views: 62
 -
 th_IMG_20140811_214516_zpsccd9fcff.jpg6.6 KB · Views: 57
 -
 th_IMG_20140804_083846_zps49c03784.jpg6.7 KB · Views: 63
 -
 th_IMG_20140804_083846_zps49c03784.jpg6.7 KB · Views: 70
 -
 th_IMG_20140804_083846_zps49c03784.jpg6.7 KB · Views: 55
 -
 th_IMG_20140804_083846_zps49c03784.jpg6.7 KB · Views: 67
 -
 th_IMG_20140822_133020_zpsc4992564.jpg6.6 KB · Views: 63
 -
 th_IMG_20140822_133020_zpsc4992564.jpg6.6 KB · Views: 71
 -
 th_IMG_20140822_133020_zpsc4992564.jpg6.6 KB · Views: 69
 -
 th_IMG_20140822_133020_zpsc4992564.jpg6.6 KB · Views: 68
 -
 th_IMG_20140822_133020_zpsc4992564.jpg6.6 KB · Views: 73
 -
 th_IMG_20140825_013254_zps65d867ec.jpg7.4 KB · Views: 60
 -
 th_IMG_20140825_013254_zps65d867ec.jpg7.4 KB · Views: 68
 -
 th_IMG_20140825_013254_zps65d867ec.jpg7.4 KB · Views: 62
 -
 th_IMG_20140825_013254_zps65d867ec.jpg7.4 KB · Views: 64
 -
 th_IMG_20140825_013254_zps65d867ec.jpg7.4 KB · Views: 64
 -
 th_IMG_20140821_205222_zps26505968.jpg6.4 KB · Views: 64
 -
 th_IMG_20140821_205222_zps26505968.jpg6.4 KB · Views: 59
 -
 th_IMG_20140821_205222_zps26505968.jpg6.4 KB · Views: 66
 -
 th_IMG_20140821_205222_zps26505968.jpg6.4 KB · Views: 60
 -
 th_IMG_20140821_205222_zps26505968.jpg6.4 KB · Views: 55
 -
 th_IMG_20140821_232722_zps24787707.jpg5.1 KB · Views: 70
 -
 th_IMG_20140821_232722_zps24787707.jpg5.1 KB · Views: 67
 -
 th_IMG_20140821_232722_zps24787707.jpg5.1 KB · Views: 69
 -
 th_IMG_20140821_232722_zps24787707.jpg5.1 KB · Views: 66
 -
 th_IMG_20140821_232722_zps24787707.jpg5.1 KB · Views: 77
Last edited by a moderator:
sweet.....I was working on this game .....and then I got robbed.....loved the pack! and the game! great job!
Onkelpsycho
Sr Member
Just awesome!!!
mburkit
Well-Known Member
This pack is about where its gonna be now, sadly. My PC crashed earlier this year and I lost all the code for my electronics, which means I can't really change anything. All the lights still work as they did in the video above, but I can't really change anything with them unless I redo all of the electronics and arduino code. Maybe, at some point, when I feel less defeated by this build, I'll try to get get the slime tube moving and the full venting working.
CB2001
Master Member
Sorry for the delay in updates; I spent all of August rushing to get this thing ready for Dragon Con. I succeeded, and I want to share the process that was involved and the end result.
First, I did my best to get the pack physically done for a Dan Aykroyd Signing back at the end of July. Here is how it looked at that point:
[url]http://i66.photobucket.com/albums/h279/mburkit/Game%20Pack/th_10556280_867837989911939_1183281974425237119_n_ zps9c8678fd.jpg[/URL]
[url]http://i66.photobucket.com/albums/h279/mburkit/Game%20Pack/th_IMG_9385501328617_zps45baa064.jpeg[/URL]
Then as soon as I got home from Dan signing the pack, I began my month from Hell! I spent several hours everyday designing and soldering together electronics point to point for Dragon Con. Here are some photos of the electronics and how they are mounted in the pack.
[url]http://i66.photobucket.com/albums/h279/mburkit/Game%20Pack/th_IMG_20140812_183008_zps68dd4dbf.jpg[/URL]
[url]http://i66.photobucket.com/albums/h279/mburkit/Game%20Pack/th_IMG_20140816_230040_zps7b05a7be.jpg[/URL]
[url]http://i66.photobucket.com/albums/h279/mburkit/Game%20Pack/th_IMG_20140811_214516_zpsccd9fcff.jpg[/URL]
[url]http://i66.photobucket.com/albums/h279/mburkit/Game%20Pack/th_IMG_20140804_083846_zps49c03784.jpg[/URL]
[url]http://i66.photobucket.com/albums/h279/mburkit/Game%20Pack/th_IMG_20140822_133020_zpsc4992564.jpg[/URL]
And here is everything mounted in the pack!
[url]http://i66.photobucket.com/albums/h279/mburkit/Game%20Pack/th_IMG_20140825_013254_zps65d867ec.jpg[/URL]
[url]http://i66.photobucket.com/albums/h279/mburkit/Game%20Pack/th_IMG_20140821_205222_zps26505968.jpg[/URL]
[url]http://i66.photobucket.com/albums/h279/mburkit/Game%20Pack/th_IMG_20140821_232722_zps24787707.jpg[/URL]
http://youtu.be/4It5EH_35zo
After these photos and video, I also installed a E-Cig so my pack could smoke when it vents just in time for the convention. In my next update, I'll show that off too. But for now, I think I have you guys all caught up!
Nice! Now all you need to do is have the bumper be able to extend like this, and whenever someone asks, "Are you a nerd god?", you can say "YES!"
Last edited by a moderator:
mburkit
Well-Known Member
My bumper is on tracks so it can extend. Once I dive back into the electronics of this pack, I plan to have mine pop with linear actuators. I refuse to do mine the same as the pack in that video because they were using PC duster spray cans turned upside down. Those cans of duster can burn people and cause bodily injury if someone is too close to you. Its definitely neat, but I have plans to do it safer.
That's insanely good!
Similar threads
- Replies
- 4
- Views
- 776
- Replies
- 1
- Views
- 1,136
- Replies
- 5
- Views
- 1,204
- Replies
- 4
- Views
- 489