ANH Hero DL-44 Discussion - Three ANH Greeblies Found

It's a denix. And it is assembled currently. So I should disassemble before drilling? And positioning is done by eyeballing more so than measuring. Got it! Thanks for the swift responses guys! And if there's any other advice for a rookie before I pull the drill out, I'm open!
 
Note: Don't use a 1/4" drill bit to drill the holes in your Denix. Use the appropriate smaller drill bit for a 1/4-20 tap and then tap the holes!
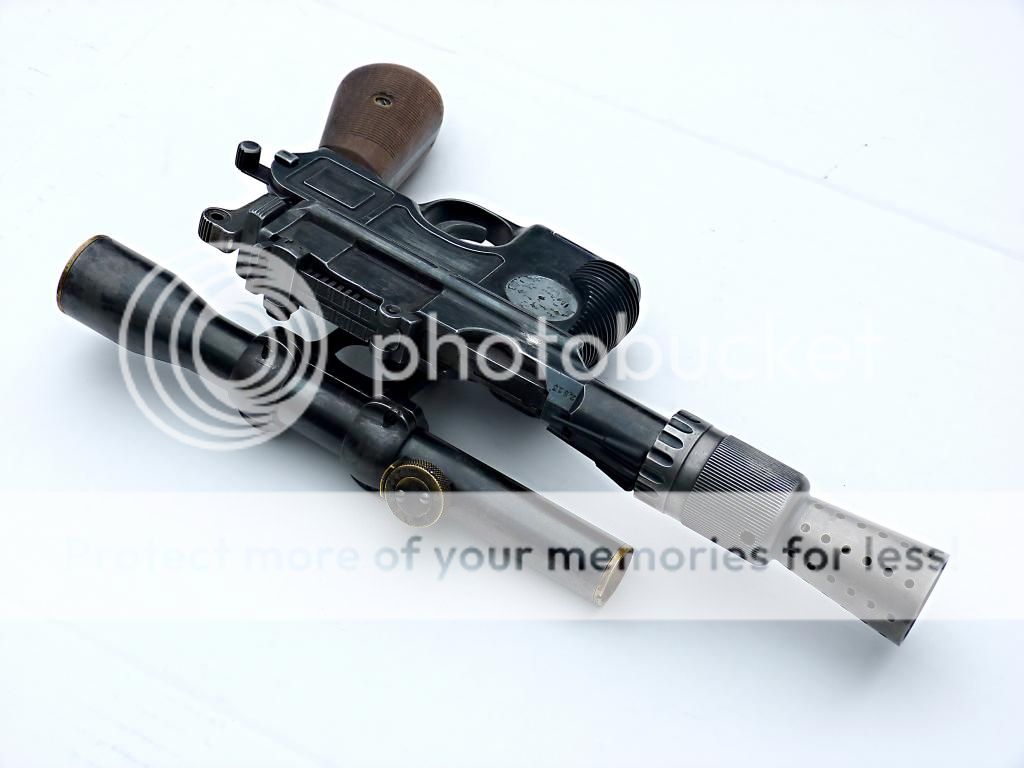
There is not enough room inside the Denix (or an MGC) beside the hammer for a 1/4" nut that holds the rod in place. Do use a nut in the magwell though, because the magwell's wall is quite thin.
The threaded rods and thumbnuts in the DEC kits are 1/4-20 which is the same as both 1/4" UNC and 1/4" BSW. The drill bit should be 5.1054 mm = 0.20100 inch = #7 US drill gauge (according to this chart anyway).

The crossbar in the DEC kits is symmetric, but in the photos of the original you will see that one end is longer past one of the thumbnuts than at the other end. The crossbar was obviously facing one way in the colour pre-production photos and facing another way in the b/w post-production photos such as the ones in the Chronicles, and that could be a bit confusing if you don't know about it.
The b/w photos seem to be the ones that most builders seem to go by because they also show the paint chipping. Also, the scope looks straighter in them.
You should also know that the Denix's proportions are a few mm off here and there compared to a real Mauser C96, so there is no 100% exact position for the cross bar on a Denix. You will have to eyeball it and select the alignment of the parts that you like best.
 
Last edited:
Thanks Darth Lars for the info and Dann for the reinforcement. I'll start working on mine this weekend and I already feel more prepared. Thanks again, guys!
 
Once you dry-fit the posts, I also recommend a bit of epoxy or Loctite when you're ready to commit. That alloy is soft, and even careful drilling / tapping can yield a bit of slop in the threads.

Good luck!
 
Once you dry-fit the posts, I also recommend a bit of epoxy or Loctite when you're ready to commit. That alloy is soft, and even careful drilling / tapping can yield a bit of slop in the threads.

Good luck!
Thanks Chiz, I figured that would be the case so I've got some epoxy ready to go.
 
...glad you guys chimed in.!

I did not add to use the correct bit for the actual drilling for the 1/4-20. Saved him a bunch of headache...

Definitely disassemble if you can.

The stuff is "soft" so go easy.

If you don't have a drill press, you can drill a smaller pilot hole first and check if you are perpendicular to the frame and then widen.

good luck Kalel...!
 
Hey Lars, Why do you suggest "not" using a nut in the mag well? I would think that because the wall is thin, you want extra support inside to sandwich the spacer and bar to the frame.

You can only get 2-3 threads in the magwell wall and that can bend easily I think...

Just curious about your experience..
 
it DOES bend easily... definitely a nut and possibly washer inside the mag well is useful.

Also on a denix, align the cross bar and scope mount WITH the scope mounted up and the upper in place... because the denix is slightly wonky. You need to make sure that the scope is visually parallel to the upper so it looks right when complete. If you just use the lower to align you're probably gonna have it skewed up or down.
Also good to know! Thanks Scott!
 
They're definitely right about that... when it comes to mounting the ANH setup on a Denix, you've got to kinda eyeball it a little, as it will never be perfect, that's just the way they are. If it helps at all, here's a pic of my old Denix lower that I drilled and tapped that looked about right to me:

20141105_124438.jpg

Good luck on your build, and don't forget to spoil us with some pictures!
 
...I used a few different types of cold blue. An old Belgian bluing I had and a product called Slate Black from Sculpt Nouveau. It works on Steel, Zamac, and brass to varying degrees.

It takes a bit of work to achieve the desired look. After a through cleaning I applied to warm metal. I didn't polish the metal too much. 0000 Steel wool finish worked fine. Took a few applications.

Even though it says Slate Black, it gave a nice blued undertone. As some noted from my photos, in some light it looks like an old vintage Mauser color , in others it looks "black" or painted.

After application and rinsing/cooling, you need to buff off the residue with 0000, and seal with oil or wax or clear-coat but give it a while to cure.

blasterFHoffLEFTFront_zps30103f33.jpg

blasterTOPLFETenhanced_zps4e5d81d7.jpg
 
...I think it's interesting that only a few people (who contacted me privately) noticed the biggest "tell" which was the "straight" FH. :)
I thought that would give it away for sure. I decided to leave mine straight and not even take the "trick" images with the bent FH so there would be no real confusion.

Not sure how the real one was attached. If they simply used the bottom screw to attach, which could cause the upward bend, I would not have wanted to be in front of that thing. The FH could have flown off any number of times...

I made a screw in " muzzle break" type unit to replicate the small muzzle diameter in the Han photo, which may have been done on the real HERO as well to constrict the barrel and allow the blanks to cycle. This screws into the NR rifle barrel threads.
 
My personal favorites of Kpax's pics were these two:

Kpax Build.JPG

They look legitimately vintage and the details in the handwritten note are great. It's an especially clever ruse when you consider this Bapty pic from Raiders:

Indy Bapty.jpg

But there's another clue here to this being Pat's build, aside from the straight FH. The crossbar is beat up like it is in the Chronicles photo, which was taken late in production, IIRC. A pic with the ammo info would be a reference taken at the beginning of production, which means the crossbar would be relatively clean like it was in the pre-production photos. That's my theory anyway!

I love that Pat put so much time and effort into placing his build in the right environment.
 
Very good points and observations VFX...

That Bapty and Co. Indy pic is great.


Not sure if this is correct or not but I was thinking that the photos of Ford with the blaster (below) were at least "production" pics (maybe pre production?) so the blaster was more or less the way we see it in the Chronicles images with the exception of the last broken off right "rod" which must have broken off after the pic below maybe during filming ?
The bottom pic shows the crossbar with "most" of the damage..maybe all but we cant see it due to the angle or lighting.

What I found in building this is that the damage to the crossbar is due to removing the mount from the dovetail. It sticks and will need nudging and will scrape the crossbar in that exact pattern due to the edges of the mount and the thumbscrew. The cool thing is that the mount will come off and clear the posts without removing the crossbar.

Either way, I figured it was close enough and since there is no "conclusive" evidence either way I chose to leave it in its the final busted up condition...

han-solo-with-blaster.jpg


harrison-ford-20.jpg
 
I really liked the vintage style photos, too. Those were well thought out what with the little hand written notes.

Totally thought I was looking at the real thing!

Then I saw the screws on the scope knob... :)
 

Your message may be considered spam for the following reasons:

If you wish to reply despite these issues, check the box below before replying.
Be aware that malicious compliance may result in more severe penalties.
Back
Top