Fullmetalsam
Active Member
Well - this is the second "layered foam" tutorial I'm posting on here and this one was inspired by Chimera30 and his take on the foam Lawgiver.
I've been playing with the idea of a Judge Dredd (Movie version) armor for a while now. I've been thinking that building this out of foam would be relatively easy - but the problem I had was with the Lawgiver. After seeing Chimera30 taking a shot at this with foam, I had to try as well.")
OK - so here is what I used on this puppy:
1- Anti-Fatigue Mat foam (the 1/4" type)
2- 2mm craft foam sheets
3- Hot Glue
4- Super77 3M spray adhesive (this stuff is amazing!!!)
5- Flexbond
6- Screws
So - I started researching pictures and was very lucky to find pictures from an auction of the Stallone Hero prop. These were very good as they were close up of the gun and were also very plane side picture (which made the next step very easy).
I then took one of the picture and started tracing edges (in Photoshop) - to make myself a pattern that I could scale properly to my hands. I've made a couple of different images for each of the layer I needed.
*** The pattern (images) is available here: Lawgiver - Template pictures by sambob3000 - Photobucket ***
Printing those was a bit of hassle, because most images would have to be printed on 2 seperate sheets of paper and joined again. I was able to scale, and print, using Excel. I scaled the images to 24cm in height (keeping the aspect ratio) - it's perfect for me, but I've got some large hands... most people would most likely have to scale down a bit.
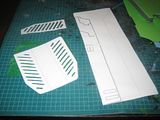
Once the pattern is printed - it's just a matter of cutting them out:
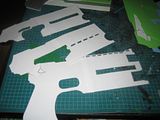
Then cutting all the foam layer you'll need to assemble the gun.
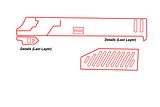
There is one thing I need to mention here... you'll see that the last pattern image (Details - Last Layer) is showing 2 parts that need to "wrap" around the top or the bottom of the gun. However, I've only shown one side of those parts. I did it like that originally because I didn't know how thick the gun would be (depending on the foam I was going to use)... so I figured out at the very end what these 2 pieces would be - once I had the gun partly assembled and could measure the actual thickness of the layers together:
OK so now, assembling the gun.
What my original idea was is to build the gun around a plastic base layer. So I would assemble it like this:
***Right side
Detail Layer - Foam 2mm
Layer 3 - Foam 2mm
Layer 2 - Foam 2mm
Layer 1 without the top rail - Foam (anti-fatigue mat)
Layer 1 - Plastic
Layer 1 without the top rail - Foam (anti-fatigue mat)
Layer 2 - Foam 2mm
Layer 3 - Foam 2mm
Detail Layer - Foam 2mm
***Left Side
But my dremel-fu was not that strong this weekend so I ended up scraping the plastic layer and using part plastic part foam on the base layer... as you can see here:
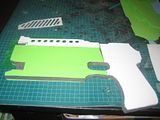
So - once you're done with the base... it's time to layer up the foam.
What I use this time to glue the foam layer together is Super77 Spray Adhesive (instead of hot glue - like in my pipboy tutorial). This stuff was suggested by a friend and it's amazing. It's quick, it's easy, it doesn't add thickness, keeps the foam "workable" (dremelling/soldering details)... and it seems to be durable. So follow the instruction on the can - ALWAYS WEAR A RESPIRATOR USING THIS PRODUCT (we're talking about glue) - and glue those pieces of foam together.
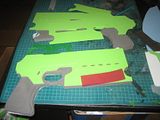
*** You'll also notice is those picture, that I decided to not use the handle parts of the template for each layer... it made the construction so much easier - so I suggest you cut them out too... However, keep them close so you can use them for detailing later on ***
OK - now comes the part where you want to "hide" the fact that this is a layered foam prop. I did the same thing on my pipboy and it's just a matter of gluing 2mm foam scraps to the outside of the gun. For this I used hot glue and I usually put a little more that needed and put it close to the edge - so that when you press down with that foam sheet, the glue with squirt out on the side a little bit. This is so, when you cut out the excess foam (it is very important that there is excess foam to cut out), it will make a clean cut. Another random advice on this step is to try to do an angled cut... so that the side of the layer of foam you just applied is cut to a 45 degree angle - again this is just to make it look nice.
Then, it's that step where you have to figure out those pieces:
Now that you're gun is assembled, you can calculate it's thickness and glue it in place (using again Super 77).
*** Note that I did not follow my own advise on this and tried to calculate the thickness by adding up the foam sheet thickness together... this is a no-no. The bottom piece was too wide and I had to adjust it a bit... by adding a layer of foam to the bottom of the gun to make it a bit longer. I'll try to take a clear picture of this and post it here ***
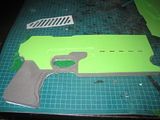
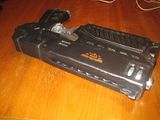
So now you should have a gun that looks like this:
It is ready for detailing.
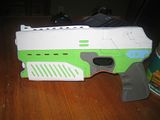
Here are the things I did up to now:
- Sanded the handle to a rounder shape
- Using a soldering iron - I traces the lines I had marked in the top detail part and the handle
What I still have to do:
- Pick up some screws and put them where needed
- Trace smaller detail lines with a pen
- Paint !!!
- Weathering
Then I should be done.
I'll be posting progress in this thread and will be updating the first post when needed - so that information on the tutorial is right here.
*** Update 1 - 2011-05-16 ***
OK - so to continue the tutorial.
Once the gun is totally assembled, it's time to do the detailing.
So what I did was the following:
1- Trace small lines with a pen
You have to go over those line quite a few time so that they "stay" in the foam... depending on the lines you want (thin -vs- thick) you can use different things. Some pens have a very "sharp" tip and will trace very thin line - cheaper ballpoint pen will usually have a rounder tip and will trace thicker lines. So use the "tool" you need for the job.
2- Trace bigger lines with a soldering iron
Bigger detail lines (like the one that are seen on the top part (nearer the handle) of the gun were traced with a soldering iron. Again you can have smaller or bigger tips you can use depending on the soldering iron you have.
You have to be very careful when doing this though - cause there is just no coming back. The foam will "melt away" at the touch of the iron and, usually, details lines are in part of the prop that you can't hide easily.
3- Cut out the vents
Like the ones that are close to the top barrel of the Lawgiver.
Using the soldering iron you melt the foam away to get the vents you want (and how deep you want them). Again, be careful as this release a lot of smoke... so work in a well ventilated area or not too close to a smoke detector
4- Put the "fake" barrel in the top vents
First, what I used for the barrels on this Lawgiver are 3/4" PVC pipe. I cut a 1" long section for the bottom barrel and used a 1/4" section for the top barrel (which is just glued to the from of the gun).
But because you can see the top barrel in the top vents on the Lawgiver - I used again two section of about 1/4" that I cut up in small part... what I mean here, is I took the pipe and cut out piece of that circle ... about a 1/3 of the circle.
So I was left with a small piece I could just glue inside the vent that would make up a "fake barrel".
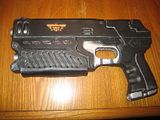
5- Put the screws in at the appropriate places
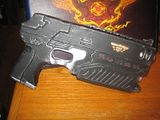
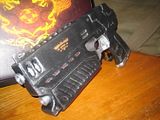
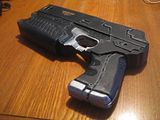
6- Painted
And here is the final result:
*********************************
Thanks for reading !
*** I'll be using this thread to post progress on the Dredd foam armor as well - and patterns I will make/use for it - hence the reason why it is posted in the costume section ***
I've been playing with the idea of a Judge Dredd (Movie version) armor for a while now. I've been thinking that building this out of foam would be relatively easy - but the problem I had was with the Lawgiver. After seeing Chimera30 taking a shot at this with foam, I had to try as well.
OK - so here is what I used on this puppy:
1- Anti-Fatigue Mat foam (the 1/4" type)
2- 2mm craft foam sheets
3- Hot Glue
4- Super77 3M spray adhesive (this stuff is amazing!!!)
5- Flexbond
6- Screws
So - I started researching pictures and was very lucky to find pictures from an auction of the Stallone Hero prop. These were very good as they were close up of the gun and were also very plane side picture (which made the next step very easy).
I then took one of the picture and started tracing edges (in Photoshop) - to make myself a pattern that I could scale properly to my hands. I've made a couple of different images for each of the layer I needed.
*** The pattern (images) is available here: Lawgiver - Template pictures by sambob3000 - Photobucket ***
Printing those was a bit of hassle, because most images would have to be printed on 2 seperate sheets of paper and joined again. I was able to scale, and print, using Excel. I scaled the images to 24cm in height (keeping the aspect ratio) - it's perfect for me, but I've got some large hands... most people would most likely have to scale down a bit.
Once the pattern is printed - it's just a matter of cutting them out:

Then cutting all the foam layer you'll need to assemble the gun.
There is one thing I need to mention here... you'll see that the last pattern image (Details - Last Layer) is showing 2 parts that need to "wrap" around the top or the bottom of the gun. However, I've only shown one side of those parts. I did it like that originally because I didn't know how thick the gun would be (depending on the foam I was going to use)... so I figured out at the very end what these 2 pieces would be - once I had the gun partly assembled and could measure the actual thickness of the layers together:


OK so now, assembling the gun.
What my original idea was is to build the gun around a plastic base layer. So I would assemble it like this:
***Right side
Detail Layer - Foam 2mm
Layer 3 - Foam 2mm
Layer 2 - Foam 2mm
Layer 1 without the top rail - Foam (anti-fatigue mat)
Layer 1 - Plastic
Layer 1 without the top rail - Foam (anti-fatigue mat)
Layer 2 - Foam 2mm
Layer 3 - Foam 2mm
Detail Layer - Foam 2mm
***Left Side
But my dremel-fu was not that strong this weekend so I ended up scraping the plastic layer and using part plastic part foam on the base layer... as you can see here:

So - once you're done with the base... it's time to layer up the foam.
What I use this time to glue the foam layer together is Super77 Spray Adhesive (instead of hot glue - like in my pipboy tutorial). This stuff was suggested by a friend and it's amazing. It's quick, it's easy, it doesn't add thickness, keeps the foam "workable" (dremelling/soldering details)... and it seems to be durable. So follow the instruction on the can - ALWAYS WEAR A RESPIRATOR USING THIS PRODUCT (we're talking about glue) - and glue those pieces of foam together.


*** You'll also notice is those picture, that I decided to not use the handle parts of the template for each layer... it made the construction so much easier - so I suggest you cut them out too... However, keep them close so you can use them for detailing later on ***
OK - now comes the part where you want to "hide" the fact that this is a layered foam prop. I did the same thing on my pipboy and it's just a matter of gluing 2mm foam scraps to the outside of the gun. For this I used hot glue and I usually put a little more that needed and put it close to the edge - so that when you press down with that foam sheet, the glue with squirt out on the side a little bit. This is so, when you cut out the excess foam (it is very important that there is excess foam to cut out), it will make a clean cut. Another random advice on this step is to try to do an angled cut... so that the side of the layer of foam you just applied is cut to a 45 degree angle - again this is just to make it look nice.
Then, it's that step where you have to figure out those pieces:
Now that you're gun is assembled, you can calculate it's thickness and glue it in place (using again Super 77).
*** Note that I did not follow my own advise on this and tried to calculate the thickness by adding up the foam sheet thickness together... this is a no-no
. The bottom piece was too wide and I had to adjust it a bit... by adding a layer of foam to the bottom of the gun to make it a bit longer. I'll try to take a clear picture of this and post it here ***So now you should have a gun that looks like this:

It is ready for detailing.
Here are the things I did up to now:
- Sanded the handle to a rounder shape
- Using a soldering iron - I traces the lines I had marked in the top detail part and the handle
What I still have to do:
- Pick up some screws and put them where needed
- Trace smaller detail lines with a pen
- Paint !!!
- Weathering
Then I should be done.
I'll be posting progress in this thread and will be updating the first post when needed - so that information on the tutorial is right here.
*** Update 1 - 2011-05-16 ***
OK - so to continue the tutorial.
Once the gun is totally assembled, it's time to do the detailing.
So what I did was the following:
1- Trace small lines with a pen
You have to go over those line quite a few time so that they "stay" in the foam... depending on the lines you want (thin -vs- thick) you can use different things. Some pens have a very "sharp" tip and will trace very thin line - cheaper ballpoint pen will usually have a rounder tip and will trace thicker lines. So use the "tool" you need for the job.
2- Trace bigger lines with a soldering iron
Bigger detail lines (like the one that are seen on the top part (nearer the handle) of the gun were traced with a soldering iron. Again you can have smaller or bigger tips you can use depending on the soldering iron you have.
You have to be very careful when doing this though - cause there is just no coming back. The foam will "melt away" at the touch of the iron and, usually, details lines are in part of the prop that you can't hide easily.
3- Cut out the vents
Like the ones that are close to the top barrel of the Lawgiver.
Using the soldering iron you melt the foam away to get the vents you want (and how deep you want them). Again, be careful as this release a lot of smoke... so work in a well ventilated area or not too close to a smoke detector
4- Put the "fake" barrel in the top vents
First, what I used for the barrels on this Lawgiver are 3/4" PVC pipe. I cut a 1" long section for the bottom barrel and used a 1/4" section for the top barrel (which is just glued to the from of the gun).
But because you can see the top barrel in the top vents on the Lawgiver - I used again two section of about 1/4" that I cut up in small part... what I mean here, is I took the pipe and cut out piece of that circle ... about a 1/3 of the circle.
So I was left with a small piece I could just glue inside the vent that would make up a "fake barrel".
5- Put the screws in at the appropriate places
6- Painted
And here is the final result:


*********************************
Thanks for reading !
*** I'll be using this thread to post progress on the Dredd foam armor as well - and patterns I will make/use for it - hence the reason why it is posted in the costume section ***
Last edited: