Daft Punk Thomas Helmet -- Skipped a few chapters

Functional and beautifully elegant. Translation: I'm stealing this idea.

I don't want to sound like I live in a mutual admiration society, but "THANK YOU" for the compliment.

I believe it was close to a year ago when I first saw your, now famous, "How to make a Daft Punk helmet in 17 months" video when I went
125313d1276642432t-angle-grinder-cutting-metal-jawdrop.gif


...I'm not kidding. My first search was "who the heck is Volpin" etc. etc... and yes! I did search eBay for finished helmets (rookie).

12 months later, I have the matching pair. :thumbsup


Oh yeah!! C'mon.. you know it's coming...
5grouphug.gif
 
Last edited:
Rubber cement is quite effective on foam padding. Just be sure to lay down a coat or two and let it dry on the foam before putting down the actual coat for bonding.
 
As you can tell, it's just a piece of styrene with t-nuts and cap screws. Not very fancy, but it works. I'm using this approach for the final setting but with a better bonding material for the styrene and t-nuts.

On a different note, do you know what I can use to permanently bond the foam padding to the helmet? I used an "All Purpose" spray adhesive, and it seemed to grasp well, at first.

Nice solution, I was trying to get mine to rig to the aluminum frame, but this looks like a better (and easier!) solution.

As for the foam, I used 3M Weatherstrip adhesive in my Guy helmet. That stuff is spectacular for gluing open-cell foam. It dries black and just slightly pliant. You couldn't get it off if you wanted to though, so make sure things are exactly where you want them before mounting. This stuff is available at auto parts stores. Fumes are NASTY so make sure to let it air out for at least a couple days before wearing again.
 
Now is time for some tinting.

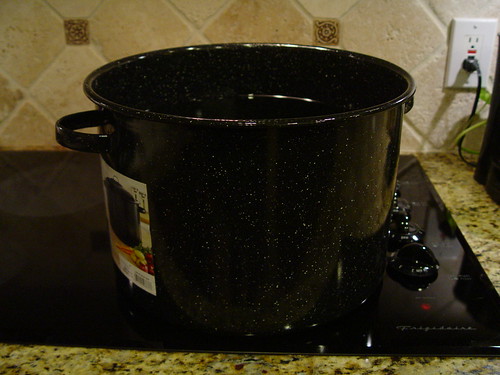
I started by getting the biggest stockpot I could find at "Mal-Wart" :lol.
I found this 21 quart capacity pot. I don't think I needed this big of a pot, but I was also planning on tinting my guy manuel visor.
5662842825_56997b5925.jpg


Anyway. First, I filled the pot to about 3/4 full ,and set the temp at 160 deg F.

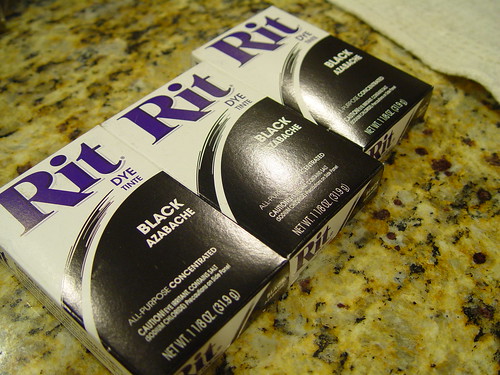
Once the water reached that temp, I poured the dye. I used 4 packs
5662843205_fc0826e372.jpg


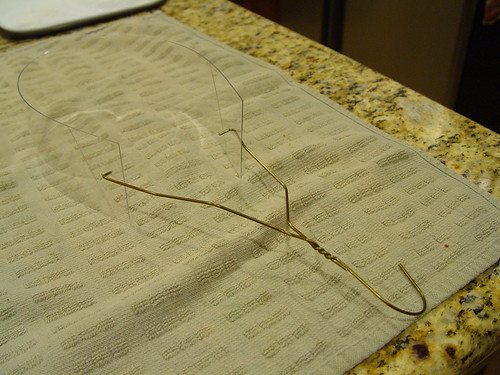
Rigged the visor with a clothes hanger for an easy way to pull it out, and in it went for its first dip.
5663411632_e8b75198c6.jpg


It only took 10 seconds to realize the water was too hot for the thin PETG sheet. It was basically floating like a noodle. :confused

5662843809_0331ca9f45.jpg


I did see, however, how the dye was adhering to the plastic.

After a few trials, I noticed that 140 deg F, only a pot half full of water, and 4 packs is what I needed to get the dye into the PETG and still keep the visor form intact.

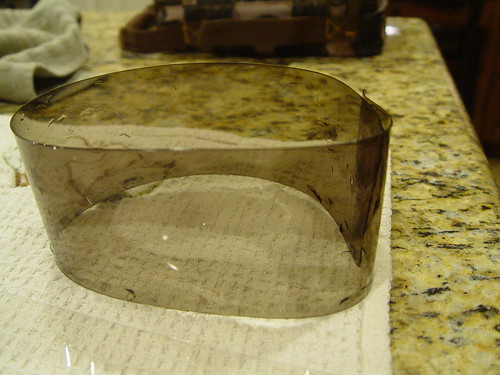
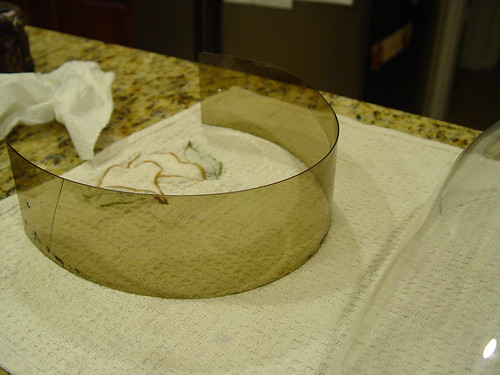
I basically left visor in for 5 minute intervals with a cool bath after each dye dip. The picture below is after (2) 5min dips.

5663411808_510a2e7ef8.jpg


After 5 dip sessions, I came out with (what I think) a final piece that had enough tint
5663412246_c57eca5d1c.jpg


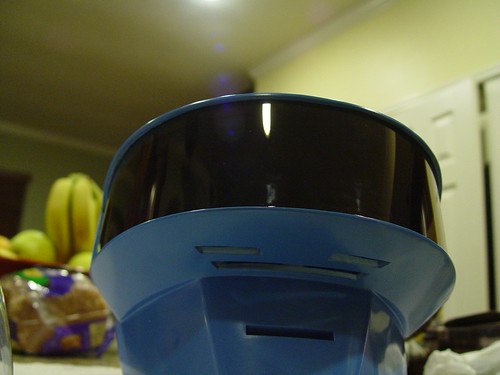
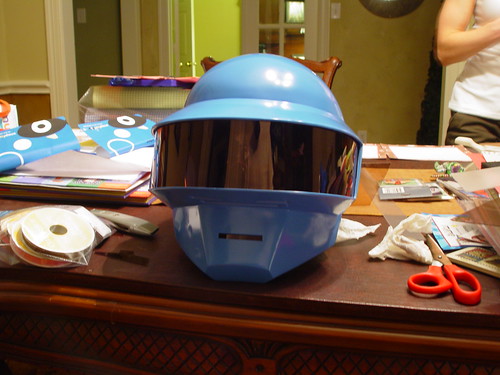
Here it is from the front

5663411260_cae5d3eb1c.jpg


Some comments about this approach:


  • Visibility is EXCELLENT.
  • Didn't notice any tint difference after 3 dip sessions (at least from what I can tell).
  • The visor has a really reflective shiny look. Don't know if this is good or bath. We'll see.
  • It's critical that you get the right temp. You want the highest temp you can get away with without melting or warping the PETG. For me, it was around 140 deg F before I started to see deformations.

Great job.
A question, the quantity that you have used, I only served for one visor? or is reused, and reusable if it is necessary to heat the liquid again?
 
The dye is re-usable as long as you heat up the liquid each time you want to dye something.
WOW, fantastic, thank you so much for the tip, I can finally make a visor Guy Manuel, where you can see through.
TEK Thanks and congratulations for the work you're doing.
 
Just as an aside about the battery pack, there's the problem of deep discharge to worry about. Lipo's don't like going below 2.75-3V per cell, because it permanently screws up the chemistry of the battery. Discharging below that cut off voltage will 'brick' the battery.

A lot of cell phones, pda's, Sparkfun prototyping packs, etc have protection circuits built into them to prevent deep discharge. However, most R/C packs do not have protection because the circuit would be too large and cumbersome for the high amp draw of R/C planes/boats/cars. As such most R/C electronic speed controllers have a built in detection circuit that will throttle back/off when you approach the cut off voltage.

In your case, Tek, I think you can use a audible low voltage warning board, from places like Hobby Lobby or Tower Hobbies. It will monitor pack voltage (sometimes via the balancing connector) and beep at you when you approach the cut off voltage. That'll give you a nice margin of safety.
 
Correct about Lipos and deep discharges. :thumbsup

I'm intimate with Lipos as I normally deal with 44.4V 12S Lipo systems for my Trex700 RC helicopter. In that hobby, not knowing your Lipo limits can run you costs of around $200 for new batteries, and about $400 in crash damages. :cry not to mention putting yourself (and others) in danger.

Such as the case of a fellow flyer:
ggtx1g


So, yeah. I do carry a little 2S lipo alarm, but it's just not practical as the audio is way too loud for this application. So, I have a non-audio version coming my way. This one uses LED bars to show voltage levels.

Another thing I use is a TIME sensitive mechanism. Meaning, I keep track of how many hours I have used a certain pack. In the last convention, my Guy Manuel helmet ran for about 2hrs straight, and I still had 60% capacity left. Needless to say, these are low amp draw systems (my GM can barely break 1 amp momentary peaks). Anything more than 2 hours is not a matter of battery issues but "fogging" the visor and sweating more than anything. :lol

On a more serious note, I do encourage ANYONE that plans to use Lipo batteries to take note of ThreeFN's point here, and read information about Lipo batteries. These batteries can be harmful if not handled properly. Deep discharges, charging at higher "C" rating than recommended, Abuse (punctures, excess heat, shorts, etc) are all big
no%20no%20no.gif


I do have a fancy charger as well that detects every cell while charging AND I always charge using a lipo bag. Needless to say, I always balance charge these suckers.

IMPORTANT: It is not a matter of ruining the battery pack. It is about your SAFETY! Check this video.
YouTube - ‪2S Lipo on fire‬‏

:eek


Just as an aside about the battery pack, there's the problem of deep discharge to worry about. Lipo's don't like going below 2.75-3V per cell, because it permanently screws up the chemistry of the battery. Discharging below that cut off voltage will 'brick' the battery.

A lot of cell phones, pda's, Sparkfun prototyping packs, etc have protection circuits built into them to prevent deep discharge. However, most R/C packs do not have protection because the circuit would be too large and cumbersome for the high amp draw of R/C planes/boats/cars. As such most R/C electronic speed controllers have a built in detection circuit that will throttle back/off when you approach the cut off voltage.

In your case, Tek, I think you can use a audible low voltage warning board, from places like Hobby Lobby or Tower Hobbies. It will monitor pack voltage (sometimes via the balancing connector) and beep at you when you approach the cut off voltage. That'll give you a nice margin of safety.
 
I have a non-audio version coming my way. This one uses LED bars to show voltage levels.

Got a link for this? I'm using a 11.1 in my helmet and would like to use a similar setup. I was just going to hack the buzzer off of one of the sound board pieces and just use the LEDs as indicators, but if you've got a better solution I'd love to know.
 
Got a link for this? I'm using a 11.1 in my helmet and would like to use a similar setup. I was just going to hack the buzzer off of one of the sound board pieces and just use the LEDs as indicators, but if you've got a better solution I'd love to know.

Here's the link, but unfortunately, this one is specifically designed for receiver batteries which are typically 2S. :unsure

For a 3S, you may want to try this one. For the price, you can't go wrong.
 
Correct about Lipos and deep discharges. :thumbsup

On a more serious note, I do encourage ANYONE that plans to use Lipo batteries to take note of ThreeFN's point here, and read information about Lipo batteries. These batteries can be harmful if not handled properly. Deep discharges, charging at higher "C" rating than recommended, Abuse (punctures, excess heat, shorts, etc) are all big
no%20no%20no.gif

:eek

T'was the purpose of my post. I have plenty of RC experience as well, and also deal with them daily at work. You've never really seen a lipo fire until you've seen 300Wh worth go up in a flash. That's a STAGGERING amount of energy release.

Initially I was against using lipos for the aforementioned reasons. Instead 'decided' to go with lipo external battery packs like those at batterygeeks.net. They have their own regulators so you get nice output voltages to work with (like 5V, 9V, 12V, etc) and will do all the charging and safety stuff for you. As always seems to be the case with me, I've since moved on.

Right now I'm in love with proper, regular laptop 'smart' batteries (specifically thinkpad/lenovo ones). It just about halved the part count on my master control board. All that lovely data pron you get on your laptop about remaining capacity, time to charge, remaining time estimates, etc is all calculated locally on the battery itself, then communicated to the computer. And they have all of the same safety features you'll get with the above solution. The only trick is getting access to that wonderful data pron. Luckily I stumbled across some code I can hack at to get the functionality I want.
 
I kinda figured more detail was being posted here vs TDC (invaded by n00bs). Great thread, tekparasite. Very helpful stuff.
 
Last edited:
This is how my helmet looks with a bit more gear. I'm still missing the gloves and jacket. Even though, the jacket for me will be a bit of a stretch due to Houston, Texas weather. On top of that, I've always loved the "formal" wear with those helmets.

1d7573fc96b480ad9e2b207191f0be0b-d41issa.jpg


Photo by: George Martinez
 
This is how my helmet looks with a bit more gear. I'm still missing the gloves and jacket. Even though, the jacket for me will be a bit of a stretch due to Houston, Texas weather. On top of that, I've always loved the "formal" wear with those helmets.


Photo by: George Martinez

Mind if I ask about the gloves? I'm still trying to track down my 'ideal pair' that won't be too hot but are also thick enough to accept all the electronics I have to sew to them. Good grip would be a bonus. Those formal-wear-like gloves look like they might do the ticket.

I sympathize with the heat and sweating of living in Houston. Been there for a few years but now I'm moving to... Tucson (works a pain sometimes). Living in Houston (and Tucson) is part of the reason I'm entertaining the idea of wearing a cold shirt under the 'costume' so that I should be able to wear full leathers with no problems. The trick is making it portable and innocuous.
 
This is how my helmet looks with a bit more gear. I'm still missing the gloves and jacket. Even though, the jacket for me will be a bit of a stretch due to Houston, Texas weather. On top of that, I've always loved the "formal" wear with those helmets.

super awesome looking. I also like the formal wear look. Reminds me of Anime when bots are in casual clothes, not in uniforms and looks much cooler.
 
Mind if I ask about the gloves? I'm still trying to track down my 'ideal pair' that won't be too hot but are also thick enough to accept all the electronics I have to sew to them. Good grip would be a bonus. Those formal-wear-like gloves look like they might do the ticket.

I bought these at Wal-Mart last December. It must have been a short run because they're no longer available from them. Here's a link to the product review. Funny thing is that they got bad reviews because they don't keep your hands warm which is excellent for this application.

Here's a link to the original manuf.
Yes. I know, they're female smarTouch gloves, so you may have issues finding bigger sizes.


sir this thing is beutiful could i request the arduino sketch per chance

Sure. I provided the sketch in my previous post here.
 
I bought these at Wal-Mart last December. It must have been a short run because they're no longer available from them. Here's a link to the product review. Funny thing is that they got bad reviews because they don't keep your hands warm which is excellent for this application.

Here's a link to the original manuf.
Yes. I know, they're female smarTouch gloves, so you may have issues finding bigger sizes.

Cheers mate.

Interestingly, I may have to remove the conductive smartphone touch screen 'stuff' (usually conductive fabric that connects inside to your finger) on the finger tips so that it doesn't interfere with my buttons/circuits.

Yes, the irony of that statement is not lost on me.
 
This thread is more than 7 years old.

Your message may be considered spam for the following reasons:

  1. This thread hasn't been active in some time. A new post in this thread might not contribute constructively to this discussion after so long.
If you wish to reply despite these issues, check the box below before replying.
Be aware that malicious compliance may result in more severe penalties.
Back
Top