Sean Bradley
Well-Known Member
Part One:
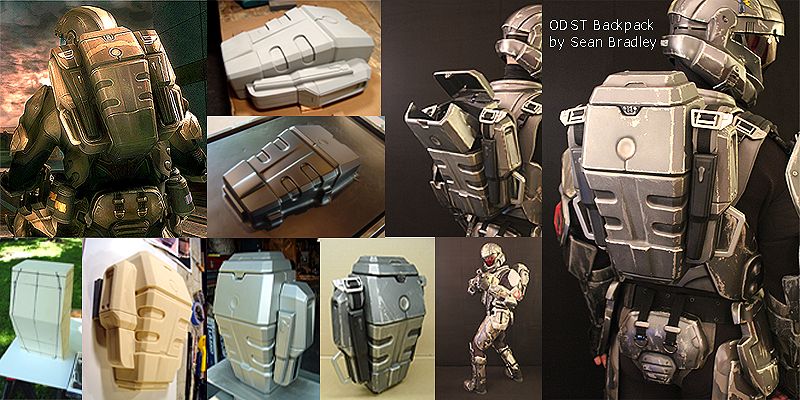
Making a game accurate functional ODST ballistic rucksack backpack...
or...
Costume Prop making with hand-carved solid foam and vacuum forming.
It's been a millennia since I've posted a build thread here. Please accept this with my gratitude.
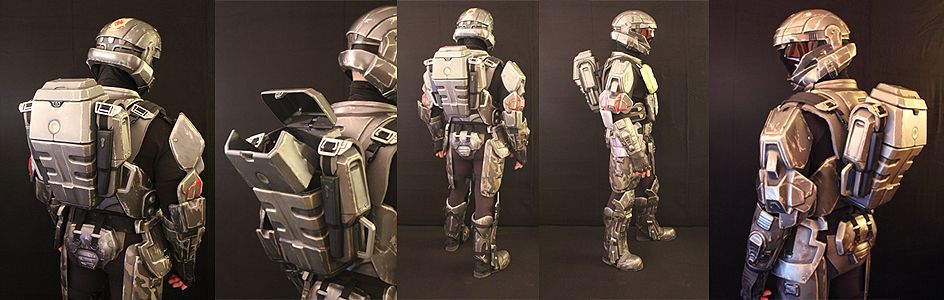
I've long promised to make game accurate backpacks available for my ODST costume and others. The ODST 'rucksack' is such an iconic and integral part of the character design, however it is often overlooked by costumers. Due to the bulk of the part and the potential to design something that could function practically for carrying around gear and swag at conventions I have been taking my time and collecting ideas/requests for my build.
While there are a few good fan made 3-D files for the backpack available I felt obliged to fabricate my own model instead of using pepakura. Because of the wide planes and lines my opinion was that there was too great a risk for warping. Also I figured that if I would have to hone and straighten the edges of the backpack in bondo, I'd rather make something entirely from scratch..
Years ago I saved a block of high density urethane foam left over from an architectural restoration project. Frequently used for dimensional insulation and rapid prototyping in industry this dense, easy to carve material is becoming more available to artists as 'carving foam'. The denser weights of foam can be rapidly shaped, cut, carved, sanded and hold fantastic detail. The resulting object can be sealed and molded or hard coated with resin and sanded.

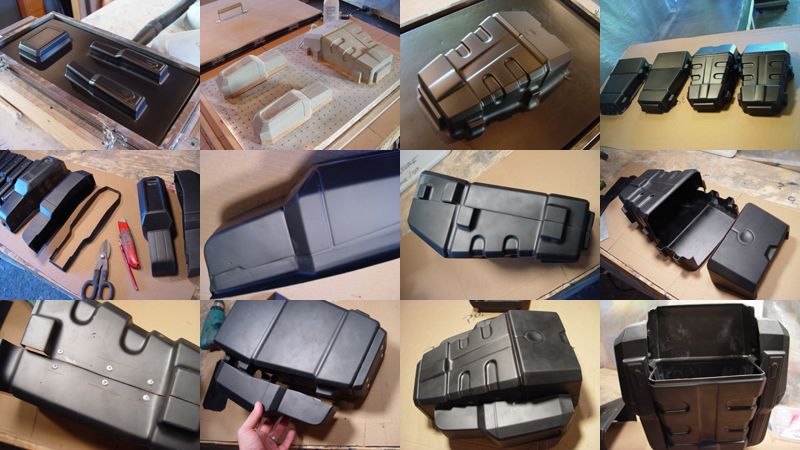
I began by sketching a rough side profile of the core body of the rucksack onto tracing paper and transferring the outline to the foam. I rough cut the block leaving plenty of space for shaving down to my dimensions. Once the block was cut I used 'Surform' planers and shavers to square it up then sketched the front profile directly onto it, then planed and cut down to my profile. I repeated this process for the left and right side compartments that attach to the body of the backpack.

Now that I had rough geometric shapes to work with I made successive shaping passes over the backpack parts, first honing and beveling, then carving in the fine details of the design. I used a variety of tools to shape the surface: rasps, sandpaper files, planes. Through this process I frequently re-checked the symmetry using calipers and a bevel gauge. I fully detailed the main body before moving on to the side parts so that I wouldn't have to keep re-adjusting their fit to each other. I removed the top and bottom panels of the backpack to prevent damage to their finished surfaces. As all these pieces would need to be formed separately, I bisected the main body of the backpack when all detailing was complete..
To prep the pieces for reproduction, I had a choice to make between hard-coating the foam forms, or molding the parts and casting them in a more durable material. If I were only making a single backpack, and it didn't need to be hollow for functionality, or if the goal was to be a silicone mold, I could have just hard coated the foam. The hardening process could lose some detail that was carved, but it could be sanded and re-defined with more surfacing work. I wasn't totally confident how the hard coated foam would stand up to vacuum forming, so I decided to mold and recast the backpack parts in a more durable material.
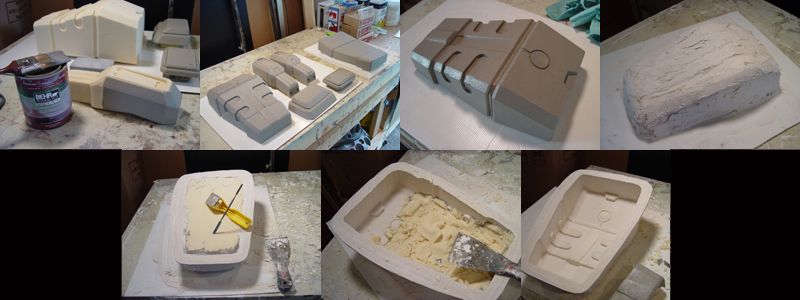
Since I only needed a single cast of each part, I opted to make simple plaster waste molds. I painted the forms with two coats of latex house paint to seal the porous foam, then lightly greased the surface with petroleum jelly to prevent the plaster from adhering to the paint. I hand applied the plaster to form the molds, building up a shell that was an inch or two thick. I embedded burlap into the mold for reinforcement. When the plaster was fully hardened, I flipped the molds over and carefully scraped and crumbled out the foam from inside the mold. Since the surface had such a good barrier coat between the foam and the plaster, the foam popped out fairly well once I cored out the undercut areas.
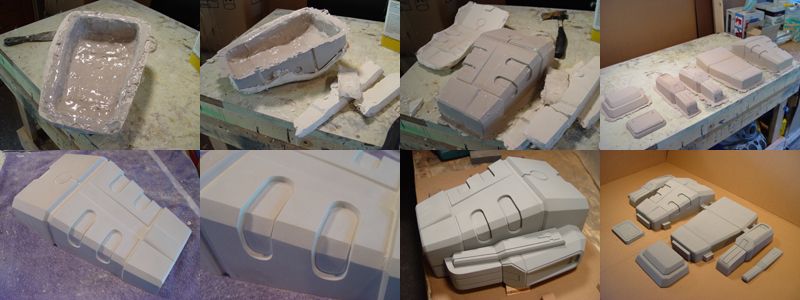
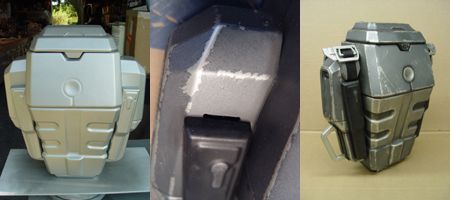
To cast into these plaster molds I again lightly greased the surface then brushed in successive coats of Bondo/Resin mixture and alternating layers of fiberglass matte. To reduce shrinkage I used the minimum amount of hardener in my batches. I built up the casting to about an even 3/4" thickness then chipped away the plaster mold. I was left with a very durable duplicate of the foam backpack elements that could easily withstand the rigors of repeated vacuum forming. To prepare the parts for reproduction I smoothed out the models, fixed a few warps, then added MDF risers and structural attachments.
*continues next post:
Making a game accurate functional ODST ballistic rucksack backpack...
or...
Costume Prop making with hand-carved solid foam and vacuum forming.
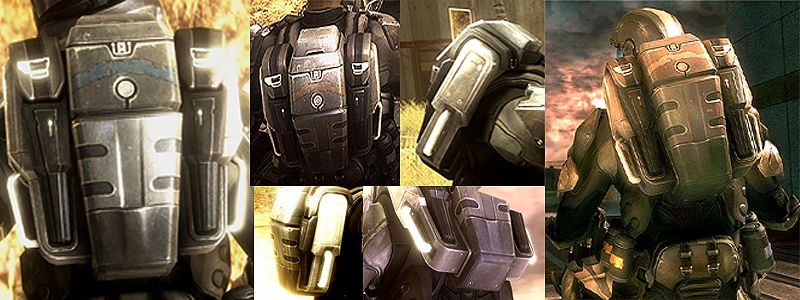
ODST 'Rucksack' via Halopedia:
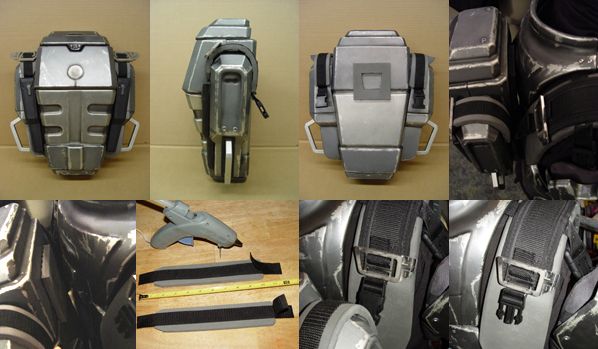
The rucksack issued to ODSTs is, for all intents and purposes, an armored backpack that attaches to the back of the armored vest. The rucksack comes in a number of different variants. The main purpose is storage, which allows a trooper to store equipment, ranging from ammunition, to medical supplies, to explosives, to battery packs which provides power to any equipment an ODST may carry, and communications, which houses the necessary radio and satellite gear that an ODST squad requires to report in to their superiors. For longer missions, ODSTs can carry larger rucksacks with enough supplies for two weeks of operation without external resupply.
It's been a millennia since I've posted a build thread here. Please accept this with my gratitude.
I've long promised to make game accurate backpacks available for my ODST costume and others. The ODST 'rucksack' is such an iconic and integral part of the character design, however it is often overlooked by costumers. Due to the bulk of the part and the potential to design something that could function practically for carrying around gear and swag at conventions I have been taking my time and collecting ideas/requests for my build.
While there are a few good fan made 3-D files for the backpack available I felt obliged to fabricate my own model instead of using pepakura. Because of the wide planes and lines my opinion was that there was too great a risk for warping. Also I figured that if I would have to hone and straighten the edges of the backpack in bondo, I'd rather make something entirely from scratch..
Years ago I saved a block of high density urethane foam left over from an architectural restoration project. Frequently used for dimensional insulation and rapid prototyping in industry this dense, easy to carve material is becoming more available to artists as 'carving foam'. The denser weights of foam can be rapidly shaped, cut, carved, sanded and hold fantastic detail. The resulting object can be sealed and molded or hard coated with resin and sanded.
I began by sketching a rough side profile of the core body of the rucksack onto tracing paper and transferring the outline to the foam. I rough cut the block leaving plenty of space for shaving down to my dimensions. Once the block was cut I used 'Surform' planers and shavers to square it up then sketched the front profile directly onto it, then planed and cut down to my profile. I repeated this process for the left and right side compartments that attach to the body of the backpack.
Now that I had rough geometric shapes to work with I made successive shaping passes over the backpack parts, first honing and beveling, then carving in the fine details of the design. I used a variety of tools to shape the surface: rasps, sandpaper files, planes. Through this process I frequently re-checked the symmetry using calipers and a bevel gauge. I fully detailed the main body before moving on to the side parts so that I wouldn't have to keep re-adjusting their fit to each other. I removed the top and bottom panels of the backpack to prevent damage to their finished surfaces. As all these pieces would need to be formed separately, I bisected the main body of the backpack when all detailing was complete..
To prep the pieces for reproduction, I had a choice to make between hard-coating the foam forms, or molding the parts and casting them in a more durable material. If I were only making a single backpack, and it didn't need to be hollow for functionality, or if the goal was to be a silicone mold, I could have just hard coated the foam. The hardening process could lose some detail that was carved, but it could be sanded and re-defined with more surfacing work. I wasn't totally confident how the hard coated foam would stand up to vacuum forming, so I decided to mold and recast the backpack parts in a more durable material.
Since I only needed a single cast of each part, I opted to make simple plaster waste molds. I painted the forms with two coats of latex house paint to seal the porous foam, then lightly greased the surface with petroleum jelly to prevent the plaster from adhering to the paint. I hand applied the plaster to form the molds, building up a shell that was an inch or two thick. I embedded burlap into the mold for reinforcement. When the plaster was fully hardened, I flipped the molds over and carefully scraped and crumbled out the foam from inside the mold. Since the surface had such a good barrier coat between the foam and the plaster, the foam popped out fairly well once I cored out the undercut areas.
To cast into these plaster molds I again lightly greased the surface then brushed in successive coats of Bondo/Resin mixture and alternating layers of fiberglass matte. To reduce shrinkage I used the minimum amount of hardener in my batches. I built up the casting to about an even 3/4" thickness then chipped away the plaster mold. I was left with a very durable duplicate of the foam backpack elements that could easily withstand the rigors of repeated vacuum forming. To prepare the parts for reproduction I smoothed out the models, fixed a few warps, then added MDF risers and structural attachments.
*continues next post:


")