Warrior Hawkgirl - Articulating Wings + Armor

Do post some progress! It sounds like you've done a lot since updating, so I'm excited to see! As for your mace, is it possible to dremel out some little cracks or designs for the light to shine through? I know you've got it covered in paint and plasti dip, but that might be a solution if you wanted it to light up.

As for the flange, it does show. I've sprayed it with the same bronze-y paint as the rest of the mace/armor, so it blends in nicely, but I'll know for sure once I get everything assembled. I can always cover it in some worbla pieces to match the rest, if it doesn't.


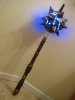
I worked on the mace, and it lights up now. I melted cracks into the mace with a hot iron with a fine tip, so it looks like lightning cracks, and I installed a strobe LED light. I will take a video once I get it all back together and update my thread. Too soon for that now, but maybe I will get to it this weekend.
 
That'll look awesome, @Iggy! Your progress looks great, so I can't wait to see it finished. Any photos yet?

I haven't been super productive this past week, but I did manage to knock out most of the mace handle. It's just two diameters of PVC covered in Worbla. 1" and 1.25"? I forget, but it worked well enough and allowed me to make a small window for the control to sit in. This will be partially wrapped in leather, with only the switch exposed.

IMG_5957.JPG

I didn't have many ideas for a design, other than scales, so I covered the rest in stringy worbla scraps for a wrapped-leather look.

IMG_5958.JPG

I'm also having some trouble attaching the globe to the light (the aluminum housing). I want to use a threaded insert, or something of the like (set/grub screw?), so I can easily take it apart when needed. Has anyone ever used any of those for metal? Canobi provided me with some nice little grub screws, but I have nothing to tap in threading with, and I have back luck mixing US and metric sizes. I'm currently planning on gluing in a threaded insert to serve the same purpose, but I keep thinking there's a better option out there.

(the aluminum housing will sit further up in the globe and be less prominent when finished)

IMG_5959.JPG

And finally, what the ******* looks like, all lit up!

attachment.php


I'd honestly love to stick it in the corner as a novelty lamp :D
 

Attachments

  • IMG_5956.JPG
    IMG_5956.JPG
    1.3 MB · Views: 1,689
springsteel: WOWZERS! My jaw just hit the floor :lol this looks so professional,Spring...just amazing.
Iggy: Wishing you and the misses good health:thumbsup
 
Last edited by a moderator:
Hey Spring, did the flange not come with a set/grub screw?

There's always a simple solution, got one forming, I just need to think it out a mo, I'll get back to you :thumbsup

By the way, the mace looks absolutely stunning, awesome job.
 
That looks awesome, @Iggy! The strobe looks great with the small lightning crackles, and I love the button on the bottom of the handle; super handy. Can't wait to see it all finished!!

Thanks, @George! I'm putting a lot of effort into this costume, so I'm glad it's turning out!
@Canobi: No grub screws with the flange. I bought it locally without giving much thought to how I was going to attach it to the LED (I tend to get impulsive when excited). I did ask around on who could thread a hole, but apparently our local metal shops no longer exist, and that particular hardware store didn't have a tap. Even so, the mace globe is already fully attached to the flange, so I'm not about to bring in the entire assembly even if they could thread it!!

And thanks - it's your light that makes it look good!
spydrwebz: The spike on the end is a remnant of when the handle went straight through the mace head and out the other side. I had already built the globe before deciding to have a hollow handle, and didn't really feel like cutting off the top design to add another spike. As well, it makes a good "foot" to rest the mace on upside down without damaging it, which is one of the reasons I ran the spike through in the first place. It looks a little out of place, but I saw it first on some historical maces, and thought it looked kinda cool.

ph-0.jpg

So, I was really hoping to get this costume mostly finished to wear to Kansas City's Planet Comicon (March 14th), but I've barely even started on the wings! Ah!
 
Last edited by a moderator:
Springsteel, great work!

Just to add to the fiberglass discussion: consider driveway markers available at a local big-box hardware store. Usually about 48" for $2.25 and no shipping.
 
OK, so how about drilling a 5mm hole in the side wall of the flange and use a 6-7mm length M5 hex head screw. That way you could attach the handle and flange with the same retention hole.
 
Springsteel, great work!

Just to add to the fiberglass discussion: consider driveway markers available at a local big-box hardware store. Usually about 48" for $2.25 and no shipping.

Excellent idea! Though I'm having trouble finding anything smaller that 1/4", which is getting pretty hefty. I'll have to keep searching on that, because I like that idea. I think what I'll have to do in the end is make a mock-up with the steel wire I have, then measure exactly how much fiberglass I would need to order - that way, I reduce the risk of screw-ups.

OK, so how about drilling a 5mm hole in the side wall of the flange and use a 6-7mm length M5 hex head screw. That way you could attach the handle and flange with the same retention hole.

Aaaand now is where I begin to wonder if you meant to add a threaded hole into the lower end of the aluminum housing on the LED... Because that would make a lot of sense! Unfortunately, there is no threaded hole, so I might check around town and see who has a tap for such things - LOVE the idea of a single retention hole. That would definitely simplify things.


So, I was hoping to get this costume "finished" (mostly wearable) in time to try it out for Kansas City's Planet Comicon, but my wings are still a struggle. I did manage to turn out most of a comfy "backpack" this weekend, made from some gutted backpack straps, a camping pad, and some previously-wasted worbla/wonderflex bits. BUT, my computer is experiencing a bit of difficulty uploading photos, so those will have to wait...
 
Ahh, I think there's been a miss identification. The grub screw that can be seen is for securing the handle, there's a second, hidden grub screw underneath the outermost tube holding the LED assembly in place ;)

The idea for the flange is to drill a hole the same size as the hex head screw (measure screw head diameter and choose the corresponding drill bit size) which will hold everything securely once screwed down, no need to tap threads.

Here's a pic of my current saber project to show you what I mean. The tube underneath is tapped, but the tube you can see isnt, the screw head is just sitting in a hole:

 
Last edited:
Yes!!! I feel so foolish now!! I thought that screw held the assembly together, but I see now you installed it for the handle. Stupid moment. Please ignore.

Thanks, Canobi.
 
Just realised I may not have mentioned it, but the handle retention hole has been tapped for an M5 screw/bolt.
 
Yes! Thank you! Turns out my hardware store has a large metric section and I ended up finding a bolt that works perfectly. The mace looks spectacular!

So, still no photo uploads. I haven't made a lot of progress lately - life so rudely gets in the way sometime. But I'll have to find myself a new computer for when I do have something worth sharing.
 
Still no photos, but I do have a couple of videos to share. First, my wings are highly inspired by this man's beautiful, beautiful wings (minus the animatronics). If I can create something that is 10% as fantastic, I will have achieved my goal. He has a great pile of WIP photos on his deviantart page that have been so helpful.

I've been busy lately, but have managed some tinkering on the wings this week. Here's a video showing the wing concept so far. There's all kinds of awkward here, so please ignore the giant mess and the fact that my phone is propped in a roll of tape to film.

Once I get my life in order, and find a better computer, I'll add some photos and details on how I made the frame. I'll start experimenting with some feather attachments and arrangements next week. I've made feathers before using this great tutorial, and they worked out really nicely - that's the plan for these wings as well.

More to come...
 
So cool :D:thumbsup The first video with the angel wings was really beautiful,and awesome to see that they flap by themselves!
Your framework looked decent and is going to make fine wings:thumbsup no matter the 'mess',because it serves a purpose hehe
Thanks for posting your update!
 
This thread is more than 7 years old.

Your message may be considered spam for the following reasons:

  1. This thread hasn't been active in some time. A new post in this thread might not contribute constructively to this discussion after so long.
If you wish to reply despite these issues, check the box below before replying.
Be aware that malicious compliance may result in more severe penalties.
Back
Top