TVsRobLowe
Active Member
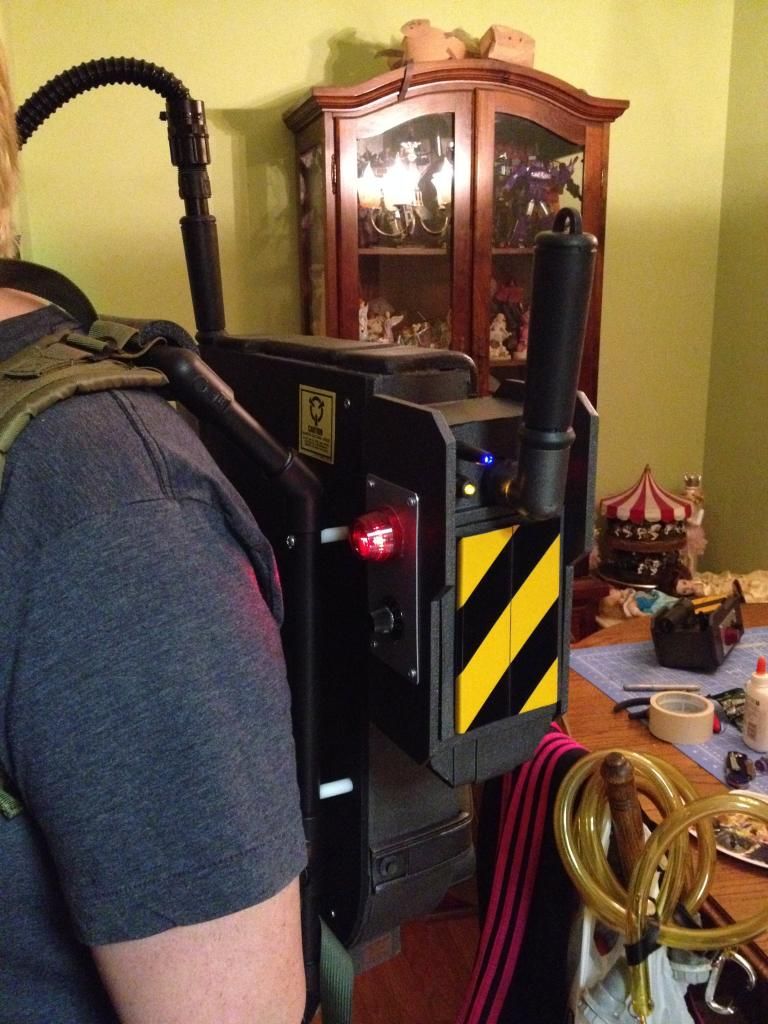
After various updates to two of my previous foamcore-based Proton Packs, I only had packs for myself and another. My wife agreed to play dressup with me at Halloween and maybe a few other times, so I had a choice: Either update my third foamcore-pack, or start something from scratch. After discussing with my buddy in my costuming group, he was also looking to make a pack for his girlfriend. Seeing the chance to knock out two new packs assembly-line styled, I offered to make him one and he agreed. As with all of my builds, I do my best to make the best looking, durable prop I can while still being budget conscious. Budget for these is ~$100 for both and I’m roughly in that ballpark so far.
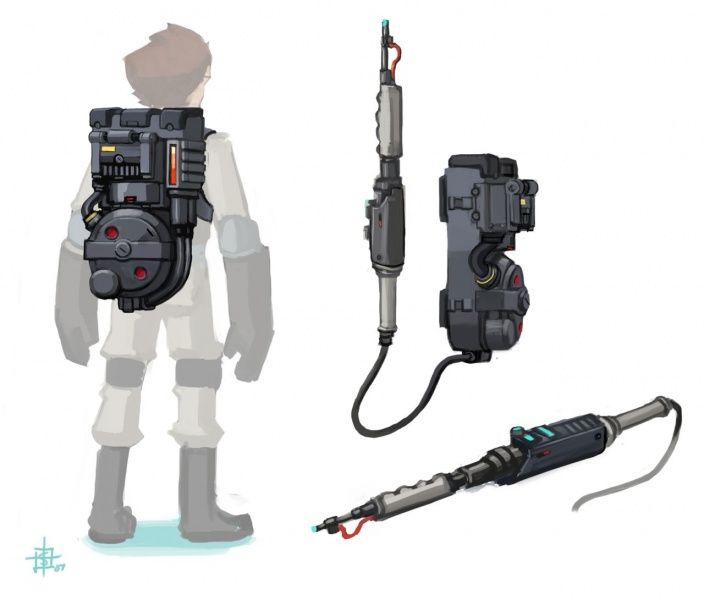
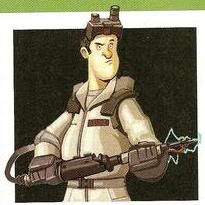
The design I decided on was based on the concept art proton packs for the Wii version of Ghostbusters: The Video Game. I’ve always loved this design, I see so many people come up with their own concept of a “modern” proton pack, but I think this design satisfies that idea. It’s refined, clean, and has little of the jumbled together industrial look of the originals. I also think being being refined, it has somewhat of a feminine quality, and since these are going on female Ghostbusters, I have some wiggle to room to be different. I know that sounds kind of sexist (“Oh, girls can’t be like the real Ghostbusters?”), but there’s something cute about this design, my wife likes it, my friend’s girl likes it, so that’s good enough for me. Sexist would be asking them to wear short-shorts or a dress instead of a flight-suit.
During the making of these, I used all of the skills I gained from making the first packs, and avoided every mistake I made with them. So far, making these have been a breeze compared to my first. I would make them the same way – foamcore cut with 90-degree angles and held together with hot glue.
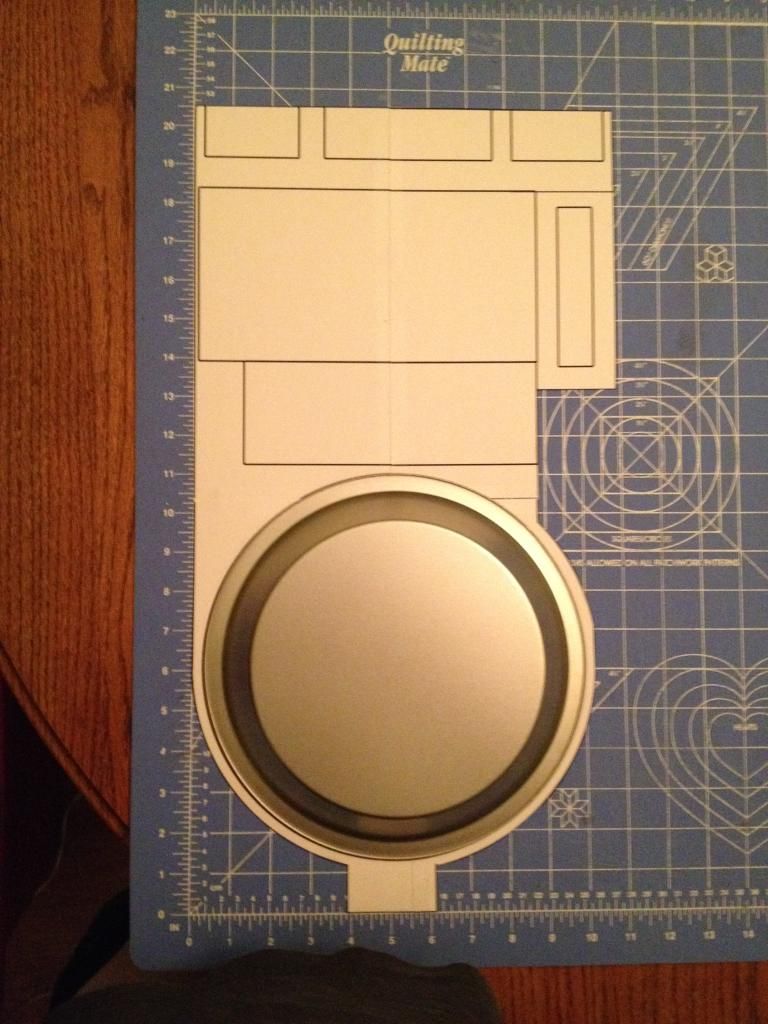
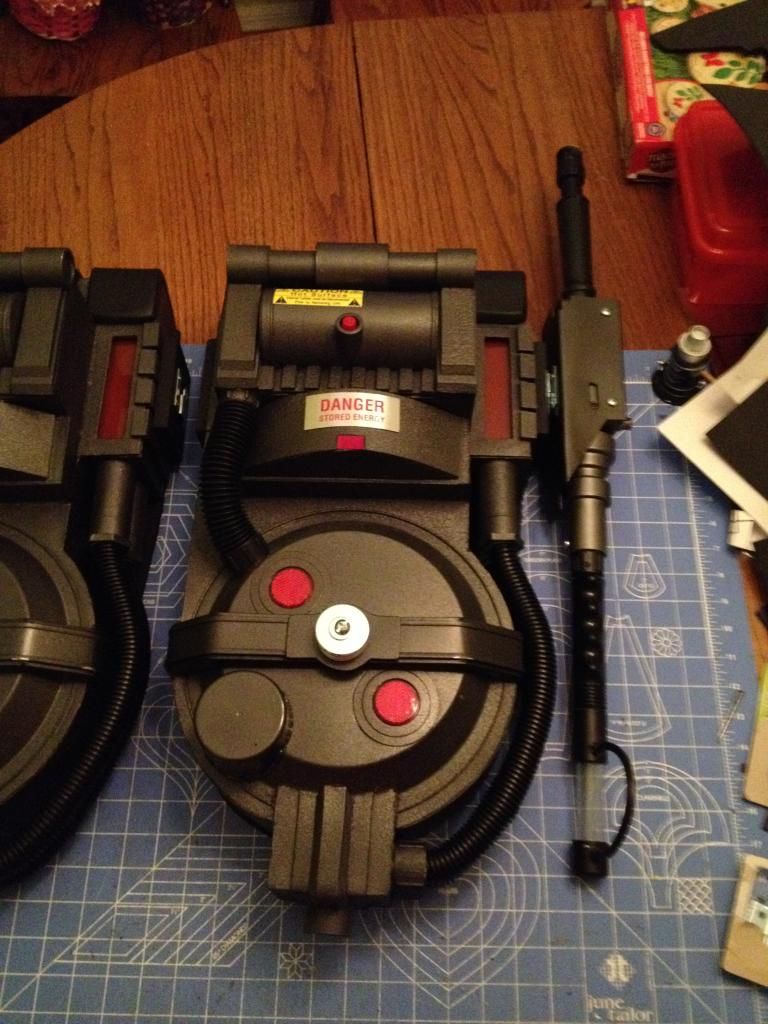
My first step was to find a cake pan to use for the cyclotron. I found these pie pans at Dollar Tree. They’re undersized compared to the 9” ones on the standard pack, but I really like the bevel on them. I created some template in Illustrator scaled to the pan, printed them out on card stock, and made a full size template. From top to bottom, they’re about 4 inches shorter than a standard pack, but will be a little taller in the end once things get added on. Working on the templates, a few things had to be changed to work in the real world – proportions and perspective on the concept art just aren’t true to life, and what is in the art doesn’t really work in real life. A good example of this is the lower box just below the cyclotron – built like the art, I wouldn’t have the room for three tubes to insert and still be strong made out of foamcore. On the build, I made the box taller and gave it room for the tubes to fit.
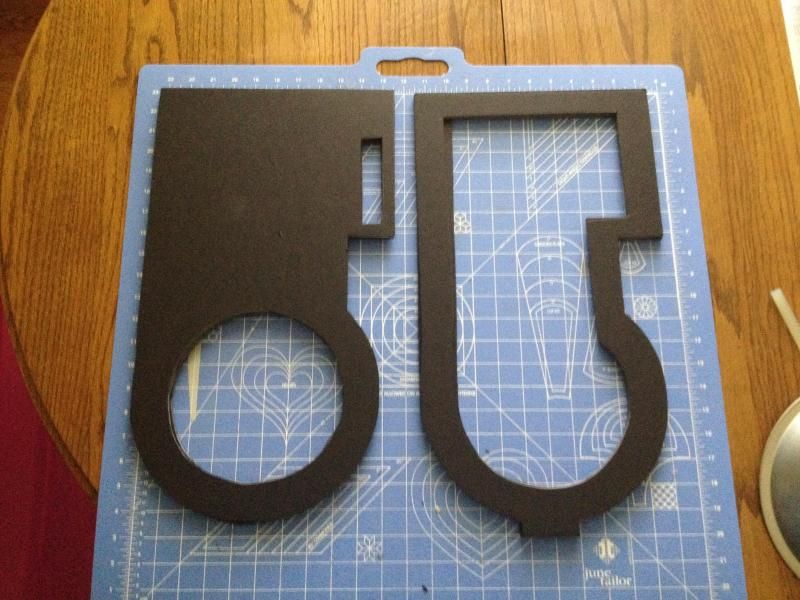

After making the template, I traced on to foamcore, and added some height. For the curved portioned, I used EVA foam (6mm foamies sheets). Foamies were used in a few places for details.
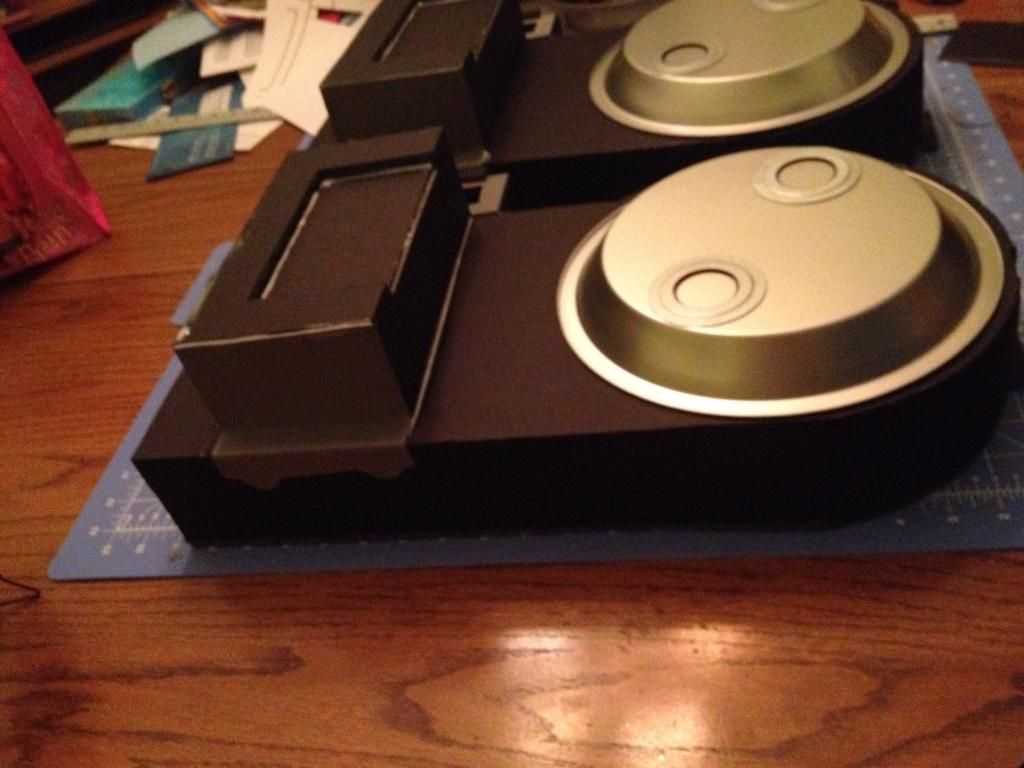
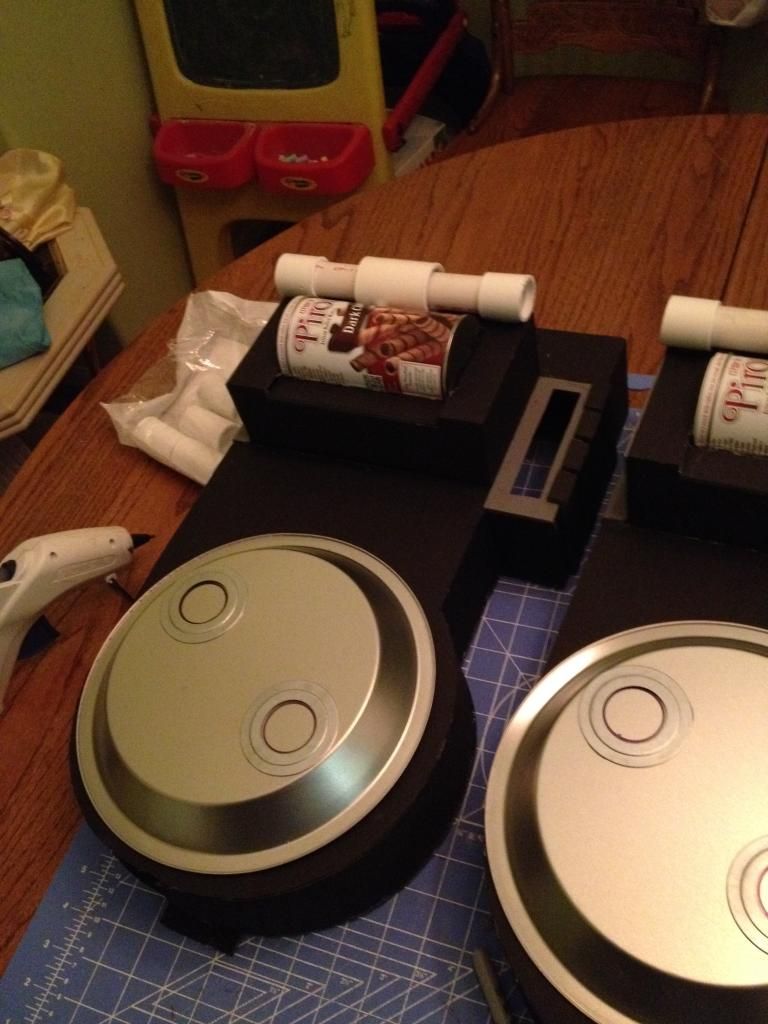
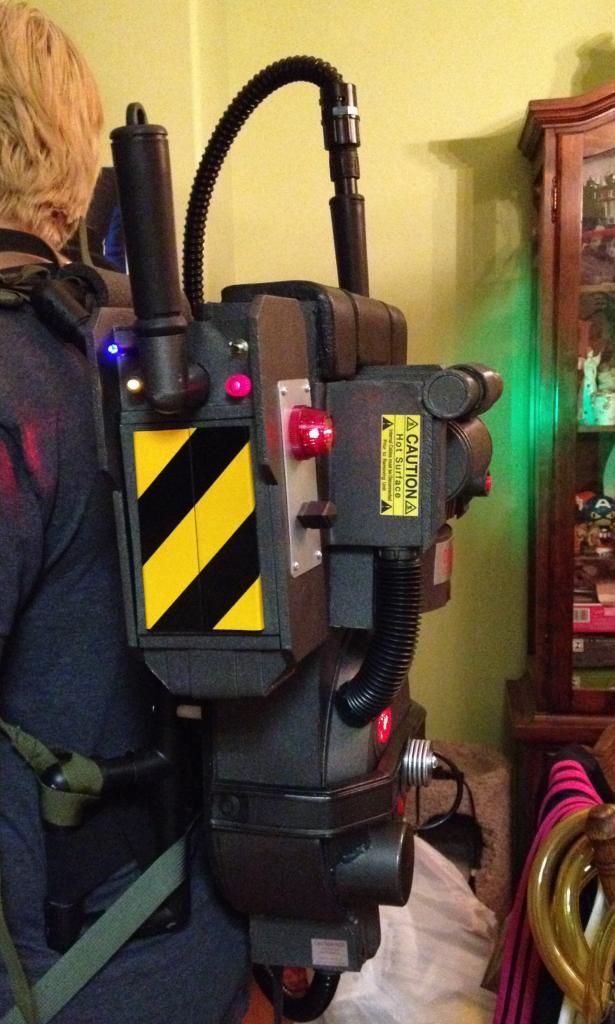
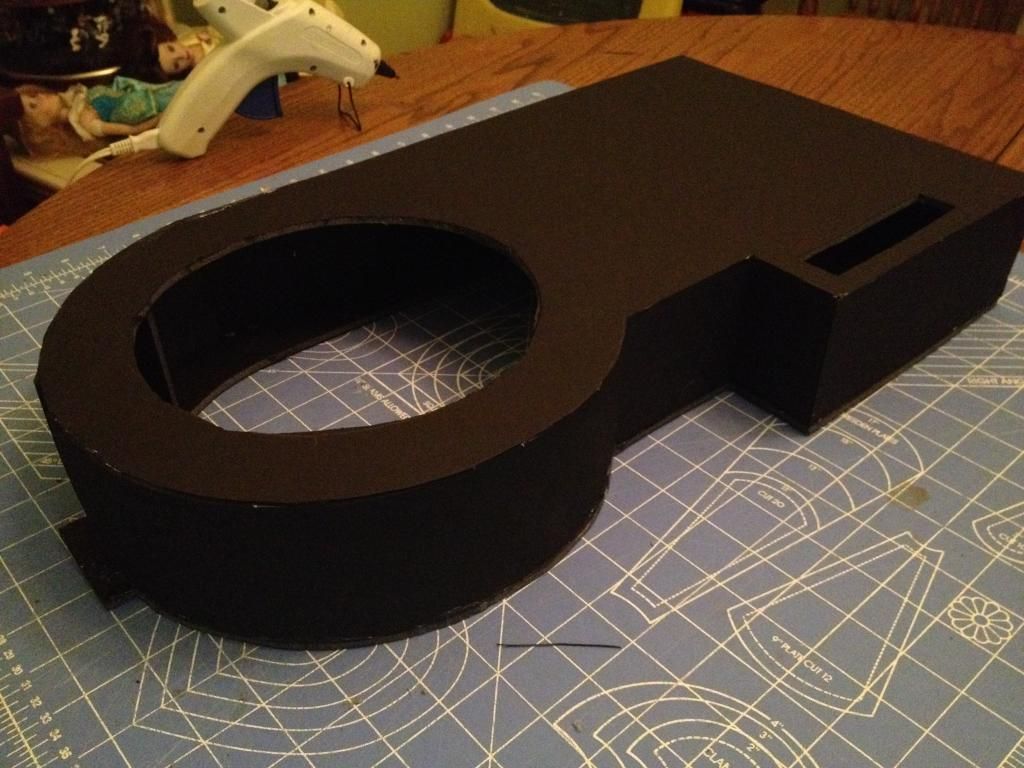
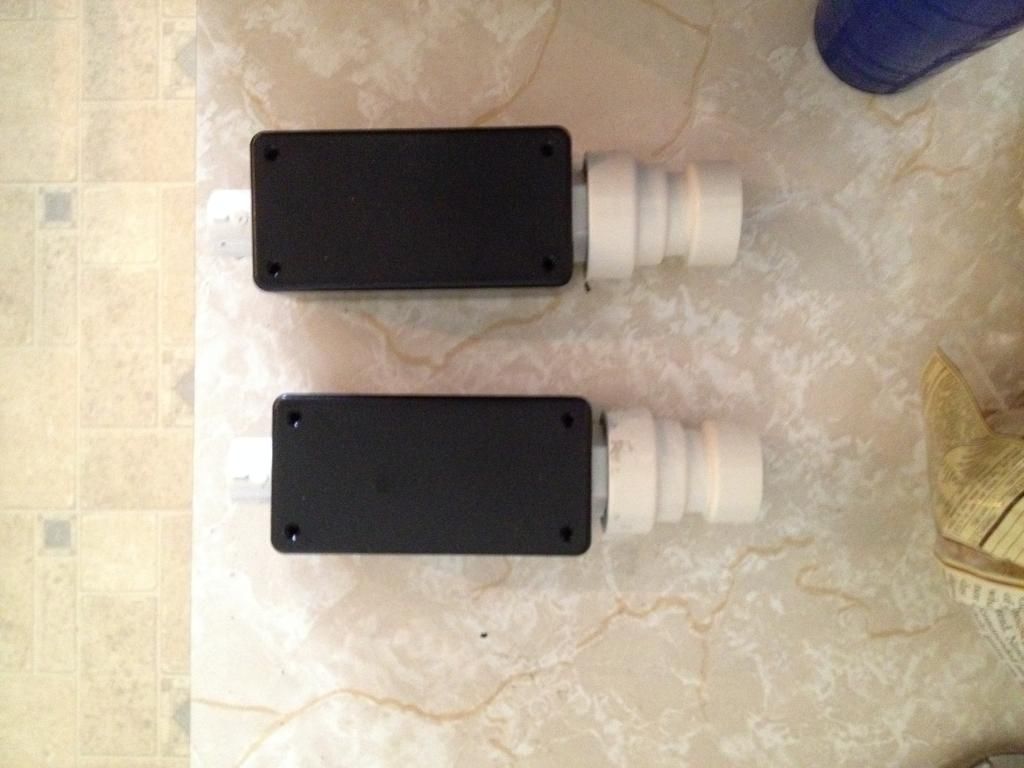
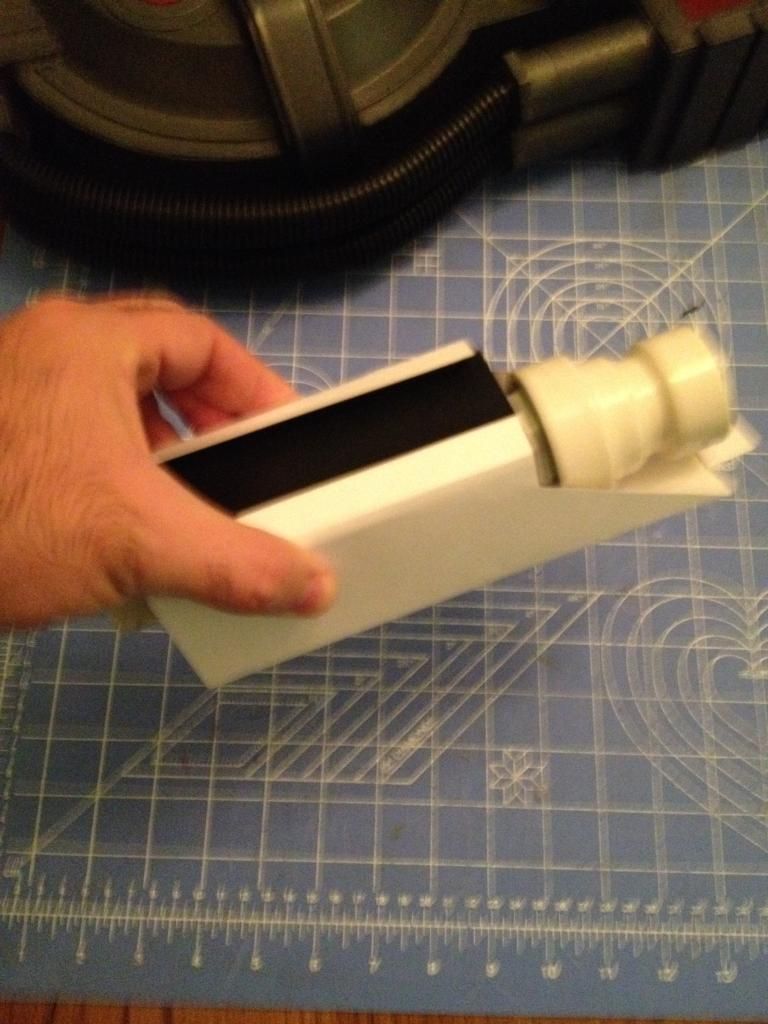
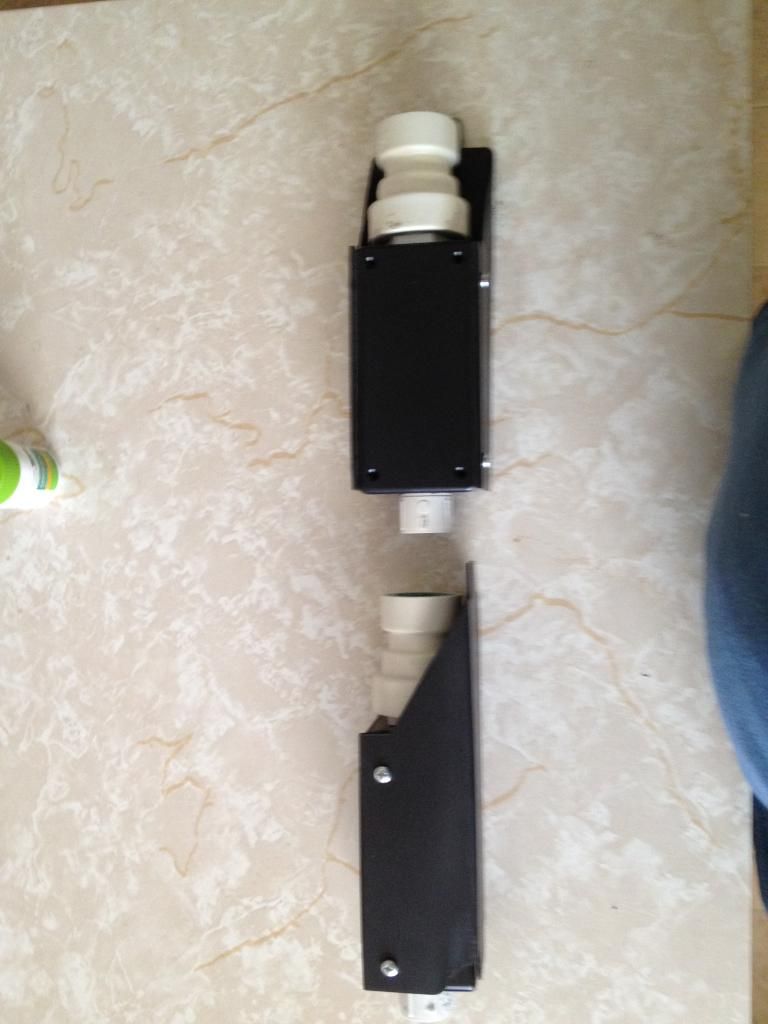
When it came to the details on the control box, I considered scratch building everything. I came across these aluminum canisters at Dollar Tree and they ended up being a perfect fit for my already-built box. I make the top bars out of PVC and nested couplers. At this stage it really looks like a junk pack. Aluminum reducers/washers were also added to the cyclotron at this point. Used foamcore + foamies to finish up the rest of the pack details.

Next I made the base for the bumpers using some Hot Wheels track. Not a new idea, but it works well. These raised lenses were considered but I decided against them to go with a more traditional style flat lense. PVC pipes were used for the injector tubes.
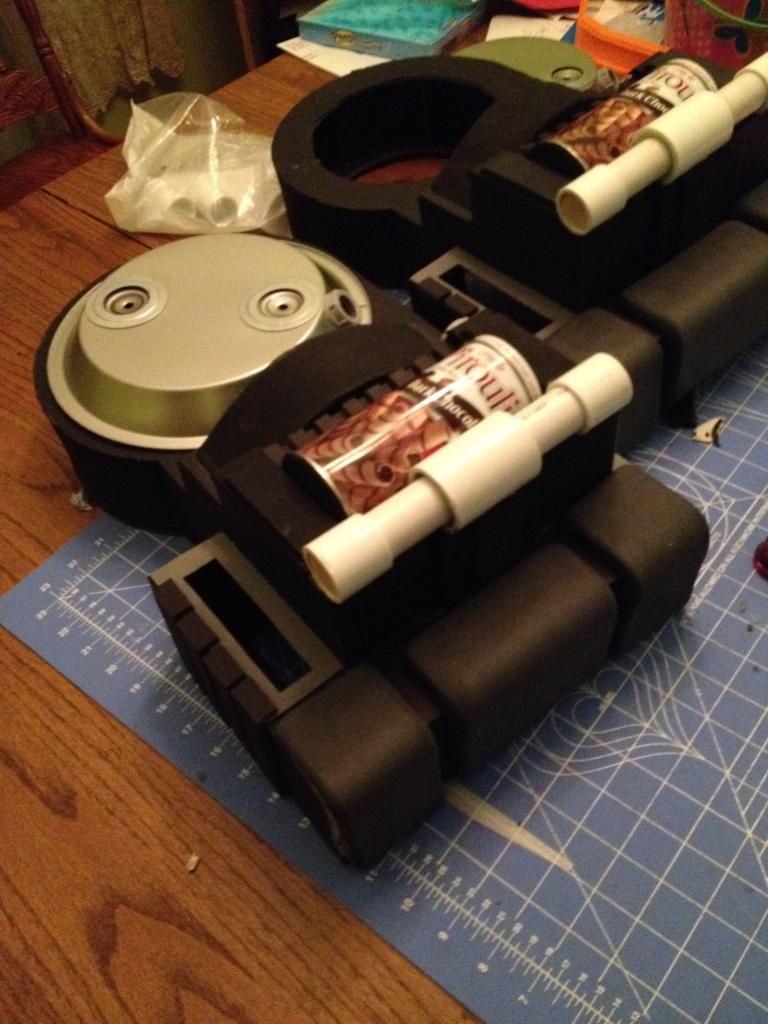
EVA Foam floor tiles were used to make the top “bumper” portion. Sanded down the sides with a sanding screen to give them a curved edge. I also heat-formed some styrene to make the front of the curved section between the cyclotron and control box.
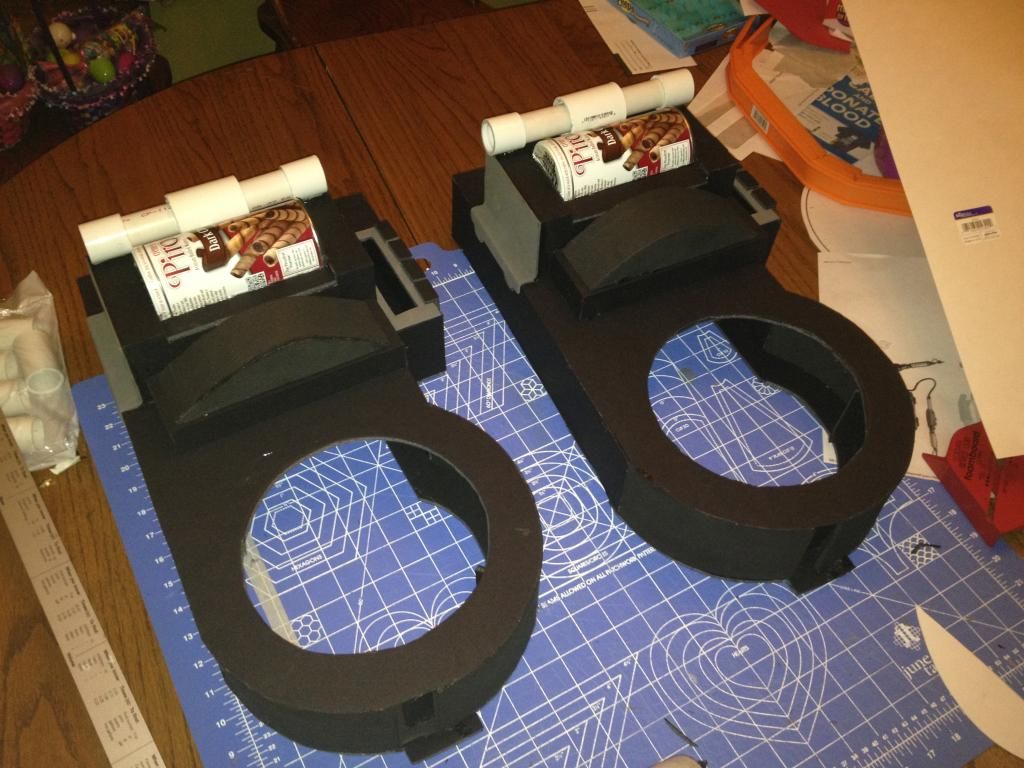
The lower box made, along with various connection points for the hoses.
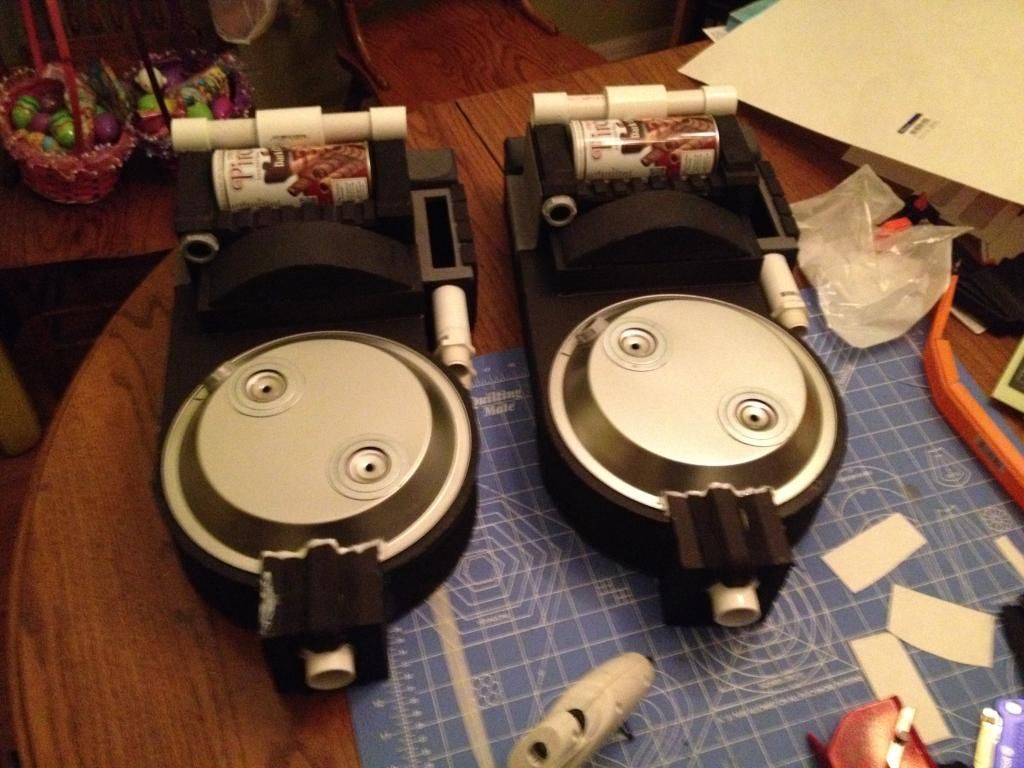
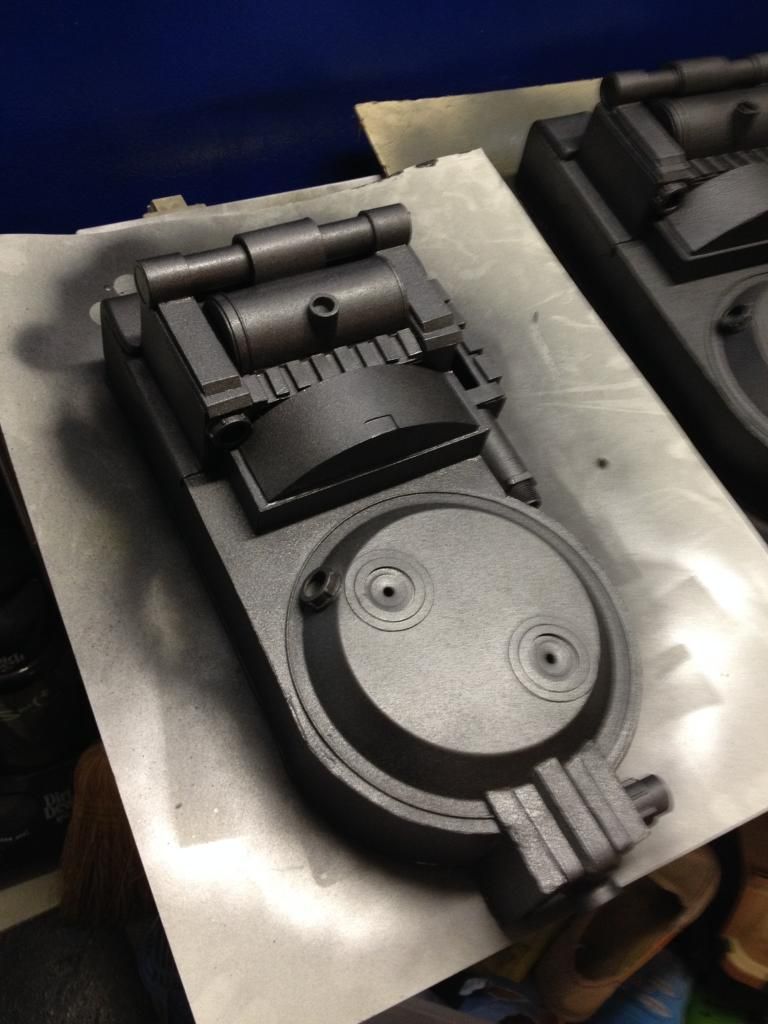
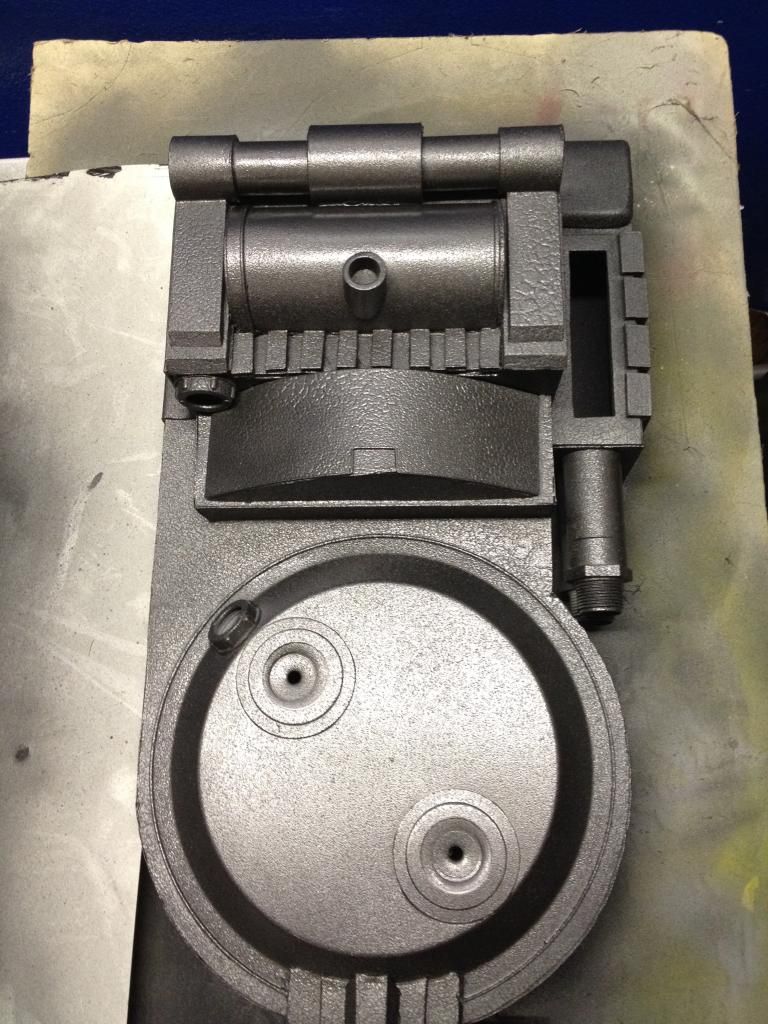
Finished bodywork on the pack. Center pieces on the cyclotron bumpers were made with styrene.
Time for paint! I covered the EVA Foam with Mod-Podge to prep it. To seal my foamcore, I sprayed down 4 coats of Plasti Dip spray. This waterproofs the foamcore and make the whole thing more durable. After the plasti dip, a coat of Rustoleum Textured, and another thin coat of Plasti Dip. The whole thing looks cast-iron at this point, but I started to get an orange peel effect on a lot of the smoother sections. I think lighter coats of Plasti Dip would have prevented this, but I went ahead with it. The Gun-Metal color used is Rustoleum Metallic. I don’t know the actual color, but it’s the medium-brightness silver.


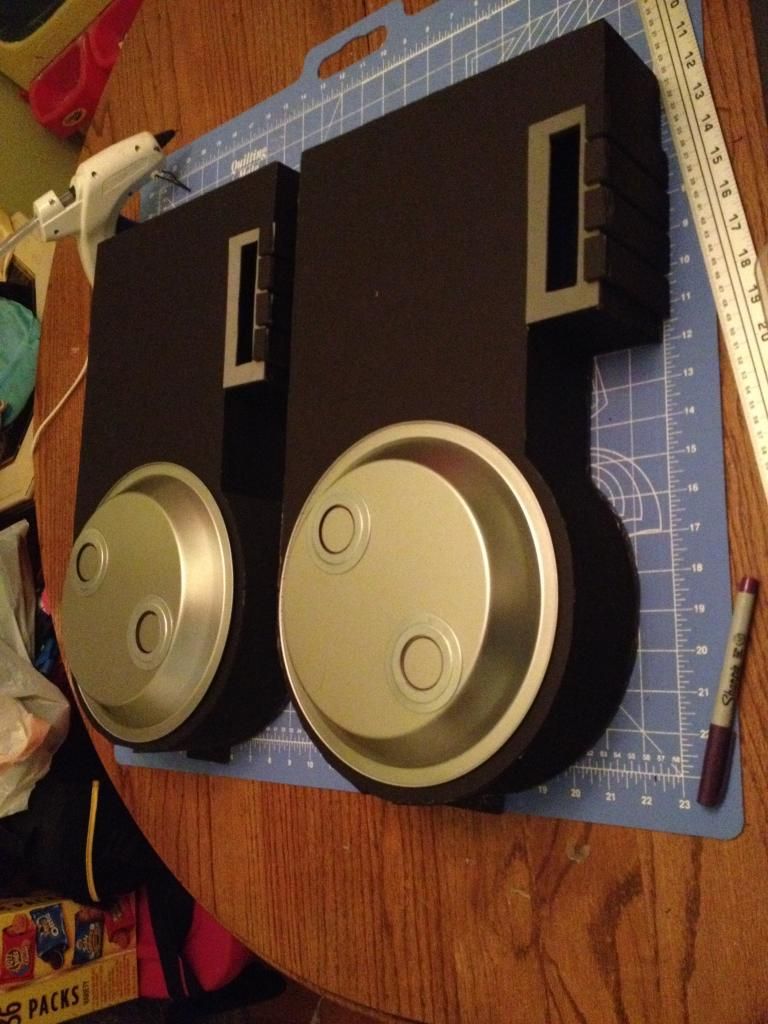
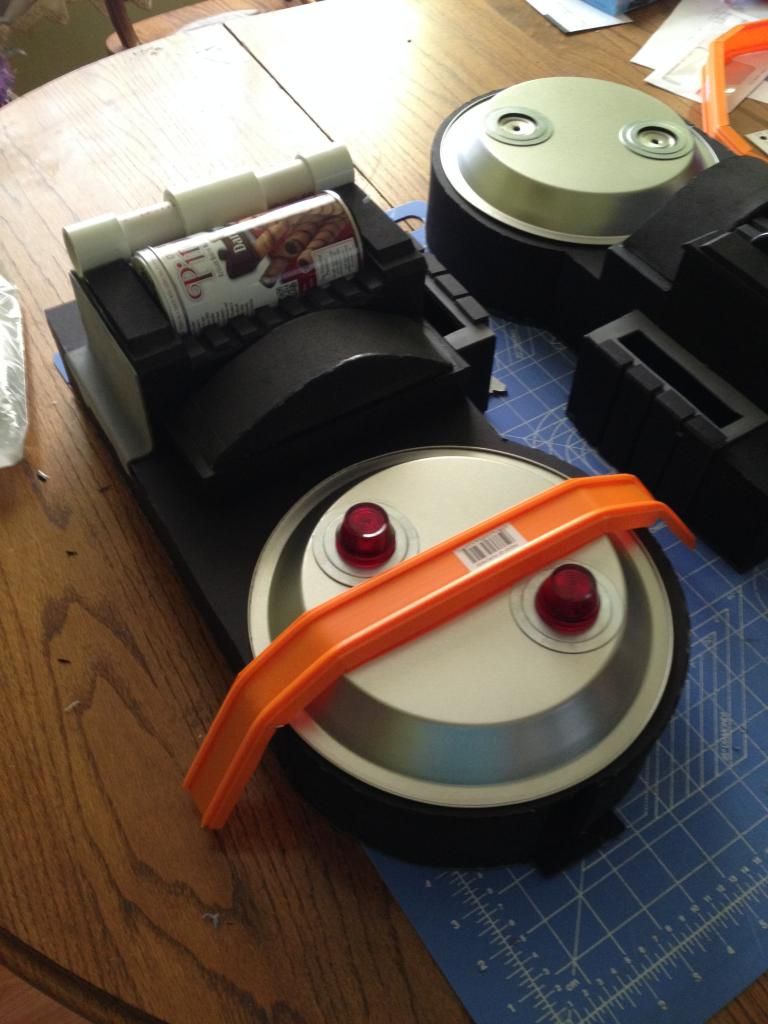
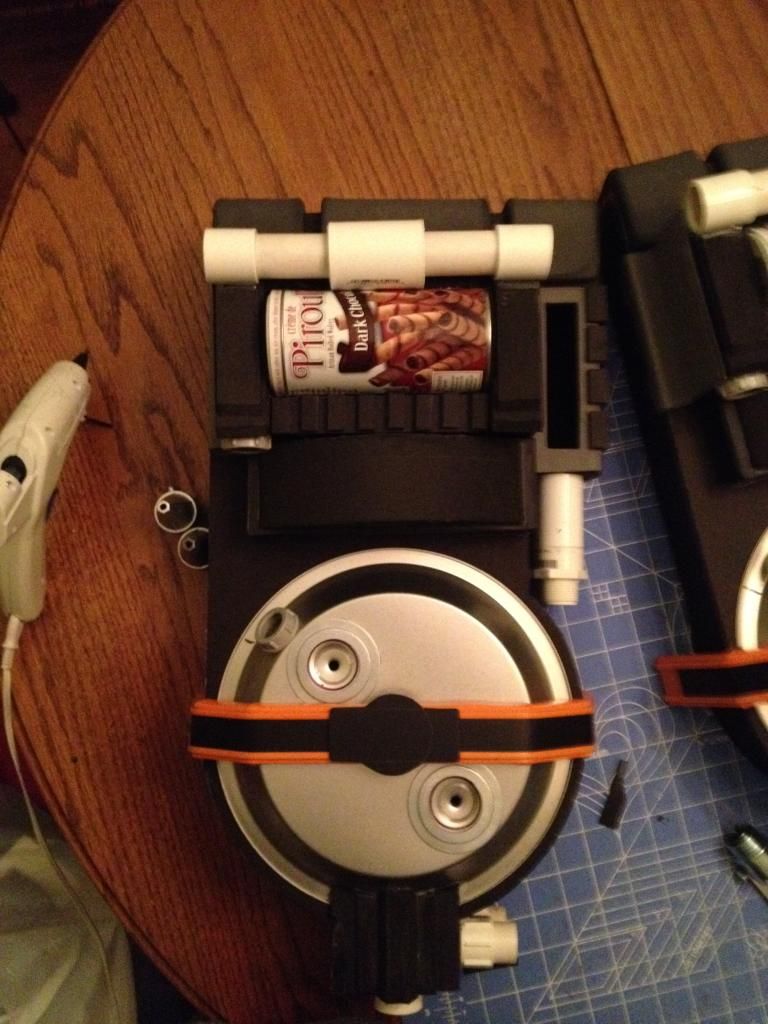
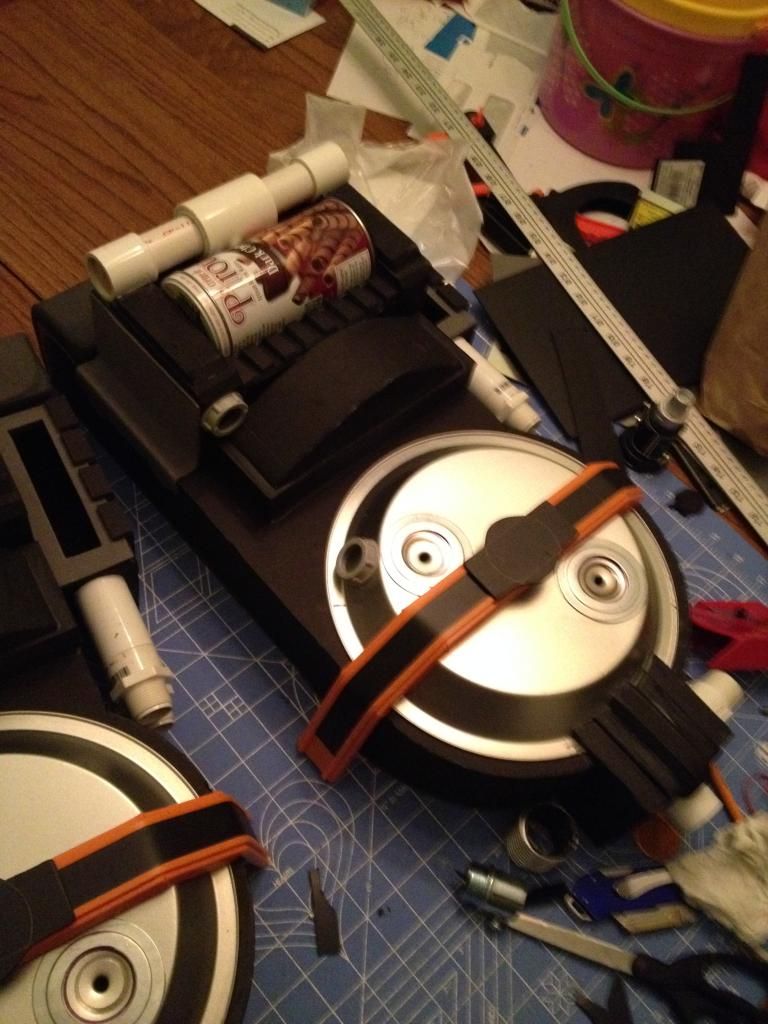
After painting the packs, I set in the reflectors and painted up the bumpers. Shock mounts were made with washers and loom tubing and bolted on through the bumper to the back side of the pie pan.
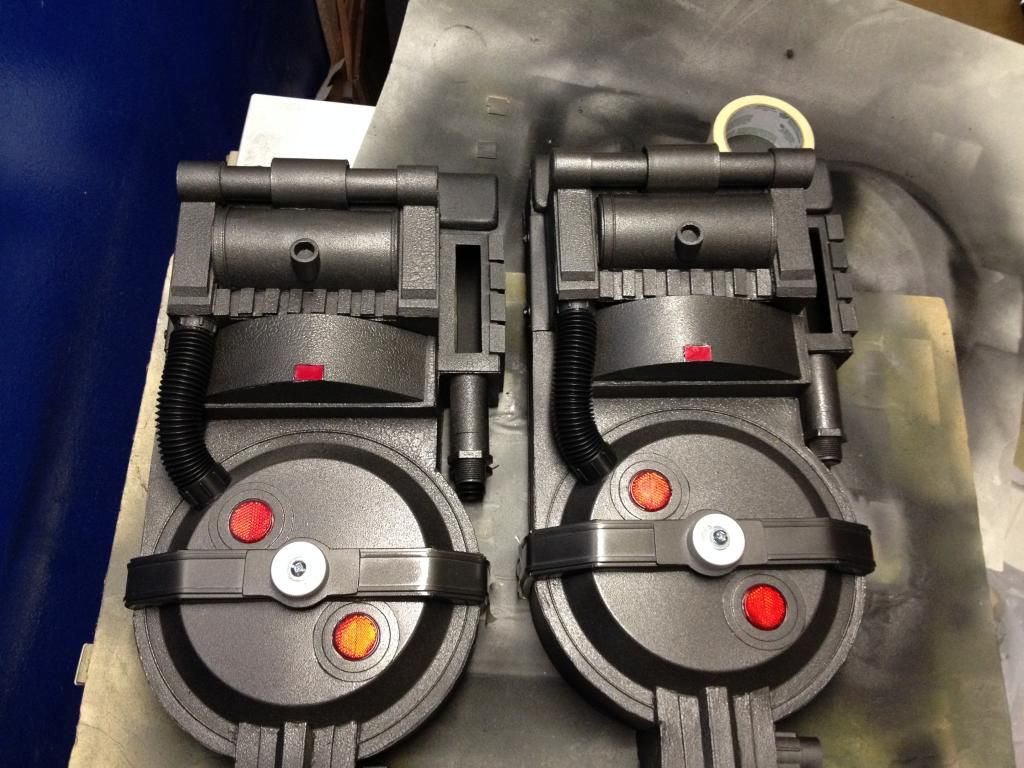
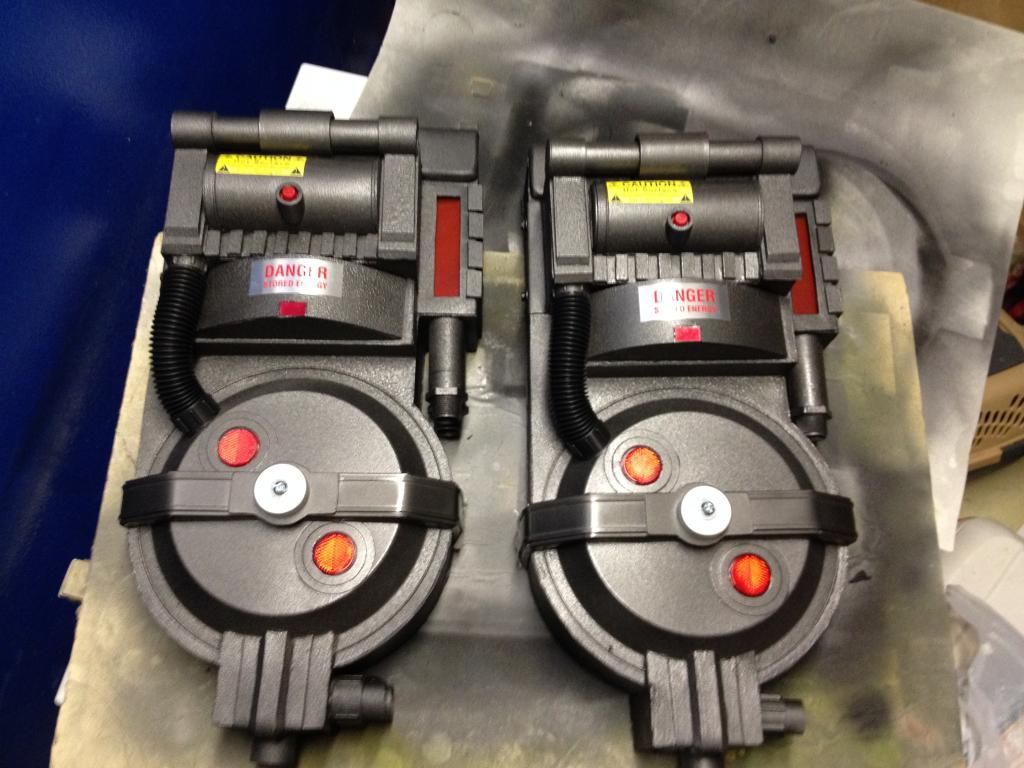
Labels that I picked up at Skycraft in Orlando were affixed to the packs at this point. Split loom was added as well.
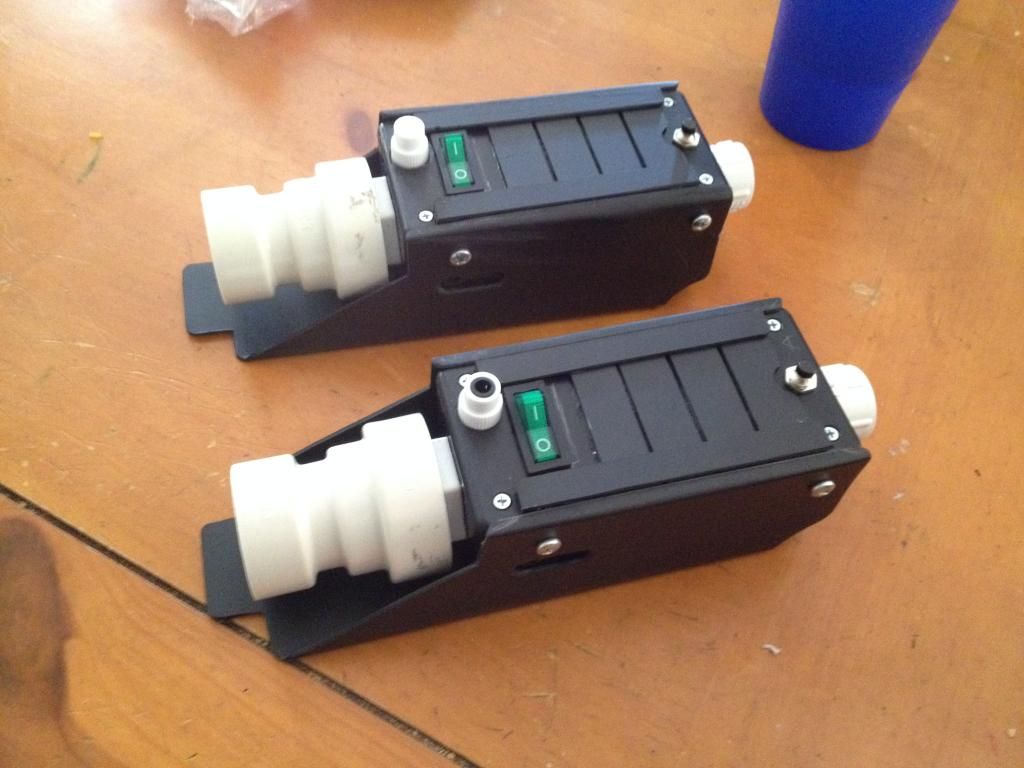
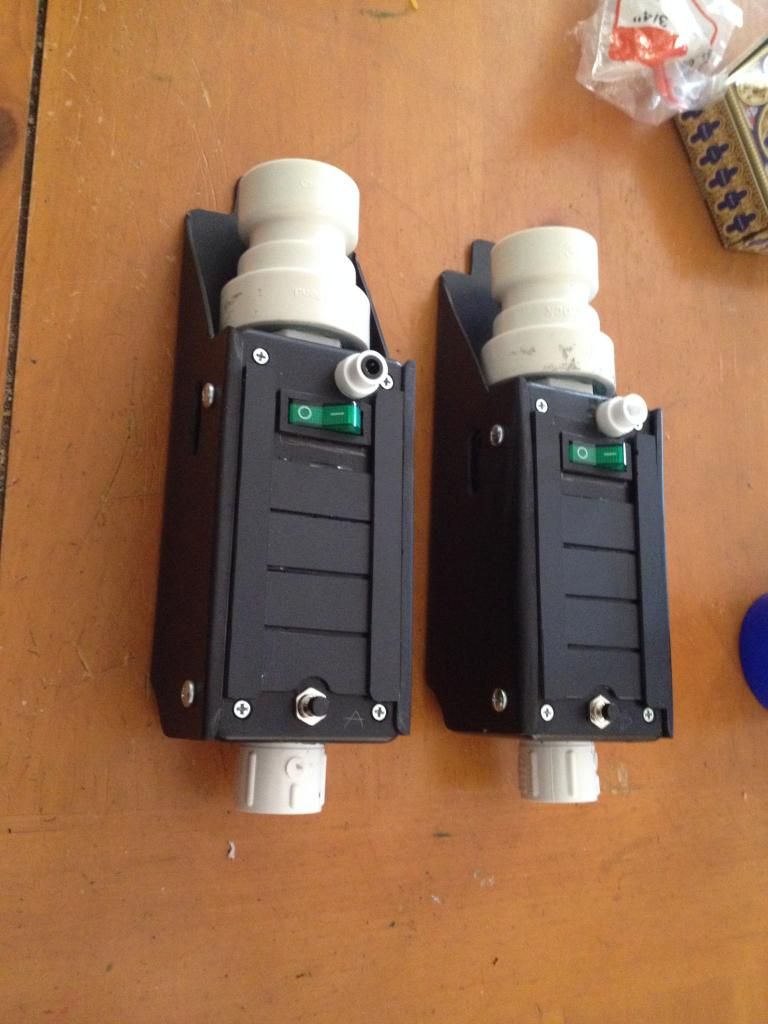
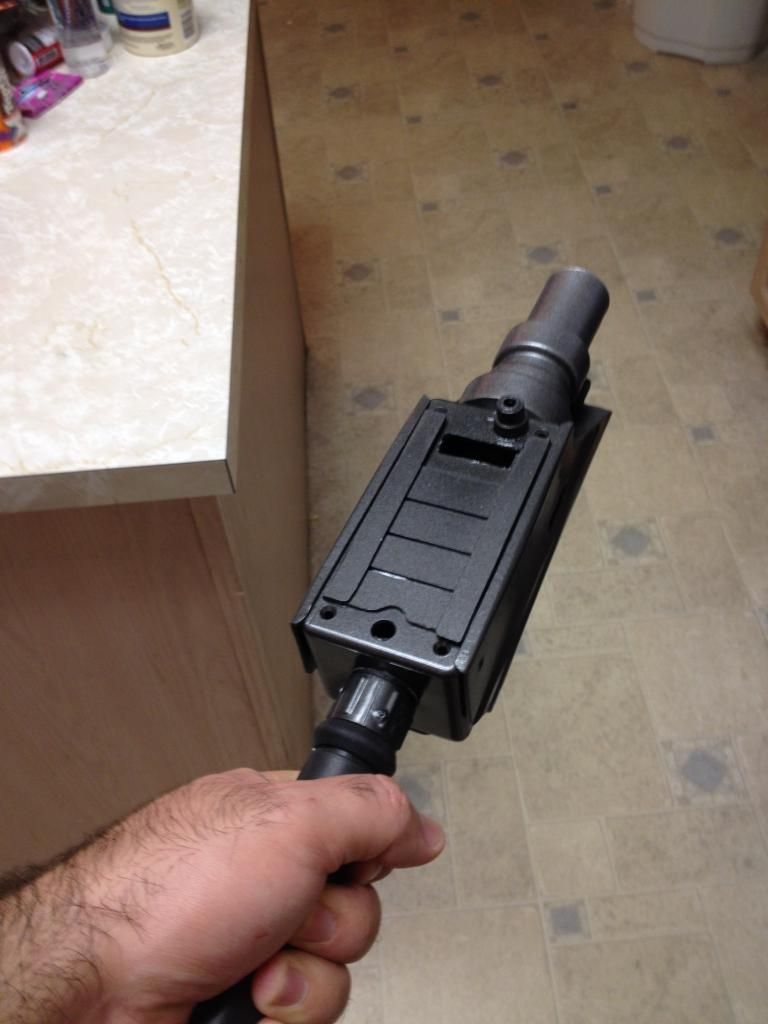
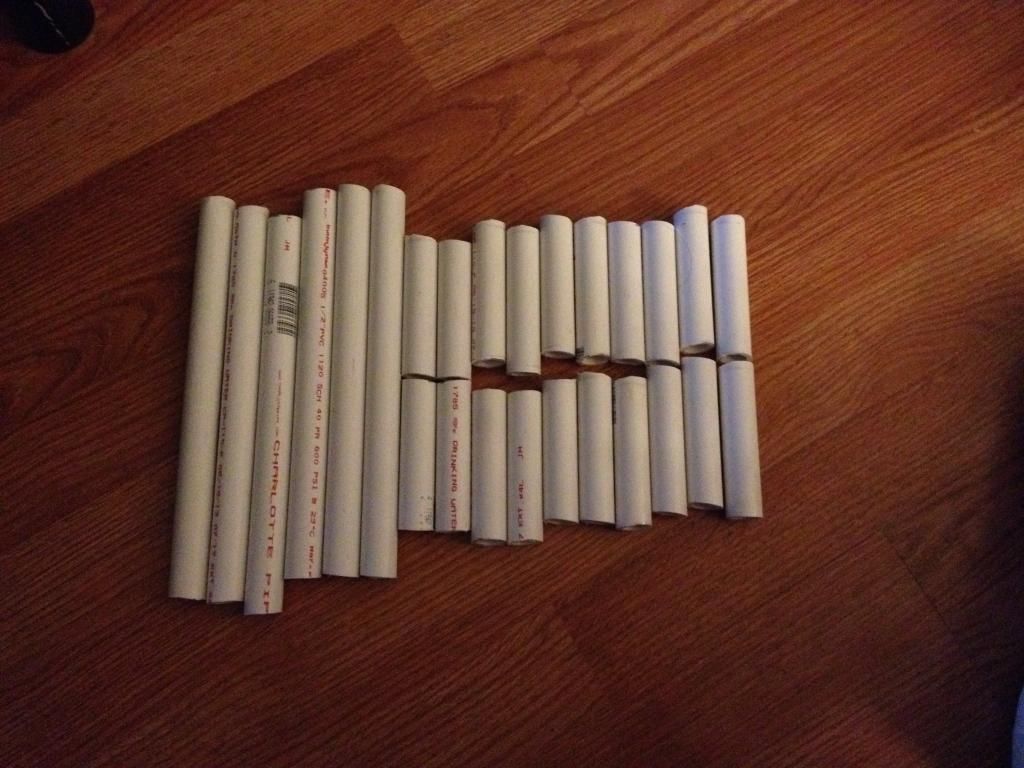
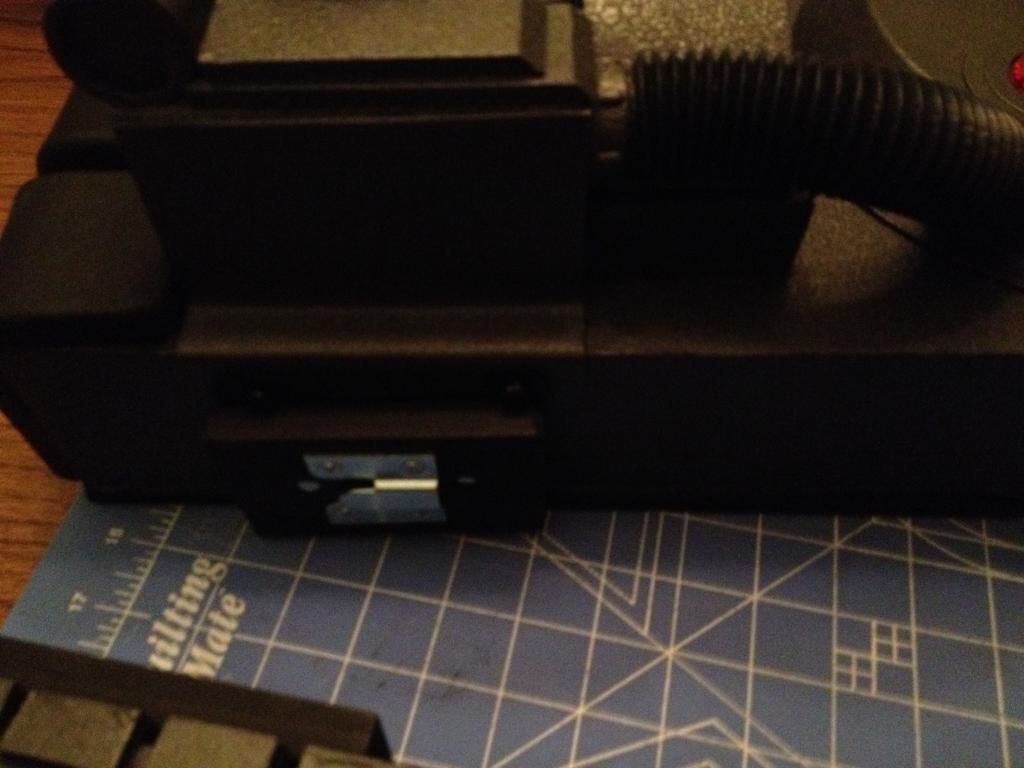
Taking a break from the packs, I started work on the throwers. My initial idea was to nest multiple PVC tubes and cut down to get the layering effect, but further inspecting the art of the thrower, I think the thrower box is more square with rounded edges. For the tip I’m also deviating from the concept art – I need something more durable so I’m going to use clear acrylic with some PVC fittings. For the base thrower box I used a project box from Radio Shack and screwed on a few PVC couplers with conduit nuts.
For the outer shell, I considered using foamies but they just weren’t going to be durable enough. I decided to try heat-forming some styrene. I hadn’t done it much before, but with these I said I would take my time. I made a template, cut out the styrene, and started work with my heat gun. The end result was a lot better than I was expecting.
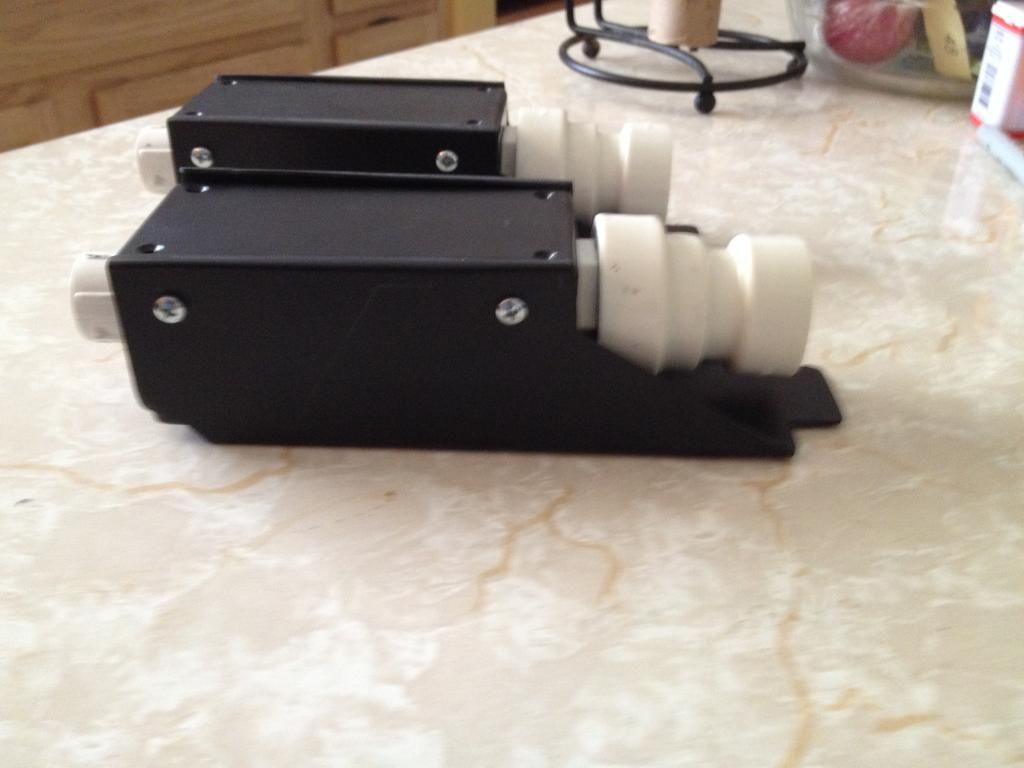
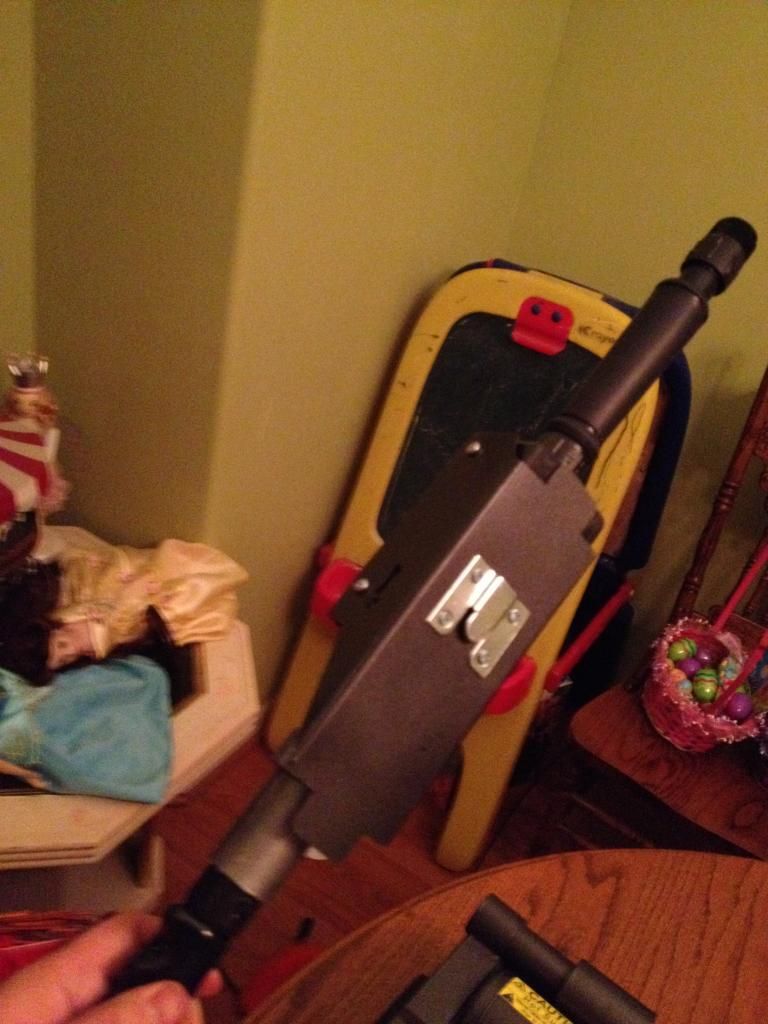
Styrene was used to make the details on the top faceplate, and LED holders and holes for switches were cut. A test tube plug was used for the raised LED holder near the plug. PVC pipes and various couplers were used for the rest of the body.
After base shapes on the throwers were made, they received a coat of the same gunmetal Rustoleum, along with some silver to differentiate along the front couple.
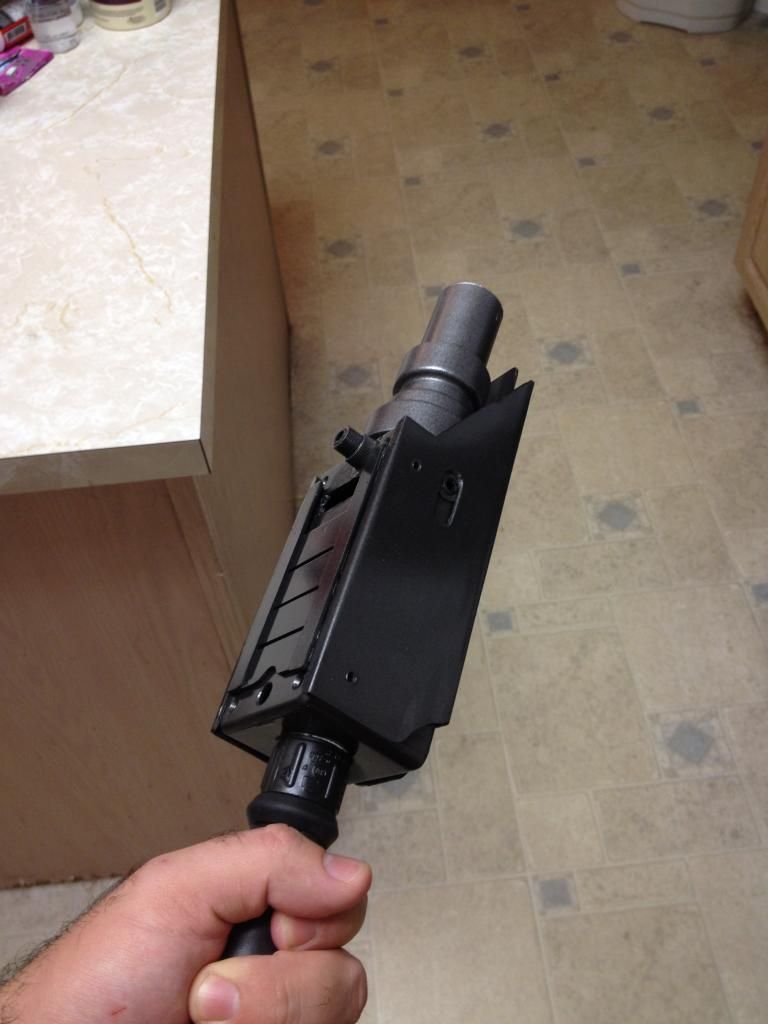
Unseen are the motherboards I cut out of MDF. Nothing special, they were just cut from the same base template and mounted to the shell via wood blocks mounted in the shell. Grips were then installed. Rear grips were some I picked up at Skycraft, front grips are retro-style bike grips. The clear portion of the tip are from some clear hollow acrylic I also picked up at Skycraft. The wire and connectors at the tip are Rainbird sprinkler hoses and bits.
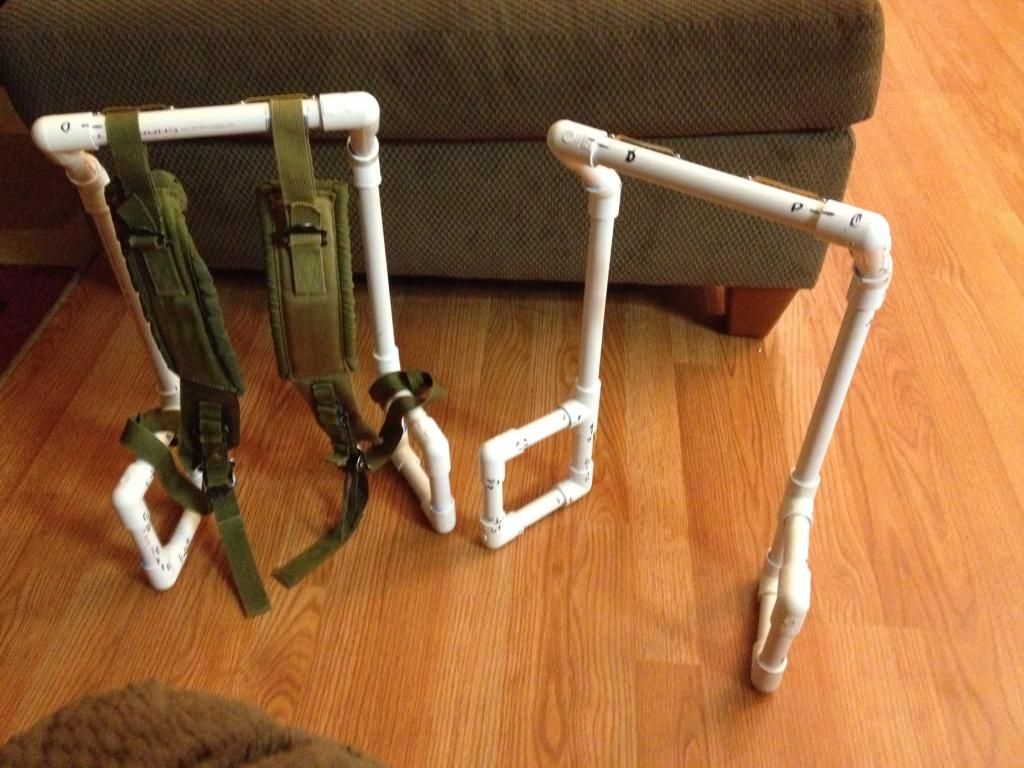
For the backpack frames, ALICE frames were desired, but they’ve been going up in price on ebay. Back in 1999 I think I bought 4 for less than $60, now I can’t find one for less than thirty. I decided that I would go ahead and make my own frame out of PVC, and add on ALICE Straps and make an alternative to the kidney pad using an elastic band. Horizontal support will come from the motherboard itself.
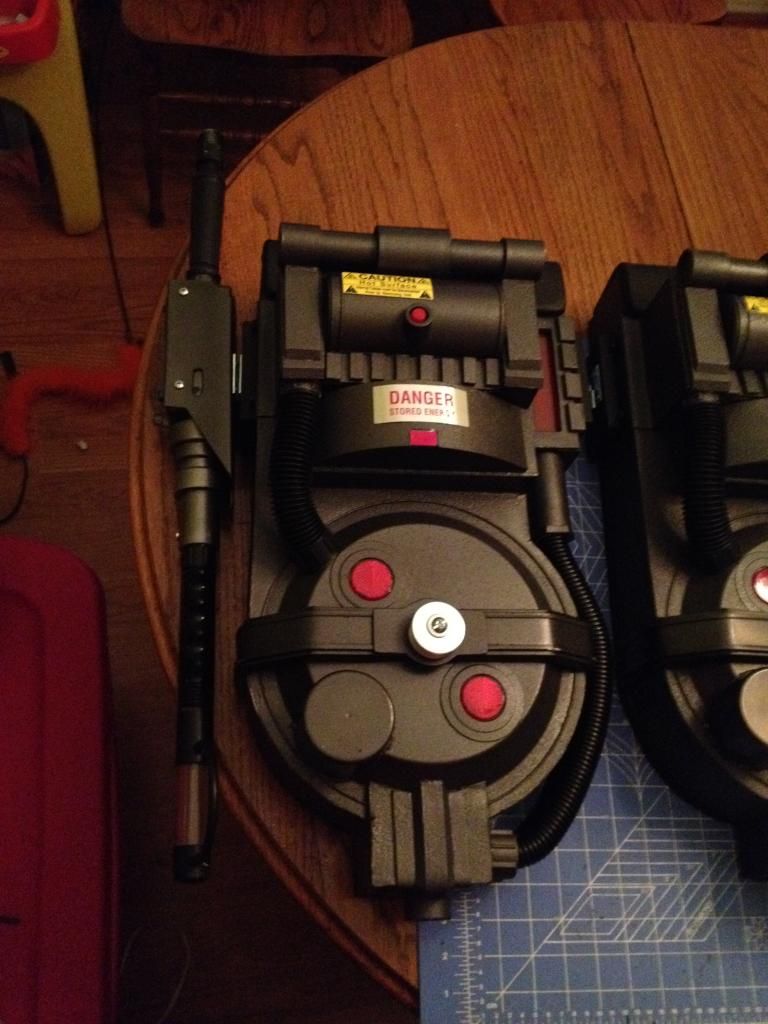
This brings me to my current state – yesterday I added mounting blocks and slide-mounts to the pack and throwers. Mounts are on the left and right, even though the concept art is a left-handed pack. The front of the thrower actually rotates so the pack is truly ambidextrous.
Thanks for checking these out. My next update will probably be the finished packs with lighting. My goal is to have them finished by July 4th.
The design I decided on was based on the concept art proton packs for the Wii version of Ghostbusters: The Video Game. I’ve always loved this design, I see so many people come up with their own concept of a “modern” proton pack, but I think this design satisfies that idea. It’s refined, clean, and has little of the jumbled together industrial look of the originals. I also think being being refined, it has somewhat of a feminine quality, and since these are going on female Ghostbusters, I have some wiggle to room to be different. I know that sounds kind of sexist (“Oh, girls can’t be like the real Ghostbusters?”), but there’s something cute about this design, my wife likes it, my friend’s girl likes it, so that’s good enough for me. Sexist would be asking them to wear short-shorts or a dress instead of a flight-suit.
During the making of these, I used all of the skills I gained from making the first packs, and avoided every mistake I made with them. So far, making these have been a breeze compared to my first. I would make them the same way – foamcore cut with 90-degree angles and held together with hot glue.
My first step was to find a cake pan to use for the cyclotron. I found these pie pans at Dollar Tree. They’re undersized compared to the 9” ones on the standard pack, but I really like the bevel on them. I created some template in Illustrator scaled to the pan, printed them out on card stock, and made a full size template. From top to bottom, they’re about 4 inches shorter than a standard pack, but will be a little taller in the end once things get added on. Working on the templates, a few things had to be changed to work in the real world – proportions and perspective on the concept art just aren’t true to life, and what is in the art doesn’t really work in real life. A good example of this is the lower box just below the cyclotron – built like the art, I wouldn’t have the room for three tubes to insert and still be strong made out of foamcore. On the build, I made the box taller and gave it room for the tubes to fit.
After making the template, I traced on to foamcore, and added some height. For the curved portioned, I used EVA foam (6mm foamies sheets). Foamies were used in a few places for details.
When it came to the details on the control box, I considered scratch building everything. I came across these aluminum canisters at Dollar Tree and they ended up being a perfect fit for my already-built box. I make the top bars out of PVC and nested couplers. At this stage it really looks like a junk pack. Aluminum reducers/washers were also added to the cyclotron at this point. Used foamcore + foamies to finish up the rest of the pack details.
Next I made the base for the bumpers using some Hot Wheels track. Not a new idea, but it works well. These raised lenses were considered but I decided against them to go with a more traditional style flat lense. PVC pipes were used for the injector tubes.
EVA Foam floor tiles were used to make the top “bumper” portion. Sanded down the sides with a sanding screen to give them a curved edge. I also heat-formed some styrene to make the front of the curved section between the cyclotron and control box.
The lower box made, along with various connection points for the hoses.
Finished bodywork on the pack. Center pieces on the cyclotron bumpers were made with styrene.
Time for paint! I covered the EVA Foam with Mod-Podge to prep it. To seal my foamcore, I sprayed down 4 coats of Plasti Dip spray. This waterproofs the foamcore and make the whole thing more durable. After the plasti dip, a coat of Rustoleum Textured, and another thin coat of Plasti Dip. The whole thing looks cast-iron at this point, but I started to get an orange peel effect on a lot of the smoother sections. I think lighter coats of Plasti Dip would have prevented this, but I went ahead with it. The Gun-Metal color used is Rustoleum Metallic. I don’t know the actual color, but it’s the medium-brightness silver.
After painting the packs, I set in the reflectors and painted up the bumpers. Shock mounts were made with washers and loom tubing and bolted on through the bumper to the back side of the pie pan.
Labels that I picked up at Skycraft in Orlando were affixed to the packs at this point. Split loom was added as well.
Taking a break from the packs, I started work on the throwers. My initial idea was to nest multiple PVC tubes and cut down to get the layering effect, but further inspecting the art of the thrower, I think the thrower box is more square with rounded edges. For the tip I’m also deviating from the concept art – I need something more durable so I’m going to use clear acrylic with some PVC fittings. For the base thrower box I used a project box from Radio Shack and screwed on a few PVC couplers with conduit nuts.
For the outer shell, I considered using foamies but they just weren’t going to be durable enough. I decided to try heat-forming some styrene. I hadn’t done it much before, but with these I said I would take my time. I made a template, cut out the styrene, and started work with my heat gun. The end result was a lot better than I was expecting.
Styrene was used to make the details on the top faceplate, and LED holders and holes for switches were cut. A test tube plug was used for the raised LED holder near the plug. PVC pipes and various couplers were used for the rest of the body.
After base shapes on the throwers were made, they received a coat of the same gunmetal Rustoleum, along with some silver to differentiate along the front couple.
Unseen are the motherboards I cut out of MDF. Nothing special, they were just cut from the same base template and mounted to the shell via wood blocks mounted in the shell. Grips were then installed. Rear grips were some I picked up at Skycraft, front grips are retro-style bike grips. The clear portion of the tip are from some clear hollow acrylic I also picked up at Skycraft. The wire and connectors at the tip are Rainbird sprinkler hoses and bits.
For the backpack frames, ALICE frames were desired, but they’ve been going up in price on ebay. Back in 1999 I think I bought 4 for less than $60, now I can’t find one for less than thirty. I decided that I would go ahead and make my own frame out of PVC, and add on ALICE Straps and make an alternative to the kidney pad using an elastic band. Horizontal support will come from the motherboard itself.
This brings me to my current state – yesterday I added mounting blocks and slide-mounts to the pack and throwers. Mounts are on the left and right, even though the concept art is a left-handed pack. The front of the thrower actually rotates so the pack is truly ambidextrous.
Thanks for checking these out. My next update will probably be the finished packs with lighting. My goal is to have them finished by July 4th.
")