Panterona
New Member
Hi guys,
I'm a noob on this forum but I have recently begun my Gamora costume from GOTG and would like to share my progress as I go along with you guys I am hoping to finish it in time for a fotoshoot next week ^_^
I started this project way before proper reference photos could be found, so you can guess how many hours I spent watching trailers and getting screen caps of the outfit from as many angles as possible! I made the top before I saw the movie and I am pretty happy with the way it came out, especially now getting a better look at the details *twirls* Here is where I am so far with everything

SO I took a pair of old battered boots and took off the old heel, the wedge is created from a block of wood with shoe rubber and crepe tot e bottom of it When I took this to a shoe maker for help and advice, they were concerned about the size of the hole and the propensity for it to break under pressure and my weight. So this was the biggest it could be made without putting me at too much risk. Next I need to add on the other details with diff grades of leather to the front.

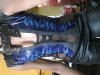
So I went to my local leather shop and found some amazing pieces of leather with an abstract snake skin motif on them and thought they would be perfect for this project. This is me test dying it navy blue to match the top. The texture of this is amazing

These are the front pieces dyed and cut out, so you get a better idea of how the texture moves and works on the chest pieces. I will then attempt to hand paint the most vibrant pattern down the middle so that you have a cool gradient effect. Will do some tests before I paint the finished piece.

SO this is the top at about 90% completion! I created leather ribbing on the sleeeve bit and dyed and painted some netting fabric for the detail work. I am pretty happy with the way this has turned out so far. I just need to add the criss cross ribbon detail to the mesh and the top should be done.
Next steps: The pant, I bought this gorgeous navy blue/purple ribbed leather for that, I then gave it a black dye wash, so that its black ish but has the blue depth in it somewhat. This is for the knees. I am also gonna test out painting the black leather I have before hand to match what I wanna do to the top. For reference here is a nice shot of the leg bit:

Will post more pics and progress as I go along
~ Panterona
I'm a noob on this forum but I have recently begun my Gamora costume from GOTG and would like to share my progress as I go along with you guys
I am hoping to finish it in time for a fotoshoot next week ^_^I started this project way before proper reference photos could be found, so you can guess how many hours I spent watching trailers and getting screen caps of the outfit from as many angles as possible! I made the top before I saw the movie and I am pretty happy with the way it came out, especially now getting a better look at the details *twirls* Here is where I am so far with everything
SO I took a pair of old battered boots and took off the old heel, the wedge is created from a block of wood with shoe rubber and crepe tot e bottom of it
When I took this to a shoe maker for help and advice, they were concerned about the size of the hole and the propensity for it to break under pressure and my weight. So this was the biggest it could be made without putting me at too much risk. Next I need to add on the other details with diff grades of leather to the front.So I went to my local leather shop and found some amazing pieces of leather with an abstract snake skin motif on them and thought they would be perfect for this project. This is me test dying it navy blue to match the top. The texture of this is amazing
These are the front pieces dyed and cut out, so you get a better idea of how the texture moves and works on the chest pieces. I will then attempt to hand paint the most vibrant pattern down the middle so that you have a cool gradient effect. Will do some tests before I paint the finished piece.
SO this is the top at about 90% completion! I created leather ribbing on the sleeeve bit and dyed and painted some netting fabric for the detail work. I am pretty happy with the way this has turned out so far. I just need to add the criss cross ribbon detail to the mesh and the top should be done.
Next steps: The pant, I bought this gorgeous navy blue/purple ribbed leather for that, I then gave it a black dye wash, so that its black ish but has the blue depth in it somewhat. This is for the knees. I am also gonna test out painting the black leather I have before hand to match what I wanna do to the top. For reference here is a nice shot of the leg bit:
Will post more pics and progress as I go along
~ Panterona