You are using an out of date browser. It may not display this or other websites correctly.
You should upgrade or use an alternative browser.
You should upgrade or use an alternative browser.
The "I'm painting a Captain America Shield" thread
- Thread starter GeneralFROSTY
- Start date
I clear any bare metal surface. Clearing the back and the brackets is usually the first thing I do.
Declanuk123
Jr Member
I received my aluminium spun blank shield today...,
probably going to start painting tomorrow as a weekend project... pics to follow
probably going to start painting tomorrow as a weekend project... pics to follow
Rodimus
New Member
Here are a few I've been finishing up for clients. In case anyone missed this, I DO take commissions to paint and assemble your shield.
http://i1215.photobucket.com/albums...merica Shield/20140908_115858_zpsyntgpfur.jpg
http://i1215.photobucket.com/albums...merica Shield/20140908_144436_zpsrw4oyxjd.jpg
http://i1215.photobucket.com/albums...merica Shield/20140908_115653_zpsl3fdgtjz.jpg
http://i1215.photobucket.com/albums...merica Shield/20140908_144345_zpspw7jawqi.jpg
Frosty, that is beautiful. The devices you have made are awesome and I like the Boba Fett helmet in the background.
I have a question for you and anyone who can help. Im being held up by the star. I cant bend it well enough to get it flush with the shield. Any tips for getting it to f\lay better?
Here are a few I've been finishing up for clients. In case anyone missed this, I DO take commissions to paint and assemble your shield.
http://i1215.photobucket.com/albums...merica Shield/20140908_115858_zpsyntgpfur.jpg
http://i1215.photobucket.com/albums...merica Shield/20140908_144436_zpsrw4oyxjd.jpg
http://i1215.photobucket.com/albums...merica Shield/20140908_115653_zpsl3fdgtjz.jpg
http://i1215.photobucket.com/albums...merica Shield/20140908_144345_zpspw7jawqi.jpg
Oooooh…could one of those be mine? :thumbsup
Can't wait…they look great! :love
Thanks for the "behind the scenes" pics!
Yes, one of those is yours.
As for bending the star, we employ a process that involves pre forming it over a mold in the vacuum press to give it a uniform curve.
As for bending the star, we employ a process that involves pre forming it over a mold in the vacuum press to give it a uniform curve.
Oooooh…could one of those be mine? :thumbsup
Can't wait…they look great! :love
Thanks for the "behind the scenes" pics!
Glad you went with Jimmy's service, Brad! Best in the biz
saberlover
Well-Known Member
Again, can anyone give advice on forming the star?
Lay it on a bowling ball, and give it light taps with a rubber mallet to curve it. Then you can flip a large salad bowl or pot upside down to hold the points down on the shield when you epoch it in place. Worked well for mine.
Lay it on a bowling ball, and give it light taps with a rubber mallet to curve it. Then you can flip a large salad bowl or pot upside down to hold the points down on the shield when you epoch it in place. Worked well for mine.
Sorry, I think this is kinda overkill. All you really need to do is gently (with your hands) bend and curve each of the 5 points down slightly until it's close to the curve of the shield. The glue dies the rest. It really doesn't take any pounding to do this. In all the shields I have made this is all that was necessary.
Last edited:
Dozer3677
Well-Known Member
Again, can anyone give advice on forming the star?
Short of having a "Star Press Machine" like Frosty?
So I carefully formed it by hand. Take time, use gloves. Once I had it formed to my liking, I lay it on the area it will cover, and place a heavy bag of sand or soil (I prefer sand) over the top of it. Leave it as such for a few days, and even consider placing more weight on top of the sand, like phone books, weights, etc. The weight of the sand will help form it to the curvature of the shield. Once you are satisfied with the star, take it off and apply your adhesive.
Also, work small. When using your hands, don't try to curve the entire thing at once. Work on one small section on one arm of the star at a time. Once you have your first bend set, work on the next arm. Do it in small steps, because if you try to do too much at once, you may mess up the work you just accomplished because the metal is very fickle and bending it one way will also make it bend in other, unexpected ways.
Take your time. Take your time. And then, take some more. It will turn out great.
Sorry, I think this is kinda overkill. All you really need to do is gently (with your hands) bend and curve each of the 5 points down slightly until it's close to the curve of the shield. The glue dies the rest. It really doesn't take any pounding to do this. In all the shields I have made this is all that was necessary.
I second this. Pounding it sounds like it would leave too much potential to over-curve it, and they're much harder to fix if you do too much than they are to make small corrections.
lovelyandy
Well-Known Member
The fact that there's a 41 page thread on just painting should have been a good indication of just how hard this was going to be.
Read every post. Got all the necessary stuff and darn it if I'm not having the same troubles anyway.
got better at masking as i went along. by the end im confident im a shield masking expert.
Only a few bits gone wrong on the edges. i'll scrape any excess off with a toothpic and and missing bits of red im going to clear red acrylic it and it'll hopefull match.
there's one section i had to re-mask on the fly and i let the tape touch the 10 mins dry red and it took a little chunk off. so i sprayed that area a few times to cover it up now that whole area looks a lot darker and more glossy. ARGH!
not wanting to start again (yet) as i'll have to order more paint, but i can see why people start over 4 or 5 times.
Was wanting to have my 1st shield as a clean one but i think battle damage will hide some of the crimes.
Thiink i'll get another one to put my Valor star and brackets on, they deserve only the best and a 1st attempt shield is not good enough.
actual practice trumps reading 41 pages three times any day of the week.
For anyone else thinking about doing this but thinking it looks difficult, just do it. it is difficult, but the only way you'll get any good at doing a cap shield is by doing a cap shield.
DFanatic
Active Member
The fact that there's a 41 page thread on just painting should have been a good indication of just how hard this was going to be.
Read every post. Got all the necessary stuff and darn it if I'm not having the same troubles anyway.
got better at masking as i went along. by the end im confident im a shield masking expert.
Only a few bits gone wrong on the edges. i'll scrape any excess off with a toothpic and and missing bits of red im going to clear red acrylic it and it'll hopefull match.
there's one section i had to re-mask on the fly and i let the tape touch the 10 mins dry red and it took a little chunk off. so i sprayed that area a few times to cover it up now that whole area looks a lot darker and more glossy. ARGH!
not wanting to start again (yet) as i'll have to order more paint, but i can see why people start over 4 or 5 times.
Was wanting to have my 1st shield as a clean one but i think battle damage will hide some of the crimes.
Thiink i'll get another one to put my Valor star and brackets on, they deserve only the best and a 1st attempt shield is not good enough.
actual practice trumps reading 41 pages three times any day of the week.
For anyone else thinking about doing this but thinking it looks difficult, just do it. it is difficult, but the only way you'll get any good at doing a cap shield is by doing a cap shield.
Hey man, you should post some pictures of yours. Curious to see what it looks like. I guess you aren't getting the eFx one, huh.
lovelyandy
Well-Known Member
Hey man, you should post some pictures of yours. Curious to see what it looks like. I guess you aren't getting the eFx one, huh.
Haha, no not getting the EFX one.
Had to laugh when they sent out an email about taking the time to quality check their shields and had a typo in the paragraph.
Not sure I ever posted about my Thor helmet but I did get a replacement for the cracked one, it was chromed but didn’t have the second pass of shading on it that the first one did so it looks a little flat. Decided to keep it rather than not have one but I’m not 100% happy with it.
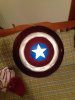
Here’s my shield progress, got it from a UK place called Northeast Metal Spinners.
Cleaned with Acetone
Masked with green Frog tape
Red VHT Anodized red paint
Tidied up all the imperfections around the grooves with cocktail sticks.
Spilled a dot of acetone on the red and burned a blop of paint off.
Decided ‘That’s it! I’ll do it battle damaged then fine!’
Damaged a few more sections. Left it for a day.
Tonight I ‘ll mask off with Yellow (delicate) frog tape.
Spray the centre with VHT Anodized blue.
Going to use the star that came with it (I’ve clumsily filed some details on it but it’s pretty ugly. Weathering will hide some of my cackhandedness hopefully.
I'm painting a sled that I striped and the blue duplicolor looks great but the red turned like a dark red which works for me I guess since I want to make it look like it did when he first fought Bucky as the winter soldier in the streets. Does anyone know why it would turn real dark?
Attachments
lovelyandy
Well-Known Member
the paints too thick? the colour of primer you used? could be any number of things. The prefered method seems to be 2x light coats then one thicker coat.
The point of the Duplicolor paint is its translucency, so you can see the metal underneath. Painting over with primer renders that useless
Similar threads
- Replies
- 10
- Views
- 1,305
- Replies
- 4
- Views
- 1,390
- Replies
- 1
- Views
- 517
- Replies
- 10
- Views
- 2,019
- Replies
- 6
- Views
- 1,473