Bonehead Helmet - WIP

Tacheny

New Member
Although this is my first post on the Bonehead Machine56 helmet I'm making, it's been an already long(ish) road.
BONEHEAD-TEST-SUBJECT-56-04.jpg

Being new to pepakura, I'm wasn't too savvy regarding scale, but I've learned quickly. Now on my 5th attempt, I'm finally successful making my pepakura base.
The previous 4 were had sizing and proportion issues. I don't intend to make an exact replica, but I'd like it to be pretty close. I'm going to mold the check and mouth bits out of milliput but I'm also open to suggestions of products I'm ignorant to.

The bottom is too small to put my head through, so I'll have to create a hinge system, probably in the back, so I can get my head in and out. Not sure how long this will take, but I have nothing but time.

Ideas, opinions, critique, words of wisdom, etc. are very welcome. :)

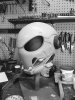
Here's my progress so far.

1lv5U5N.jpg UfqGINW.jpg WQnw5P9.jpg Qb781cL.jpg tYYNcPK.jpg
After 1st coat of resin T7pXYjK.jpg
Another resin shot, with enough left over for another project ;) 3722suH.jpg

-Sam
 
That's cool kialna, I'd love to see it.


After looking at mine and some progress pics of the actual helmet, the pep file I used is a lot closer to the action figure helmet. I'm not going to go for an exact replica, but the actual helmet is more visual appealing. I'll have to figure out what too do about the differences in the raised parts vs the lower parts.

You can see here how the eyes and cheeks are indented, but not the helmet around the ears. The raised part was added after and is just really a molding.
1398b3838196877597708a3e3c5ab337.jpg


My initial thought is to see if I can make a smooth transition with bondo, but, worry about the excess weight in the end. I also worry about losing the rounded look.

j0koN1P.jpg

I've also thought about when I fiberglass the inside, to not fill those gaps with the fiberglass, then trim the outer layer and use the fiberglass as my platform for bondo. But I'm not sure how possible it'll be to keep the fiberglass from naturally filling it for me. Maybe I could lay something down to keep it from sinking in.

U5sFCWH.jpg

The outside of the eyebrow is also pretty substantial. I imagine just 'shaving' it smaller, but that sounds too easy, but also very difficult. I could also try to keep the fiberglass from sinking into the eyebrow gap inside the helmet so that I could take away the excess then build out from there, but I have such little experience with fiberglass, I don't now how possible this is. Would it be better to just put multiple layers of the fiberglass that I could sand through to bring the bulk down?

mOJUEeP.jpg 0DWhPPb.jpg

I've thought of casting the helmet once I'm done, so weight and a lot bondo may not be much of an issue. I don't want to make it any wider than it already is, which is why I feel like working from the outside in is my best option. Then again, when I hold it and look at it as it is now, I really like it. I'm struggling with my degree of replica. It wouldn't ever be 100%, since I don't know the actual dimensions, but there are aspects I really like I think I could recreate, but I have to choose now how I'm going to proceed. Keep it as it is and work it into my own iteration, or manipulate it what I've outlined and then begin working from there. Idk, I'll sleep on it and see what happens when I start fiberglassing.

I'd appreciate any comments or suggestions. My inexperience keeps me timid, but I also know I could fix anything I wreck.
-Sam


9737065cff8611e2bc3b22000ae80efa_7.jpg


1398b3838196877597708a3e3c5ab337.jpg


j0koN1P.jpg


mOJUEeP.jpg


0DWhPPb.jpg


U5sFCWH.jpg
 
Last edited by a moderator:
I made some progress today.

I began by adding some Bondo to the inside of the helmet at both brows and around the whole 'shelf.' I figure It will give me the ability to sand beyond the paper into bondo while not going past my fiberglass.

LbpwSOC.jpg 5JTifu1.jpg 5sCwqn6.jpg

Since I had the bondo out, I decide to start building the nose up a bit too. The pep file is pretty flat and I want it to have more of the shape of the actual helmet. It's a little high and the shape isn't quite right, but at least it's a start. I gave it a quick sand to get an idea of how it will turn out and I'm pretty happy with it. I also filled in the three mouth slits. They were all wrong and this will give me a better place to continue from. I also need to build up the chin and the jaw, but Hobby Lobby is closed on Sunday's so I'll go later in the week, pick up some Milliput.

w7RRKVB.jpg489INJ7.jpg

Here's the fiberglassed product. There are lots of little nooks and cranny's that made it a bit difficult to fill properly, so I have a decent amount of air bubbles. I don't really care, it's very strong and will never act as a safety type helmet. It also makes me lean further towards making a mold in the end. Time will tell...

rN7Ftoe.jpg

I'll be cleaning up the excess fiberglass and probably getting a coat of primer down to give me a clean slate to start with. I still wonder what I'll do about the ears and circles on top of the helmet. They're not quite symmetrical and I can't imagine I'll do a stellar job with any fillers. I'll probably create an implant of time sort, PVC maybe.

-Sam
 
Progress! I've been going through the bondo. Making this helmet round and getting rid of low spots has been my main concern. I want the bulk of it to be worked out and looking how I think it looks good. I'll then work the details, jaw, cheeks, mouth, ears, top circles.

Here it is painted black to get more of an even idea of what I'm working with.
wD5vSz1.jpg VR1x90L.jpg DMI2NrA.jpg
Looking decent. I'm getting the roundness i'm looking for from the eyes back. In these pics I still need to add more near the nape of the helmet.

Here is my work from tonight after loading up the bondo in low spots. A dremel is a life saver when it comes to built up bondo, then an palm sander to get everything else smoothed out. It would be hard to want to keep going by using hand strength alone. Here is where I'm at compared to an actual helmet/where I'm going. They're starting to look alike.

Starting to get the rounded profile. The eye brows on mine need to be straightened out a little. The circles on top will be filled then placed better, they're too close. The cheeks need some build up, but I'm not quite there yet.
W7g0OKM.jpg 332_3270.JPG

My furrow is getting better looking. I've filled in more of the cheeks and the mouth area, going to work on making it a little wider. The jaw and chin will be made out of Milliput, not sure how I'm going to accomplish that, but I will. Mine also has a cone head look to it, that's got to go. I need to roll the brows over a bit more too, they are turned up too much, but still, not really there yet, just sort of touching on some of these areas until I like the main profile of the helmet.
EB7xAOu.jpg 332_3271.JPG

Our angles are a bit different, but I can see the head is a little bulbous going towards the brows. I'll work on getting that taper more correct. My brows/upper eyes also need to be rounded up, they are a little to flat. I think my choice to widen the mouth area and fill in the cheeks is going to result in a more accurate look. The nose to the mouth needs to be worked on, mine is too concave, I need more of a convex look. The nose looks about where it needs to be tho. Also need to work on the gap between the eyes and ears. May need to build mine up more.
ZG4vn0f.jpg 332_3272.JPG

I'm really liking my overall shape. Getting a nice roundness. Once I fill in those holes I think I can start getting better placements drawn out. Not sure how I'll accomplish this, but I'll think of something. I also feel like the ears may be just a little low, but not sure if I care enough to move them 1/2 an inch, and then again, they could be where they should be.
GJfvrNc.jpg p9vq5DD.jpg

Til next time.

-Sam
 
She's starting to look like something!

Got a decent amount of work done these last few days.

Made some progress on the mouth, chin and jaw. She's starting to really gain wight with all of the bondo work. The shape of the skull is going well, any time I have extra bondo while I wait for something to dry, I just add it to the skull. It allows me to work on two place of the helmet at once. The white paint I used here is crap too, won't do that again.

z2KtwmY.jpg v9PiAqV.jpg hUaB96G.jpg

After some sanding and a shaping of the jaw, I wanted to get an idea of where I was proportion wise. It's really getting there! I was worried my face was a bit narrow, but realized I needed some build up in the inner eyes. Nothing is shaped yet, but everything is evolving as I go.

gKk9LsU.jpg

More bondo and sanding, I realized my mouth needed to be flatter and my eyes were too beveled. The cheeks will be taped into the nose to make more of a triangular shape, not so boxy. I keep adding bondo to the cheeks, don't want too much, but enough that when I start to remove material, it I have enough to create the pockets I'll need. The bottom of the eyes are looking better too. I'm waiting to shape them til more near the end so I can create the shelf they need once and done.

xJTceZF.jpg B4euiXq.jpg YsValpN.jpg

Once I feel the chin and jaw are where I want, I'll start to make the pieces from Milliput that protrude.

-Sam
 
More progress and surgery. Got rid of the ears, they never looked right and would always be a hindrance. I'll make some out of some type of ball and probably PVC tubing. They'll look better in the end. I also removed the part of the jaw that went up towards the ears. It'll make sculpting another easier and allows me to get really round with the rest of the dome. Every step closer continues to look better and better!

batWJLV.jpg tXk9TXs.jpg 6cPw9SD.jpg

I think I'm getting to a point where I'll stop using so much bondo and get to start doing more detail work. I still need to reinforce the back of the cheeks with bondo so when I start cutting into it, I don't create holes. The chin is too big, the jaw's shelf needs to be a bit bigger and my eyes aren't quite right, but close. I printed some 'templates' to help. My symmetry is coming together nicely, just minor tweaks as time goes by.

-Sam
 
Here she is currently. The mouth/face/nose area has been hard to replicate, but I feel like I'm really close. I think the nose to the chin area needs to be a little flatter and I need to add some material around the cheek bone area. Might wait till I start to cut out the cheek and mouth area. Over all I'm stoked on my progress and symmetry. I have new ears made and will start to make the protruding parts of the jaw and mouth this weekend. Close, but still tons of work to do.

CWV5ItB.jpg

-Sam
 
I've been listening to a lot of Daft Punk lately, especially while working on this helmet, hopefully channeling some of their helmet vibes!

Here she is, still wet, looking pretty awesome. I'm super happy with the nose, which I brought down half an inch yesterday and I also added the cheek bone seam earlier this week. Cutting straight lines is hard, but they look pretty decent. I keep telling myself I'll see more imperfections than anyone else. I'm also taking some artistic liberties and changing a few subtle things, but trying to keep it true to the OG. I'm also debating heavily about wether or not I want to put the small circles on the top of the skull. She's so round and symmetrical, I don't want to mess with that. We'll see...

I'm also finding it difficult to make the rounded part of the skull totally smooth, small ripples that can be seen in the 3rd pic are difficult to get rid of. I'm not totally against them tho, sort of give it an actual skull feel, i.e. BoneHead...

I've got the inserts for the cheeks and the half rounds above them shaped and primed. They'll need some Bondo/spot putty and sanding to get them smooth, but look great overall. The ears are done as well, used a wiffleball and RedBull can, I love how they turned out. They also need some detail work, but the that's easy after conceptualizing the 'how.'

I'm going to try to get the jaw pieces done this weekend. It's more difficult than I thought it was going to be to shape the Milliput, but I'm getting better at it and will make it look good. I'm also debating about the thin moulding that outlines around the head. Might wait till I make my mould and have another to work with to get more nuts with detail. Same goes for the circles on top. Might be for helmet two.


ITTpaTg.jpg vEbKzw0.jpg QoORdE7.jpg
 
I was hoping to leave off all of the accessory pieces so painting could be a little simpler, but there is no way of doing the jaw pieces without the gaps if I were to add them later. I guess I "could" make it happen, but that would be more work than taping, so I bondo'd them on and they look pretty great. Got my ears on too, still have to put the insert into the ear, which will be a little different than the actual, but I'm beyond 100% accurate.

oIlbMjg.jpg R3Xna4e.jpg

I'm getting super close, but have some minor details to keep working on, specifically being the jaw pieces. I also need to try to smooth out the mouth lines, but it's difficult to make look good and time consuming. I figure with black pain in them, it'll be less noticeable, we'll see.

qtAyNdi.jpg vtxjDlw.jpg

I also picked up a plastic picture frame sheet and tint for the lenses. Close to the end!
 

Attachments

  • sDbkvUn.jpg
    sDbkvUn.jpg
    2.2 MB · Views: 213
They say patience is a virtue and mine have run out. As the end comes closer I seem to have less patience for the work I'm doing, especially when my spray painting become such a pain.

I finally got the black down, but it took multiple tries. When clear frosts it's maddening. It turned out great tho and I really like the white. It made me think 'Police,' sitting all black and white, but it really looked like a skull. Ready for the RED
fT5sEW7.jpg Qsqlzvz.jpg 80NFvF0.jpg

Here's the final coat of red, the first time. It turned out really well and I was super pumped.
YmUfZct.jpg

The next day I tried to clear it. It didn't work out at all. It ran and wrinkled. I was pissed, but was able to remove most of the red and got back to a decent base to work with.
pDFSTAn.jpg


Here she is 90% done. Need lenses, paint the jaw pieces white, add the black to the cheek pieces, mouth lines, teeth holes, and I'd like to add some white to the indents. She turned out as well as it could have considering the issues leading to this point. In a week or so I'll try to clean up some of the edges, but for now I'm going to be happy with my progress and slow down a bit.
QOUk04T.jpg DMEhyor.jpg 1ePDs2S.jpg
 
Small update. Got my lenses in, used an Ikea poster lens and 5% window tint. Miliput on the inside to keep it in place. Paint more white and continue to with model paint, no more spray paint, I'll just mess it up. I'll continue with small details, but she's pretty much done. Now I wait for the funds to mold it and make one that I'll cut so it'll fit on my head.

UNF04E0.jpg KwRTrup.jpgPE5SOsR.jpg
 
It's been a while since I've updated, but there's not too much to update. Waiting on the funds to make my wearable mold, but for now, here she is as she sits now. I painted in the cheek diamond and the 3 dots on the jaw muscle spot. Painting is possibly the most difficult thing about this whole project, so it doesn't look great, but it still looks badass.

D5K3ZVp.jpg SLHBOjM.jpg
 
This thread is more than 7 years old.

Your message may be considered spam for the following reasons:

  1. This thread hasn't been active in some time. A new post in this thread might not contribute constructively to this discussion after so long.
If you wish to reply despite these issues, check the box below before replying.
Be aware that malicious compliance may result in more severe penalties.
Back
Top