Greedo Blaster Discussion

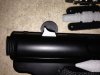
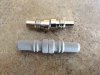
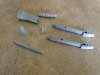
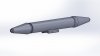
Revised the barrel so that it is tapered up to the point where the Tomtit piece sits at which point it is straight & will fit inside & go to the depth of the recess. Opposite that I came up with a "witch hat" spike, that will fit into the recess opposite the barrel. This is made to slide inside the Tomtit piece. For the barrel & the spike there may be some fitting, but it should be very close., but there won't have to be any cutting or modifying the Tomtit piece.

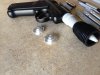
The barrel has a .500" hole with a key way that will mate up to the preferred airsoft pistol that everyone seems to be using.

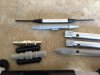
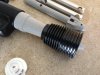
Here are some renders of how the barrel assembly looks.

That looks fantastic. I want that!

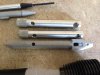
btw: you seemed hesitant about your rear sight piece. It looks great to me.
 
Thanks MJF. I am pretty happy with the barrel now & how everything will fit together. I am still not sure on the consensus about the cone inside the barrel but it looks pretty close to the reference photos & I used dimensions from the Mitchell pieces that were used on Boba Fett's Knee darts/toe spikes. I think this would be very secure as well.

Not that I was unsure on the rear sight, which should fit in the airsoft dovetail. It had just been awhile since I worked on this & wanted to make sure I was still good with it.

I feel pretty good with the barrel set up now & have put it up for sale in my shop along with the rear sight.

If anyone thinks there needs to be some changes let me know.
 
Thanks MJF. I am pretty happy with the barrel now & how everything will fit together. I am still not sure on the consensus about the cone inside the barrel but it looks pretty close to the reference photos & I used dimensions from the Mitchell pieces that were used on Boba Fett's Knee darts/toe spikes. I think this would be very secure as well.

FYI, not sure if you know this from the discussion, although the cone is the type of piece used for Fett, it is not the same exact style according to Lone Pigeon. Discussion and image can be found here: http://www.therpf.com/showthread.php?t=201887&page=5&p=3393847&viewfull=1#post3393847

I'm not showing this in an attempt for you to change anything, just thought you might like to know.

Heading to your shop now.
 
I only used the Boba Fett pieces as reference cause if I was to make it like the actual piece the cone is twice the length & this would have required drilling a hole in the Tomtit piece. I could easily make it an option if someone was wanting that though. The only real difference that I can tell is the cone length is around 34 mm which I made the cone length 17 mm. I made the diameter of this 12 mm (7/16") which is pretty close to what I came up with from the reference photo, it may actually be 12.7 (.500") but hard tell. With this it will stick out the end of the gun by 6.35 mm (.250").

I went with more of what I thought looked good without any mods to the Tomtit piece.
 
I got no problem with that.

i had bought some of those replica aluminum rods for the side. But I think I might just go with your combo piece. I worry about all those pieces staying glued so the 3-in-1 option seems like a good idea.

A question about your scope piece. Does it have a hole for a wire/rod to go through? Also could it be made with a base built on the bottom to help afix it to the main body. It seems like many are using an altered piece of t-track.as the base.
 
i had bought some of those replica aluminum rods for the side. But I think I might just go with your combo piece. I worry about all those pieces staying glued so the 3-in-1 option seems like a good idea.

That was a reason I decided to do that option. I am on that always worries about pieces coming unglued.

A question about your scope piece. Does it have a hole for a wire/rod to go through? Also could it be made with a base built on the bottom to help afix it to the main body. It seems like many are using an altered piece of t-track.as the base.

I made this piece hollow so that a wire could be put through it. This piece will probable need to be cleaned out & open the hole up some for a wire to go through.

As for the base for it I could add a platform for it to sit. I will look into that & see what I can come up with.

I wondered about the pieces that go on ejector port as well. Maybe a similar type mount.
 
I got no problem with that.

i had bought some of those replica aluminum rods for the side. But I think I might just go with your combo piece. I worry about all those pieces staying glued so the 3-in-1 option seems like a good idea.

A question about your scope piece. Does it have a hole for a wire/rod to go through? Also could it be made with a base built on the bottom to help afix it to the main body. It seems like many are using an altered piece of t-track.as the base.
Lemme know if you wanna get rid of the aluminum stylus brush rods.

Also, toolguy, you're doing a great job with all this, I'm loving it!

Wish we could figure out what's on the side opposite the ejection port.
 
MJF asked if I could add some kind of mount to the sight so I revised the sight & added a mount area that would help attaching it to the top of the gun. This will raise it off the top of the gun .5 mm (.020") the base is 6 mm X 10 mm. It has an arc that will sit on a 12.7 mm diameter. The thickest section of the mount is 1.71 mm (.067"). This is what I came up with. Thoughts?
 

Attachments

  • Sight_With_Mount.JPG
    Sight_With_Mount.JPG
    42.4 KB · Views: 116
I like it. It's a simple thing I know but it really helps. I do not know anything about the real mount or its size. Ideally it should be high enough so that the rods align and set into the groove of the notch of the rear sight. That looks right to me.

My build it going to look so much better than it would have thanks to you. :)
 
Great, I have a KJW Ruger MKI airsoft on order & should have it next week sometime. Will be ordering what I need as well for my build.
 
Ok, I have a paint question I want to bounce off the group.

When I construct this pistol, i want it to be weathered. One thing I know i will have to do is paint the airlift as well since i need to paint the printed parts as I want them to match as if they were part of the original Ruger MK1.

Here is the dilemma: What is the best way to approach this?

1. Assume the nature of the original parts. Those that are black plastic Tomtit parts most likely were left natural and showed no weathering. Other parts like the turntable parts probably had been painted therefore the paint wore and metal exposed. Do I replicate the the non-wear on the Tomtit parts and probably the grip?

or

2. Do I approach this as an idealized weapon. The entire thing painted the same color and weather (including faux) added to all parts including the tomtit parts (with the exception of the grips) I plan to leave those unpainted though I may try to add a dirt wash for a used look.

or

3. Suggestions
 
I think option 1 would be more accurate to how the original prop was done. I would think that there was weathering added to the Tomtit pieces to make them not look so clean.

But my preference would be towards option 2 for a more idealized look, but would be worn like it was pulled from the holster numerous times.
 
Just ordered a WWII M9 FlashHider. :) Next is to find the elusive Compac Scope.

This topic is about the blaster that Greedo used, not the blaster that killed Greedo.

I think option 1 would be more accurate to how the original prop was done. I would think that there was weathering added to the Tomtit pieces to make them not look so clean.

But my preference would be towards option 2 for a more idealized look, but would be worn like it was pulled from the holster numerous times.

And that's my problem. Do I go prop accurate or idealized? I don't see any evidence of faux bare metal on this prop or many other props. I also think a lot of the weathering/wear on props occurred accidentally after filming.

I can also consider the fact that the Star Wars universe utilizes composite materials and that some parts on a blaster may not be made of metal.
 
Here are images of the parts. I'll talk about them in detail later.
 

Attachments

  • IMG_2124.JPG
    IMG_2124.JPG
    2.4 MB · Views: 153
  • IMG_2122.JPG
    IMG_2122.JPG
    1.5 MB · Views: 150
  • IMG_2121.JPG
    IMG_2121.JPG
    1.5 MB · Views: 154
  • IMG_2120.JPG
    IMG_2120.JPG
    1.7 MB · Views: 156
  • IMG_2119.JPG
    IMG_2119.JPG
    2.3 MB · Views: 179
  • IMG_2118.JPG
    IMG_2118.JPG
    1.5 MB · Views: 147
  • IMG_2117.JPG
    IMG_2117.JPG
    1.7 MB · Views: 144
  • IMG_2116.JPG
    IMG_2116.JPG
    2.7 MB · Views: 152
  • IMG_2123.JPG
    IMG_2123.JPG
    1.5 MB · Views: 135

Your message may be considered spam for the following reasons:

If you wish to reply despite these issues, check the box below before replying.
Be aware that malicious compliance may result in more severe penalties.
Back
Top