You are using an out of date browser. It may not display this or other websites correctly.
You should upgrade or use an alternative browser.
You should upgrade or use an alternative browser.
Phaser 1 Kit Buildup plus MM P2 Restoration
- Thread starter asalaw
- Start date
GSS
Active Member
Thanks for the tipsYou could try using a wooden dowel sanded down to the proper diameter as the wood would be just abrasive enough to polish. Use a low speed drill or Dremel tool and possibly apply some sort of a polishing compound if the wood itself isn't doing the job.
") Its little things like this or anything laying around the house that can be used to work.
Its little things like this or anything laying around the house that can be used to work.I tried asalaw's tooth paste suggestion and it seemed to work a bit. The inner surface that needs polishing isn't all that bad to not try. Yes like he said its best to start with a good drill setup from the start and I do have a few extra tips. I do need to "Take My Time" and get off my "butt" and get the right stuff thats right across the room! :facepalm
quarryman
Well-Known Member
Another trick to drilling acrylic on the lathe besides using lubricant and going very slow, is to clear the chips very very often. Only crank the tailstock in a little at a time...1/8" or less, and back all the way out and clear the chips. Maybe more than 10 times per emitter.
asalaw
Sr Member
Yep! I pull out and clear the chips quite often, definitely more than 10 times, and I never go in more than a couple of millimeters at a time. It's like crawling, and that back hole can take up to 30 minutes. Tomorrow I'm laying in some polycarbonate, but when I get back to it, I'm going to try acrylic one last time with water and soap as a coolant, and pull out and clear even more. If that doesn't do it, I'm taking Adam's advice and abandoning acrylic altogether for things like this, where keeping everything very cool is really tough.Another trick to drilling acrylic on the lathe besides using lubricant and going very slow, is to clear the chips very very often. Only crank the tailstock in a little at a time...1/8" or less, and back all the way out and clear the chips. Maybe more than 10 times per emitter.
asalaw
Sr Member
Breaking news! Also breaking butt! Cuz my gig just got extended another two weeks as of next Monday. So that's gonna cramp things a bit. OTOH, plenty of $$ for another month at the shop.
Also, no work this weekend, because the firm is doing some kinda funky transition thing for the new phase that starts next week.
So that means this weekend I'm either going to take another whack at the emitter, or start on the nozzle, subject to my mood. Yay!
In other news, I'm gonna have to stick to acrylic for the time being. Can't find optically clear round polycarbonate rod in non-industrial-crapload quantities (hint: if the web site has no shopping cart but says "call for a quote" instead, run). So if I can't get proper cooling on the acrylic no matter what I try, then I'm gonna have to go medieval. I'll have to get some optically clear sheet, cut off a piece to make a square rod, and turn that down using the four-jaw chuck. Not as bad as it sounds, but not my first choice.

Maybe a new supplier...
Also, no work this weekend, because the firm is doing some kinda funky transition thing for the new phase that starts next week.
So that means this weekend I'm either going to take another whack at the emitter, or start on the nozzle, subject to my mood. Yay!
In other news, I'm gonna have to stick to acrylic for the time being. Can't find optically clear round polycarbonate rod in non-industrial-crapload quantities (hint: if the web site has no shopping cart but says "call for a quote" instead, run). So if I can't get proper cooling on the acrylic no matter what I try, then I'm gonna have to go medieval. I'll have to get some optically clear sheet, cut off a piece to make a square rod, and turn that down using the four-jaw chuck. Not as bad as it sounds, but not my first choice.
Maybe a new supplier...
robn1
Master Member
Have you tried ebay? I usually find small sizes/quantities there, from folks selling off their scraps. Prices are usually good but some of them try to make a killing on shipping.
I've been rethinking my approach with acrylic tube, I could shape it OK if I go slow, the only problem I had was it wasn't centered. I figure if I epoxy a piece of 1/8in brass into the tube I can put that into the drill chuck, and then it should rotate on center. I'm gonna give this a try when I have time.
I've been rethinking my approach with acrylic tube, I could shape it OK if I go slow, the only problem I had was it wasn't centered. I figure if I epoxy a piece of 1/8in brass into the tube I can put that into the drill chuck, and then it should rotate on center. I'm gonna give this a try when I have time.
asalaw
Sr Member
Work was delayed today, with a note that we'd start tomorrow, so I decided to grab the wife and go down to Harbor Freight. After I grabbed her, I invited her to come along. (Yeah. Tell me you didn't see that one coming.)
I totally get why women take forever in shoe stores. Harbor Freight is exactly like that, except there's no shoes. Or women. So just barefoot guys. Barefoot guys are pretty hot, though.
Anyway, I scored a set of diamond grinder bits for my Dremel for $18 that I'm pretty sure I can make a few side dials with -- at least to get me through this first hero and midgrade build, till I get around to learning V-Carve Pro and machine them on the Tormach. For that, I'd probably go with a small bar of aluminum and straight-up carve them out. Below is a video showing how a guy made titanium spacers for his knives that way.
And then today, I got an email saying work is delayed again till Wednesday, so we can all go out and vote (a likely story). So I'll post pics of the stuff I got today, and I think I'll finally get around to correcting those P2 blueprints for Blender and get them posted.
Before I post the video, though, I thought I'd do a little PSA and let everyone know about a critical shortage we face:

We need more. Please give generously.
And now, here's your moment of Tormach titanium zen:
(Yeah. Tell me you didn't see that one coming.) I totally get why women take forever in shoe stores. Harbor Freight is exactly like that, except there's no shoes. Or women. So just barefoot guys. Barefoot guys are pretty hot, though.
Anyway, I scored a set of diamond grinder bits for my Dremel for $18 that I'm pretty sure I can make a few side dials with -- at least to get me through this first hero and midgrade build, till I get around to learning V-Carve Pro and machine them on the Tormach. For that, I'd probably go with a small bar of aluminum and straight-up carve them out. Below is a video showing how a guy made titanium spacers for his knives that way.
And then today, I got an email saying work is delayed again till Wednesday, so we can all go out and vote (a likely story). So I'll post pics of the stuff I got today, and I think I'll finally get around to correcting those P2 blueprints for Blender and get them posted.
Before I post the video, though, I thought I'd do a little PSA and let everyone know about a critical shortage we face:
We need more. Please give generously.
And now, here's your moment of Tormach titanium zen:
Last edited by a moderator:
asalaw
Sr Member
Quick update -- the job is going past the Thanksgiving holiday, but not sure how far. I let my membership lapse so I'm not paying for days and weeks when I can't get to the shop, but I'll pick it up again after the gig ends (we're getting lots of OT now!).
I've had enough of a break from the emitter, so I'll probably take one more crack at that before I get cracking on the nozzle -- we'll see.
I've had enough of a break from the emitter, so I'll probably take one more crack at that before I get cracking on the nozzle -- we'll see.
GSS
Active Member
This is kinda cool, as I found some wooden sticked Qtips for the purpose to fit in the emitter hole and tried leaving a bit of cotton on it and actually helped polish.You could try using a wooden dowel sanded down to the proper diameter as the wood would be just abrasive enough to polish. Use a low speed drill or Dremel tool and possibly apply some sort of a polishing compound if the wood itself isn't doing the job.
Now i'm stuck to leave well enough alone as it not bad or to try polishing up some more:facepalm
asalaw
Sr Member
Not to toot my own horn, but if you go back through the thread, it's kind of a monument to how bad it can get. I like to think of myself as an intrepid explorer, pushing back the boundaries of screwing up. For instance, is up really the only direction of screw? What about down or sideways?Stop now if you think it's acceptable...or "not bad"...trust me...it's not as bad as it could get
I'm not giving up till I discover how to screw in circles. Because it's there.
GSS
Active Member
Yup, I put my foot down, no more:behave Till I might find the perfect emitter whether its glass or hi end acrylic.Stop now if you think it's acceptable...or "not bad"...trust me...it's not as bad as it could get
These Diamond Select tips no matter how well the through hole has come out when flashing a light or green laser through them you can see tiny imperfections or bubbles in the casting itself. Leaving well enough alone......
asalaw
Sr Member
Just a quick update -- wallet's getting fatter, but time's not getting freer. Maybe a week or so on this current gig, with a chance I may be going straight onto another one for a month or two (and it's relatively major bucks). So it's gonna be a while yet. I apologize for these long-ass breaks, but a guy's gotta make a living...
asalaw
Sr Member
Update -- got the major bucks gig. Starts tomorrow. Once again, delighted to be employed, and homicidally pissed off that I can't work on my hobbies. We're capped at 40 hours, though, so maybe I will be able to pry up some time -- the most sensible thing to do on such a tight schedule may be the 3D printable internals, which I can just poke away at here at home. We'll see.
asalaw
Sr Member
And the major bucks gig just got cancelled by the client! Going in for my last few hours of translation right now. Gotta make alterations to my Anovos tunic and turn some regular pants into TOS sparkle pants, but I'm definitely going back into this full-bore (till the next gig). Still putting off the Techshop payment though, since I'm going to work on the 3D internals and get the graphics posted (including the Eveready battery labels and blueprints) like I've been promising forever.
Also, now I get to say sparkle pants. I've always wanted to.
Also, now I get to say sparkle pants. I've always wanted to.
asalaw
Sr Member
Hey everybody! Sorry about the four-month silence, I've been on a great gig (still am), but with insurance (thanks a lot, unaffordable care act) and various RL $urpri$e$, both time and money have been short. Meaning paying for and showing up at Techshop have not been an option yet this year.
So I've been focusing on building kits at home (1/350 TOS E and Moebius Batman on the bench right now).
HOWEVER -- I accidentally stubbed my toe on some new (well, new to me) information and I couldn't wait to share it.
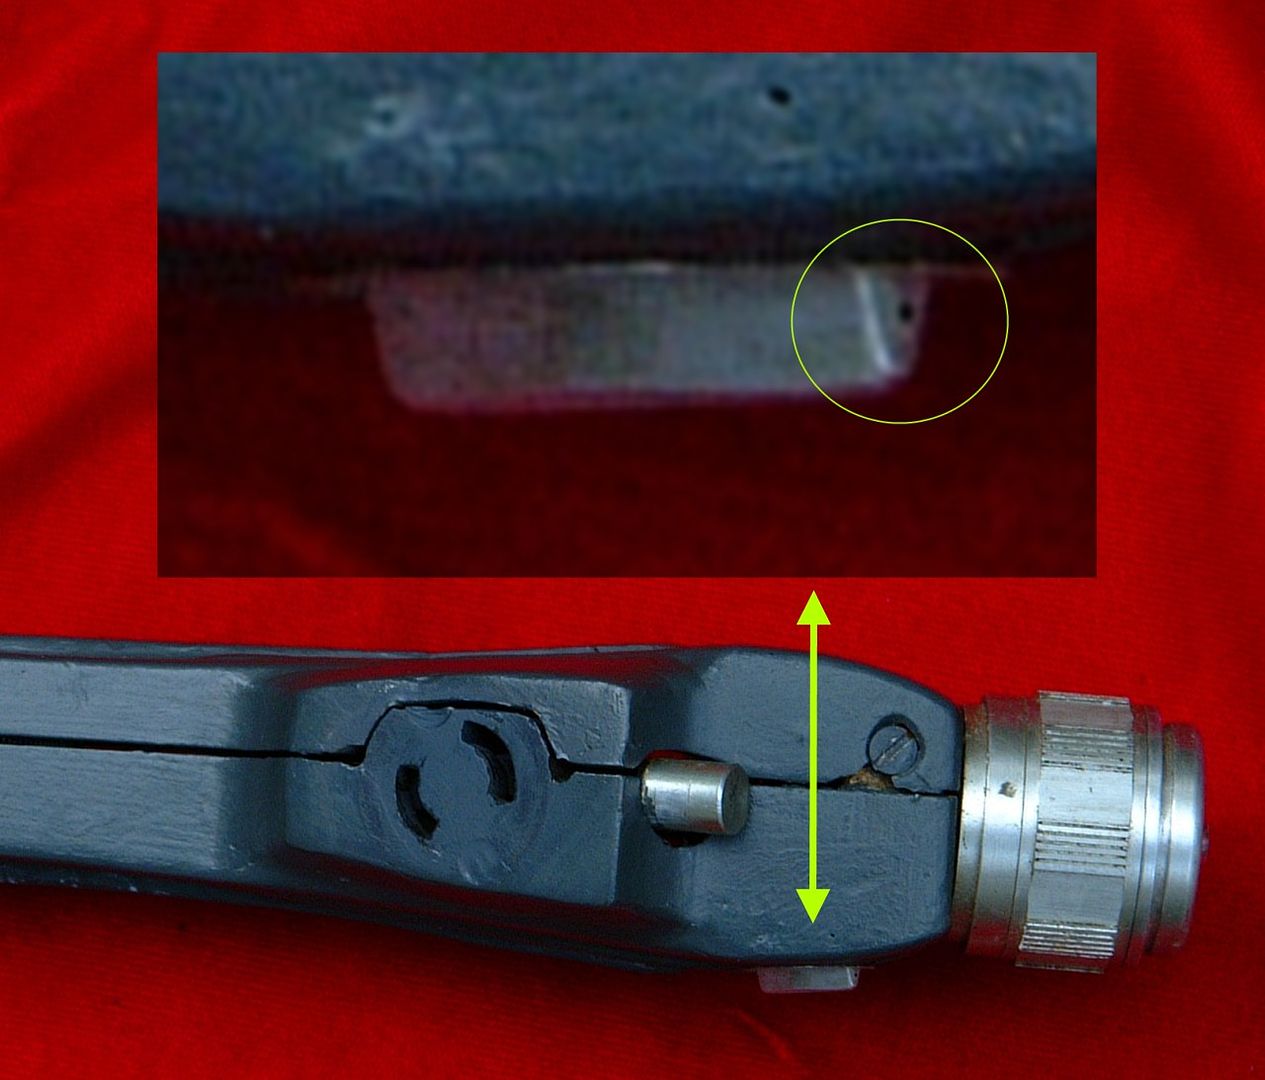
So, remember this series of photos from Gerald Gurian's Star Trek Prop Authority site? In particular, I saw this one some time back and thought it might show that the side dial was not a milled rod, but instead a butterfly-cut strip of aluminum:

I was focused on that little black dot on the bottom of the center tab, which I read as a triangular opening, meaning this was a strip of aluminum flayed in two. Most people disagreed, and there was further discussion about whether it was a piece of dirt or some other detritus. Since it was very hard to tell due to the low resolution of the photo, I dropped the whole idea pending further information and really forgot all about it.
Until last night!
A few months ago, I tripped over a thread on HobbyTalk about some of Bill George's Imgur links (yes, that Bill George). The main topic was his K'Tinga photos, but there was a list of other links, including what it turns out were his phaser photos in much higher resolution.
Not gonna belabor this except to say that as of last night (when I finally got around to looking at them closely), I am now absolutely satisfied that it is indeed a split strip of aluminum and not a milled rod. Ten minutes in Photoshop later:

Enjoy!!
(Oh, one thing -- please don't go around using words like "conclusive proof," "definitive," "forensic," or "toe jam." This is my interpretation of a photo, and I find it very convincing, but I'm not a photo analyst. Just an obsessive-compulsive prop nerd.)
The good news (and another check in the Pro column) is that this makes it massively simpler to produce this piece. Yay!
Not sure when I'll get back to this project, but hopefully it'll be sooner rather than later. The models are keeping me sane, but I really want my hero phaser. Dammit.

So I've been focusing on building kits at home (1/350 TOS E and Moebius Batman on the bench right now).
HOWEVER -- I accidentally stubbed my toe on some new (well, new to me) information and I couldn't wait to share it.
So, remember this series of photos from Gerald Gurian's Star Trek Prop Authority site? In particular, I saw this one some time back and thought it might show that the side dial was not a milled rod, but instead a butterfly-cut strip of aluminum:
I was focused on that little black dot on the bottom of the center tab, which I read as a triangular opening, meaning this was a strip of aluminum flayed in two. Most people disagreed, and there was further discussion about whether it was a piece of dirt or some other detritus. Since it was very hard to tell due to the low resolution of the photo, I dropped the whole idea pending further information and really forgot all about it.
Until last night!
A few months ago, I tripped over a thread on HobbyTalk about some of Bill George's Imgur links (yes, that Bill George). The main topic was his K'Tinga photos, but there was a list of other links, including what it turns out were his phaser photos in much higher resolution.
Not gonna belabor this except to say that as of last night (when I finally got around to looking at them closely), I am now absolutely satisfied that it is indeed a split strip of aluminum and not a milled rod. Ten minutes in Photoshop later:
Enjoy!!
(Oh, one thing -- please don't go around using words like "conclusive proof," "definitive," "forensic," or "toe jam."
This is my interpretation of a photo, and I find it very convincing, but I'm not a photo analyst. Just an obsessive-compulsive prop nerd.)The good news (and another check in the Pro column) is that this makes it massively simpler to produce this piece. Yay!
Not sure when I'll get back to this project, but hopefully it'll be sooner rather than later. The models are keeping me sane, but I really want my hero phaser. Dammit.
Last edited by a moderator:
robn1
Master Member
...I'm not a photo analyst...
Analyze this.
Click to make yuge.


It looks like a small dot or hole, perfectly round or nearly so. The "wedge" shape appears to be some schmutz right below the dot.
Last edited:
Similar threads
- Replies
- 11
- Views
- 1,269