Fallout 3: Mini-Nuke (Finished on page 7)

Re: Fallout 3: Mini-Nuke WIP

Don't forget how rough this thing looks in the game. Don't sweat the details too much.

Mini_nuke.png
 
Re: Fallout 3: Mini-Nuke WIP

Don't forget how rough this thing looks in the game. Don't sweat the details too much.

View attachment 198997

Yeah, I'm trying not too. And when I look at it from a distance it really does look good. I'm just so used to staring at reference photos and having this thing up close. Every so often I look at something and think, "darn it, I got that wrong!". Like the rivet/screws being too low or the ones on the ring suddenly looking more like spot welds. :facepalm But it is the best looking one I have ever owned. That being said...

The only major painting left to do, other than clear coats, is the bottom stripe and the screws. So let's get started.

Mask on (Welcome to Moe's!):
ddg1.jpg

Mask [half] off:
smu3.jpg

I only took the bottom of the mask off because I have to add the little tabs (I don't know what else to call them) at the base of two of the fins.

So Mask on again:
sbpo.jpg

z3u6.jpg

Ta da!
rl2f.jpg

dkm8.jpg

And reference pictures I took in the game:
xjbg.png

0emt.png
There was no way I was going to be able to pre-cut a mask before applying it to the model so what I did was just put the tape down and then cut the tape and remove what was not needed. For the most part it worked out OK, but there are a few places where the paint came off.
xv0o.jpg

So I have to decide: do I try to touch that up with a dry brush or do I try to cover it with weathering? I'm leaning towards weathering, but we will see.

Now I just need to cut a circle in a piece of card stock or something similar so I can paint the screws. I'm really close to finally getting this thing done.
 
Re: Fallout 3: Mini-Nuke WIP

I hit send too soon and I don't want to try to edit that large of a post.

Before I did the large stripe I did the very thin one at the bottom of the body. This is the first one where I put the tape down and then cut out the section to take paint. Not too bad for free hand.

Mask:
ltzw.jpg

Done:
nbcc.jpg

vcf5.jpg
 
Re: Fallout 3: Mini-Nuke WIP

I liked to play the game, but I :love your project and how amazing it turns out.
Excellent work!
 
Re: Fallout 3: Mini-Nuke WIP

Well, I screwed around with it some more today (you'll groan at that later).

Cut off a piece of a carton and cut a 3/8" hole in.
27uz.jpg

Then I took it, some aluminum paint, and went to town on the model.
hbns.jpg

8aku.jpg

I had to see how it will look when I finish it so I just set the nose on it and took a quick picture.
jxzq.jpg

I really like how the screws turned out. A couple of bubbles on the screws that I did not feel like filling even turned out great. I am really psyched now. Tomorrow I'll gloss coat it. Then I just need to print out the decals for the warning triangles and a dull coat. And glue the nose down. I'm not sure if I should do it before or after the first clear coat.
 
Re: Fallout 3: Mini-Nuke WIP

This kind of object really comes to life in the weathering and dirt wash stage.

In a recent thread this helmet went from this-
IMG_20130613_013629.jpg


to this

IMG_20130616_212509.jpg


with a litte bit of weathering and a dirt wash.
 
Re: Fallout 3: Mini-Nuke WIP

Warning!
hf7q.jpg

Decals are printed and a coat of gloss lacquer applied. Couple coats on the body in the garage. If there aren't any bugs stuck to it I'll be ready to apply the decals after work tomorrow. Unless someone thinks I really should give it the full 24 hours to cure first.
 
Re: Fallout 3: Mini-Nuke WIP

The gloss coat is very, uh, glossy. But the decals are on!
t41g.jpg

lf98.jpg

I just noticed those are good shots of the screws. Too bad some of them are not recessed any more from all the repairs I had to make before making a replacement mold.

I made the background triangles a little too large, but I think that is better than making them too small. The decals are not as dark as I would have liked. I don't know if I can print them darker or not. I'm not that sure that it even matters. :unsure Tomorrow I'll do some touch up paint to get rid of the yellow on the edges and after that dull coat.
 
Re: Fallout 3: Mini-Nuke WIP

Update time.
I have not worked on this as much as I would have liked lately. I had planned to do a lot to it this week, but instead just spent a lot of money. Some of that money included oil paint for weathering washes and a real airbrush (Paasche Talon) instead of the no-name brand that I started out with. But I did do some work and more is planned over the weekend. I've also been working on another scale model, but nothing that will be molded and cast for sale. I think.

I tried changing printer settings to get darker print for the decals but just could not get it. I also do not have the right paint to clean up the warning triangles so I was not able to make the black lines look like the definitive border that I wanted. I'm OK with it, but I am not going to use that Army Painter stuff again. I know they have matching touch-up paint, but I did not feel like driving all the way to get it, assuming I could even find them.

I cleaned up a couple of spots where the paint chipped off when I cut the masking tape, attached the nose, and put a couple coats of matte on it. So I basically have a factory version of the mini-nuke.
5yi7.jpg

6jbw.jpg

n0ua.jpg

60ah.jpg

3c9i.jpg

0ooo.jpg

For this one I just need to weather it and I'll be done. Some of the money I spent was to buy rubber. I have a template to cut some styrene and remaster the mold for the fins. I am also going to clean up the ring pieces and remold them. Right now they are not as smooth as they should be. I think I am also going to remove the rivets. Buyers will have to remove the rivets from the main body themselves.

And yes, I will eventually pick a color an paint that wall.
 
Re: Fallout 3: Mini-Nuke WIP

Well folks, it finally had to happen. IT'S DONE! Roll music again! The Gap Band - You Dropped A Bomb On Me - YouTube

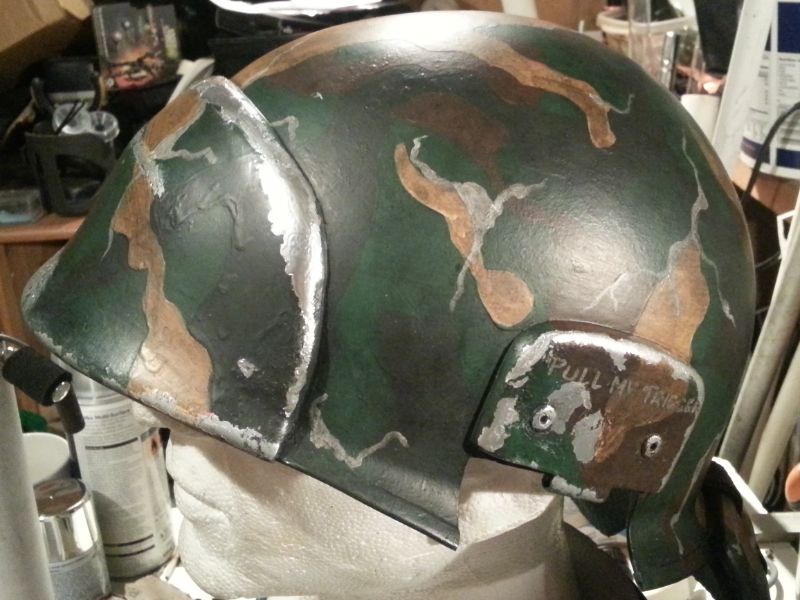
Today I finally broke down and did the weathering. I started out with just a dab of oil paint mixed in with some enamel thinner. That was working well until I rubbed too hard in some sections where it was pooling and the clear coat started coming up in clumps. When I tried to clean up the edges it just kept spreading until a large section had a ring of clear coat around it. I thought I got that fixed but when it dried it looked like I had also thinned out the main color on the body, I could see faint white underneath. At that point I had to decide whether (get it?) to fix it or repaint that section. I did not want to strip that section and then try to repaint the body, mainly because I do not have anymore of that paint. I considered being creative with the airbrush but then decided to just try using the oil paint directly with torn cosmetic sponge. I should have done that from the very start because it worked out great. For the most part I just treated it like wood stain: wipe on, wipe off. Mr Miyagi would be proud. I also used it to apply some random smudges here and there. Is it perfect? No, but I'm extremely happy with it.

Normally I would post with 600x800 pictures, but I'm going full resolution on these.
Here are two of the section I had to deal with lifting clear coat. It probably could have been done better, but it looks pretty good.
dv84.jpg

olrb.jpg

Here are the rest
9bxc.jpg

gmbb.jpg

You can see the edge of the problem zone on this one.
egwh.jpg

3c8x.jpg

h7iu.jpg

yjud.jpg

Check out my butt!
oixw.jpg

Two of how it will be displayed for now.
nq3p.jpg

a9mi.jpg

And finally, here are some I tried to pose like you would see them in the game. I might try these again when it gets darker out since even in the middle of the day DC and Vegas have that post-nuclear apocalyptic haze.
4w6x.jpg

7i88.jpg

I came back to add one at the angle that the game wikipedia version is at:
hing.jpg

So the work on this is done. I need re-master the fins and the rings before I can start making kits. The ring looks good, but in person and up close it has a minor case of cellulite. So I hope you enjoyed this.
 
Last edited:
I was searching some ruins when I came across something.

w6m6.jpg

kbzi.jpg

Not bad for a cellphone, but I suddenly wish I had a real camera where I could adjust settings so it was not so grainy.
 
So guess who found out how to use the macro feature on their camera today while researching light boxes and possibly a new camera. Maybe I should read the manual. I've only had it about five years. :facepalm But I do need to make a light box to take better static pictures.

j9h7.jpg

egvr.jpg

3li5.jpg

zp48.jpg

felu.jpg

x5ml.jpg
 
Looks great!

No metal scrapes? Would give it a some nice character and variety of weathering and bring it closer to the in-game model. Maybe a black wash as well for variety of crud color. Just water down some black acrylic and do the wipe on/ wipe off. The water based nature of acrylics will help you from having the problems you had earlier with the clear coat smearing off with the paint thinner and oil paint mixture.

Also the bubbles of resin in the grooves near the red button could probably be popped out with a pointy file or tool. I've done this before with my own lackluster castings.
 
I doubt I will use any black. I have some old car parts and the only black on them is paint. I might do some scrapes, but they would be more rust than steel color.

Sent from my Etch-A-Sketch
 
This thread is more than 10 years old.

Your message may be considered spam for the following reasons:

  1. This thread hasn't been active in some time. A new post in this thread might not contribute constructively to this discussion after so long.
If you wish to reply despite these issues, check the box below before replying.
Be aware that malicious compliance may result in more severe penalties.
Back
Top