springsteel
Well-Known Member
Super slow progress! My brother just decided that he and his girlfriend are coming along to the Nashville Comic Con, so now I've got a Gambit and Rogue added to the list - one month away!
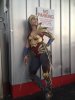
Anyway, made a skirt last night for Wonder Woman - sewn from a cotton bed sheet, painted with silver/black/blue acrylic paint.
.JPG")
As well, I someone asked how I made my sword from paint stirrers. I apologize for the poor photo quality, but hopefully it's good enough to get the point across!
.JPG")
You will need!
- two heavy-duty, extra-large stirrers from Lowe's
- two small, classic paint stirrers
- wood glue
- newspaper
- wood filler
- pvc/dowel/other rod-shaped thing
- utility knife or other sharp carving implement
- sanding implement
1. Acquire paint stirrers! For the body of the blade I used two heavy-duty, extra-large stirrers from Lowe's (about 2 feet long, 1.5 inches wide, and 0.25 inches thick), oriented side-by-side to give the blade a 3-inch width. This will be fortified with two small, typical paint stirrers, one on each side of the blade.
2. I used wood glue to fix the two LARGE stirrers together, then "paper mache'd" them by running a strip of newspaper, dampened with woodglue, down the length of the blade, over the "seam."
3. The new large blade was carved to shape and beveled with a utility knife (the large stirrers were wonderfully soft). Then, each small stirrer was also carved to match the shape of the blade. This was glued on top of the larger blade, one on each side, and clamped into place.
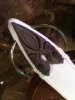
4. Once the glue dried, I shaped everything up with a little jitterbug sander, and carved a channel down the center of the small stirrer portion of the blade for detail. I then ran a bead of wood putty down the channel and pulled the excess out with my finger (to give it a smooth, indented look). Wood putty was also used around the edges of the small stirrer and smoothed out to the edges of the main blade - to create a long bevel from the thick center to thin edge.
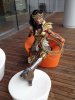
5. The whole thing was sanded smooth and covered in ~4 layers of Titebond woodglue. I sprayed the blade down with some off-brand silver paint, added details with black and silver acrylics, and covered the whole thing in 2-3 layers of Modge Podge for protection.
I didn't have the patience to prime/sand/prime/sand/etc., but this would likely do wonders for the paint job. But, it looks good enough for me.
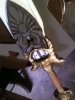
Also, the hilt is made from a short length of PVC with a notch cut down it's length, and the cross-guard is sculpted from excess Worbla and some brass brads, and pommel from excess Worbla and a golf ball.
All of the blade could have easily been done with a nice length of balsa wood, but I'm cheap and liked the challenge.
Anyway, made a skirt last night for Wonder Woman - sewn from a cotton bed sheet, painted with silver/black/blue acrylic paint.
As well, I someone asked how I made my sword from paint stirrers. I apologize for the poor photo quality, but hopefully it's good enough to get the point across!
You will need!
- two heavy-duty, extra-large stirrers from Lowe's
- two small, classic paint stirrers
- wood glue
- newspaper
- wood filler
- pvc/dowel/other rod-shaped thing
- utility knife or other sharp carving implement
- sanding implement
1. Acquire paint stirrers! For the body of the blade I used two heavy-duty, extra-large stirrers from Lowe's (about 2 feet long, 1.5 inches wide, and 0.25 inches thick), oriented side-by-side to give the blade a 3-inch width. This will be fortified with two small, typical paint stirrers, one on each side of the blade.
2. I used wood glue to fix the two LARGE stirrers together, then "paper mache'd" them by running a strip of newspaper, dampened with woodglue, down the length of the blade, over the "seam."
3. The new large blade was carved to shape and beveled with a utility knife (the large stirrers were wonderfully soft). Then, each small stirrer was also carved to match the shape of the blade. This was glued on top of the larger blade, one on each side, and clamped into place.
4. Once the glue dried, I shaped everything up with a little jitterbug sander, and carved a channel down the center of the small stirrer portion of the blade for detail. I then ran a bead of wood putty down the channel and pulled the excess out with my finger (to give it a smooth, indented look). Wood putty was also used around the edges of the small stirrer and smoothed out to the edges of the main blade - to create a long bevel from the thick center to thin edge.
5. The whole thing was sanded smooth and covered in ~4 layers of Titebond woodglue. I sprayed the blade down with some off-brand silver paint, added details with black and silver acrylics, and covered the whole thing in 2-3 layers of Modge Podge for protection.
I didn't have the patience to prime/sand/prime/sand/etc., but this would likely do wonders for the paint job. But, it looks good enough for me.
Also, the hilt is made from a short length of PVC with a notch cut down it's length, and the cross-guard is sculpted from excess Worbla and some brass brads, and pommel from excess Worbla and a golf ball.
All of the blade could have easily been done with a nice length of balsa wood, but I'm cheap and liked the challenge.

.jpeg")